Owner’s / Installation Manual Bluetooth PTT Car Kit for XP6® & XP7® AVK01G For support, please call (888) 858-9460, or visit www.sonimtech.
Introduction Please take the time to read all of the information in this manual. Familiarity with operation and installation procedures will help you obtain the best possible performance from your new Bluetooth PTT Car Kit for XP6® & XP7®. This car kit is intended to be installed by a professional installer WARNING: Changes or modifications made to this equipment not expressly approved by Sonim Technologies, Inc. for compliance could void the user’s authority to operate the equipment.
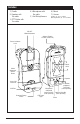
Includes: 1.) Cradle 2.) Speaker with 2m cable 3.) PTT Button with 2m cable 4.) Microphone with 2m cable 5.) 2m Wiring Harness 6.) Mount 7.) Screws: Speaker (2) -12.5 x 15.0mm Mounting Bracket (4) - 6.5 x 12.
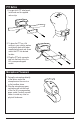
Mounting Bracket The mounting bracket gives the convenience and adjustability to have the car kit installed where the vehicle operator needs and wants it. The bracket should be installed in a location that does not interfere with the normal operation of the L vehicle or over the vehicles air bag deployment areas. R The mount attaches to the back of the car kit with 4 supplied screws. Mount to vehicle screws are not included with this car kit.
PTT Button 1. For gear shift PTT attachment, install and use the supplied velcro strip. 2. To place the PTT on a flat surface in your vehicle, replace small plastic back with larger supplied plastic part and screw mount the PTT into desired location. 3. Plug the PTT pink connector end into the back of the Car Kit’s corresponding pink socket. Microphone Placement 1. Facing the microphone directly at the driver, mount the microphone on the sun visor or the headliner above. 2.
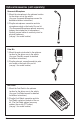
Optional Accessories (sold seperately) Gooseneck Microphone 1. Mount the microphone in the optimum location for the drivers use in the vehicle. (See your Gooseneck Microphone manual for detailed installation instructions.) 2. Plug the microphones connection end into microphone socket on the back of the car kit. (The Gooseneck Microphone optional accessory replaces the included car kit microphone.) Carefully conceal cables to avoid any visual or physical hindrances. (see pg.
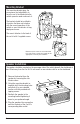
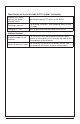
Setup 1. Voltage range: 12-32V 2. Connection Method Green Cable – 12 VDC Constant - Power White Cable – Switched +12V DC - Ignition Black Cable – Ground Green Cable – Telephone Mute (Optional Install) 3. No Phone Inserted into the Car Kit Cradle • LED light will be active but will indicate that there is no phone being paired and connected. The LED will glow Red in this mode. • If you plug in a another device to the USB port at the front of the car kit, the output that it will provide is 5V/1A.
Functions Voice Call functionalities Answer call Short press PTT button <400ms Reject call Press and hold the PTT button for >400ms End call Short press PTT button Answer waiting call a. Short press PTT button. This will put the active call on hold and accept the waiting call b.
Phone Inserted into the Car Kit Cradle (In PTT Call Mode Functionality) Generate only ‘button pressed’ and ‘button released’ events Just like pressing the PTT button on the device Receiving a voice call The receiving “Ring Alert” shall change the mode to voice call mode Ending the PTT call Must be performed from the phone not the car kit Additional functions Handset manages all call functions The car kit with short and long presses activate certain features in the handset but it is ultimately the han
Warranty Sonim 1-year limited warranty Sonim provides a limited 1-year warranty for this accessory (hereinafter referred to as “Product”). Subject to the conditions of this limited 1-year Warranty Sonim warrants this product to be free from major defects in design, material and workmanship at the time of its original purchase by a consumer, and for a subsequent period of one (1) year.