Full-motion Wall Mount MD111124-01 AWM1701
NOTE: Read the entire instruction manual before you start installation and assembly. Component Checklist IMPORTANT: Ensure that you have received all parts according to the component checklist prior to installing. If any parts are missing or faulty, telephone your local distributor for a replacement. WARNING • Do not begin the installation until you have read and understood the instructions and warnings contained in this installation sheet.
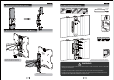
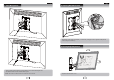
1. Removing the Decorative Covers 3a. Wood Stud Wall Mounting: 55mm/2.2" ø 4.5mm ø 3/16" 1 2 3 2. Disassemble VESA Plate from Wall Mount Drill pilot holes W-C √ W-A X X Screw the wall mount onto the wall Loosen the upper thumbscrew, Remove the lower thumbscrew with the up arrow of the plate upward WARNING • Make sure that mounting screws are anchored into the center of the studs. Use of a stud finder is highly recommended.
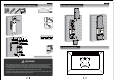
3b. Solid Brick and Concrete Block Mounting: 4. Installing Decorative Covers 60mm/2.4" ø 10mm ø 3/8" 1 2 Drill pilot holes W-B W-C W-A √ X X 5. Installing VESA Plate Screw the wall mount onto the wall with the up arrow of the plate upward WARNING • When installing wall mounts on cinder block, verify the actual concrete thickness is at least 1-3/8" (35mm) for using the concrete anchors.
6. Hook the TV onto the Wall Mount For Flat Back Screen TV TV TV TV 4mm M-G M-H Two qualified persons are required M-C M-D Loosen the upper thumbscrew spacing 4mm to VESA plate. Hook the TV onto the wall mount or M-E M-F M-I M-A M- B Screw VESA plate onto the TV. Tighten all screws but do not over tighten. -7- · Position the TV level. · Place the lower thumbscrew; Tighten both thumbscrews.
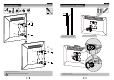
8. Adjusting Wall Mount Head 7. Cable Management M-J Depending on the weight of the display, it is necessary to slightly loosen or tighten the adjustment screw using a 4mm Allen key. 9. Pitching Angle Adjustment +3° -3° 180° +15° -15° • Remove cable covers as required, Connect cables to your TV and route along the arms. • Re-attach the cable covers to hold the cables in place . Note: Leave slack in cables to allow for cantilever arm movement.