32" LED LCD SmartTV E32S12A- AU HOTLINE . AUSTRALIA : 1300 765 663 .
Table of Contents IP Terms and Conditions IP Terms and Conditions SONIQ IP TV END USER SOFTWARE LICENCE AGREEMENT IMPORTANT, READ CAREFULLY BEFORE PROCEEDING Table of Contents Table of Contents..........................................................................................................1 IP Terms and Conditions...………........................................................................... .....2-6 Introduction……………………..........................................................................
IP Terms and Conditions IP Terms and Conditions (e) transfer, pledge, rent, share or sublicense the Software; ( f ) defeat or circumvent, attempt to defeat or circumvent, or authorize or assist any third party in defeating or circumventing controls on the use of copies of the Software; or (g) engage in any conduct or activity that may cause damage to the Software, disrupt access to the Software or otherwise interfere or affect the performance of the Software. 5. Access and support 5.
IP Terms and Conditions IP Terms and Conditions information or assistance provided by Soniq in relation to the Software or its use or application. (b) You have not made known either expressly or by implication, to Soniq any purpose for which You require the Software and You have the sole responsibility of satisfying Yourself that the Software is suitable for Your intended use. 12.
Safety Instruction Safety Instruction IMPORTANT SAFETY INSTRUCTIONS 1. Read instructions-All the safety and operating instructions should be read before the appliance is operated. 2. Retain instructions-The safety and operating instructions should be retained for future reference. 3. Heed warnings-All warnings on the appliance and in the operating instructions should be adhered to. 4. Follow instructions-All operating instructions should be followed. 5.
Safety Instruction Safety Instruction Warning High voltages are used in the operation of this product. Do not remove the back cover of the cabinet. Refer servicing to qualified service personnel. Caution Do not place the main unit on an unstable cart stand, sheif or table. Serious injury to an individual, and damage to the television, may result should it fall. Caution When the product is not used for an extended period of time, it is advisable to disconnect the AC power cord from the AC outlet.
Instruction Main Unit Control Introduction Thank you for purchasing the unit. Your unit will bring you years of high-quality viewing enjoyment. The television is easy to operate and provides exceptionally high quality image. The manual will explain the operation of the unit, including its functions, features and other important features. Before installing or operating your unit, please take the time to thoroughly read this manual, particularly the sections on safety.
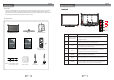
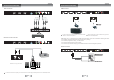
Main Unit Control Connection and setup Rear Panel Connecting the Power Cord Connect the power cord directly to the wall outlet. 1 2 3 4 5 6 7 Wall outlet 8 9 8 10 11 12 13 Power cord HDMI1/HDMI2 /HDMI3 Connect the HDMI signal. Connect the PC VGA signal output of your personal computer. DVI or PC VGA audio input. R-L-VIDEO VIDEO 1 IN DIGITAL AUDIO OUT OPTICAL LINE OUT 8 USB 9 ANT IN Connect the component video signal .
Connection and setup Connection and setup YPbPr Connection USB Connection YPbPr Cable AV Cable R L For more convenience, we recommend users use the SONIQ We recommend users to use a USB drive for programme CWK101 2.4G wireless keyboard. such as the SONIQ CUD81. OPTICAL/Line out Connection USB Usage: This TV is equipped with four USB 2.0 Host interfaces, which can be used for the following functions: - Connected for playing the media files stored in the memory storage.
Remote Control Connection and setup Ethernet/SD/MMC Connection button button Turns the TV On or Off. Mute all sounds. SUBTITLE button Displays your preferred subtitle in digital mode. Navigation buttons:( / / / ) Scrolls through menus or options . OK:Selects menus or options and confirms your input. /AUDIO button Press to select sound output mode. INFO button Views the information of the current programme and screen.
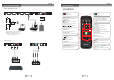
Remote Control for Smart TV Remote Control Remote Control with Letter buttons button Press to return to the HOME menu. Enters letters under ordinary mode. button Press to enter the ALL Apps interface under HOME menu. Direction buttons:( / / / ) Controls the direction movements of the mouse. button Sets keyboard shortcuts to launch applications. (This button can only work when using together with another key on the keyboard remote control.
Smart TV Function Smart TV Function Accessing HOME menu. 1.Turning on the TV will automatically enter HOME menu, or you can either Press HOME button to access the HOME menu. 2.Press the Navigation buttons or SOURCE button to scroll to one of the following menus and press OK. 3.Press the Navigation buttons to scroll to the setting or option you want and press OK. When finished, press EXIT.
Smart TV Function Smart TV Function Ethernet configuration Settings Configure Ethernet Device Ethernet Wireless & networks Turn off Ethernet Ethernet configuration Ethernet configuration Ethernet Devices: eth0 Configure Ethernet devices Connection Type Display Dhcp Security Settings Static IP Ip address Applications 192.168.1.184 eth0 Privacy Netmask 255.255.255.0 External Storage & internal storage Default Router Language & keyboard DNS address 192.168.1.1 221.5.88.
Smart TV Function Smart TV Function Tips for Network setting Settings Wireless & networks Ethernet configuration Display Security Settings Applications Privacy External Storage & internal storage Language & keyboard About Device 3. Press the Navigation buttons to scroll to Wireless & network settings and press OK. Wireless & network settings Wi-Fi Turn on wi-fi Wi-Fi settings Set up & manage wireless access points 4. Press the Navigation buttons to select Wi-Fi settings and press OK.
Smart TV Function Smart TV Function 1. All Apps: Press the Navigation buttons to scroll to the All Apps and press OK, from the displayed window you can operate any of the downloaded apps . SONIQ is able to provide more software packages for users to download for usage through the internet, users just need to follow the steps to perform during the downloading. SONIQ is not responsible for the legality of the software packages, as some packages may contain viruses.
Smart TV Function Smart TV Function Cut the Rope Press this button to switch between random playback and sequence playback. Press to switch between single cycle playback and list cycle playback Press again to stop cycle playback.. Installing... Press to set the playback time of the picture. Press to display the files by the order of letters or by time. Press After finished, a prompt window automatically pop up to show finished installation. to select memory storage under Photo section and press OK.
Smart TV Function Smart TV Function Movie section Press to highlight Music section, related information will be showed from the displayed window. Media Photo Music Movie 00:00 00:00 Media usb.b1 Photo Music Movie usb.a1 usb_b1 usb_c1 usb_a1 sdcard 1 of 4/usb_b1 Press to stop current music file playback. Pause or play. Press to switch between single cycle playback and list cycle playback. Fast backward . Press to play the files by the order of letters or by time. Fast forward.
Smart TV Function Smart TV Function The progress bar can be displayed at the bottom of the screen, press OK button to reveal or hide it. Manager:Contents of APK can be viewed through this menu option. Updating the TV firmware In order to enhance the network quality of the TV, SONIQ will regularly through the internet provide software updating, the process of updating is as simple as the following pictures indicated.
Smart TV Function Smart TV Function 4. After software downloading is completed, it may take some time for decoding: Remark: Online software updating will erase the original data, so it is necessary for the user to backup the important files. About Backup Firmware 1 Press Home to access the Home menu. 2 Press the Navigation buttons to scroll to All Apps and press OK. 3 Press the Navigation buttons to scroll to Firmware Update and press OK. 4. Select Backup Firmware by pressing direction keys. 5.
OSD Menu Operation OSD Menu Operation CHANNEL MENU Press MENU button to enter the CHANNEL page as follows: C.ATV Manual Tuning CHANNEL CHANNEL CHANNEL CHANNEL Analog Scan 200.25MHz Scan to Next Auto Tuning DTV Manual Tuning ATV Manual Tuning Fine tune Channel Edit Scan to Prev Color System PAL Sound System I Back Back Select Select 1. Press to highlight ATV Manual Tuning, then press “OK” button to enter sub-menu. 2.
OSD Menu Operation 1. Picture Mode: Press to adjust the mode by Standard, Dynamic, User and Vivid. Contrast, Brightness, Color, Sharpness can be adjusted only under User mode, Press “MENU” to return to the main menu. 2. Noise Reduction: It can be adjusted among Strong, Weak, Medium and Off. 3. Energy Saving: You can choose Middle, High,Low, Standard in this section. 4. Aspect Ration: This function will be available under DTV, and you can choose Full, 4:3, and Auto. 5.
OSD Menu Operation OSD Menu Operation LOCK MENU Press MENU to bring up the OSD menu. Use button to turn to LOCK page, it will highlight the first option, then you are required to input the password (default as 0000). LOCK Back LOCK Enter Password ---- Lock System On Recording Use the record function when you need to watch your desired programme at a later time. Start/Stop record You can record the programmed you are watching. Start record 1.Press REC on the remote to start the recording.
OSD Menu Operation OSD Menu Operation Related information of the USB will be displayed in this menu, Press navigation buttons to scroll to desired programme you want to view, related content will be played at the left window. Operate four color keys to have different functions at the right side of the bottom. Press MENU to return to the main menu. 1. Press EPG to show the EPG list. Press OK button to open DEVICE LIST.
Specification Specification Your unit can use as PC monitor, it supports below. RGB-PC,HDMI/DVI-PC mode INPUT SPEC INPUT FORMAT Horizontal frequency (KHz) ~100-240V AC, 50/60Hz (Standby)<0.5 Watt COMPONENT VGA/HDMI/DVI 1/2 Input Resolution Operating Voltage Power Consumption Video Format Supporting Vertical frequency (HZ) HDMI Programme Coverage 480i, 480p, 576i, 576p, 720p(50Hz/60Hz), 1080i(50Hz/60Hz), 1080P(50Hz/60Hz). 480p, 576p, 720p(50Hz/60Hz), 1080i(50Hz/60Hz). 1080p(24Hz/30Hz/50Hz/60Hz).
Troubleshooting Troubleshooting Ethernet ·Check whether your Wi-Fi Dongle is purchased from SONIQ. Wi-Fi can not be connected Ethernet can not be connected -47- ·Make sure Wi-Fi Dongle is being connected properly to the USB interface. ·Please refer to the instruction manual from page 24 to 25 for the setting. Check whether the network cable being connected properly. Please refer to the instruction manual from page22 to 24 for the setting.