E40V14B - AU 40" Full HD LEDTV
Table Of Contents Preparations Guide Safety Information..........................................................................................................................2 Important Safety Precautions..........................................................................................................3 Installed And Connected TV TV Bracket assemble......................................................................................................................
Safety Information High voltages are used in the operation of this product to reduce the risk of electric shock,do not remove cover of the cabinet, refer servicing to qualified service personal If the TV any changes or coarse adjustment, electric shocks to be hurt, do not attempt to open a machine-maintenance, customer contact centres needed overhaul.
Important Safety Precautions 1. Read these instructions. 2. Keep these instructions. 3. Heed all warnings. 4. Follow all instructions. 5. Do not use this apparatus near water. 6. Clean only with dry cloth. 7. Do not block any ventilation openings. Install in accordance with the manufacturer’s instructions. 8. Do not install near any heat sources such as radiators, heat registers, stoves, or other apparatus (including amplifiers) that produce heat. 9.
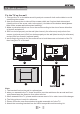
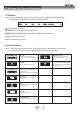
TV Bracket assemble Fix the TV on the wall 1.First,put the TV on the table smoothly and put some soft cloth on the table to avoid scratching the screen. 2.User the screw driver to take off the screws which are fixed on the bottom stand (the direction of the arrow, refer to the ptoto1).And take off the bottom stand(please take off the screws and bottom stand carefully). 3.Make one bracket which can fix on the wall according to the size of arrow direction of photo2 and photo3. 4.
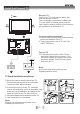
TV Buttons And Terminal Interface TV Buttons Note: The following is only functional schematic, And the actual position and arrangement of different models may be different. :Turn ON/OFF Power. SOURCE:External Signal Input Selection. MENU:Display Main MENU And Confirm MENU Item Selection. CH+/-:Selecting Channel. VOL+/-:Adjusting Volume. Terminal Interface Note: The following are the various terminal interface, the actual position and arrangement, the number of different models may be different.
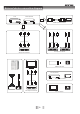
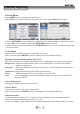
External device connection diagram DVD Set-top boxes HDMI HDMI HDMI input connection R INPUT INPUT INPUT VIDEO Y L Pb Pr VIDEO R AV input connection AV input connection USB connection AV input connection Set-top boxes SCART connection OUTPUT VIDEO R L AV output connection TV connection -6- L
Install And Connect TV Set your TV To put your TV in a firm place which can bear the weight of the TV. To avoid danger, please don’t expose the TV near water or heating place (such as light, candle, heating machine),do not block the ventilation at the back of TV. 3 Connect antenna and power 1.Connect the antenna cable to the antenna socket on the back of the TV. 2.To plug the power cord of TV (AC 100240V~ 50/60Hz). Turn on TV 3.Press the power button of the TV the indication light will turn to green.
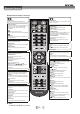
Remote Control Remote Control Key Functions Power button Toggles the unit between standby and on. MUTE button Press to mute the sound. Press again or press VOL+/- to resume. Numerical buttons Press 0-9 to select a TV channel directly when watching TV. The channel changes after 2 seconds or press “OK” button to change immediately. P.MODE button Press to select preset picture mode. S.MODE button Press to select preset sound mode. SUBTITLE button In DTV mode, press to change subtitle on / off.
Function Description Picture Menu Press MENU button to display the main menu. Press OK button select Picture in the main menu. then press OK button to enter 1.Press UP/DOWN button to select the option that you want to adjust in the Picture menu . 2.Press OK button to enter , then press UP/DOWN button to adjust. 3.After finishing your adjustments, Press MENU/OK button to save and return back to the previous menu. Picture Mode Available Picture Mode: Dynamic, standard, mild, user Note: You can press P.
Function Description Sound Menu Press MENU button to display the main menu. Press UP/DOWN button select Sound Menu in the main menu. then press OK button to enter. 1.Press UP/DOWN button to select the option that you want to adjust in the Sound menu. 2.Press OK button to enter, then Press UP/DOWN button to adjust. 3.After finishing your adjustments, Press MENU/OK button to save and return back to the previous menu. Sound Mode Available Picture Mode: Standard, Movie ,Speech ,User. Note: You can press S.
Function Description TV Channel Press MENU button to display the main menu. Press UP/DOWN button select Channel Menu in the main menu. Then press OK button to enter. 1.Press UP/DOWN button to select the option that you want to adjust in the Channel Menu. 2.Press OK button to enter .Then press UP/DOWN button to adjust. 3.After finishing your adjustments. Press MENU/OK button to save and return back to the previous menu. NOTE: TV Connection The functions of the parts not change please in kind prevail.
Function Description Favorite Management To manage( Add/Delete) Favorite channels Press UP/DOWN button to select the programs to be added into favorite list and press “RED”,” GREEN”, ”YELLOW” or “BLUE” button to mark them. Country Press UP/DOWN button to select Country. Auto Search All Mode: Select “All” item to scan all digital channels carried by current signal mode firstly and then switch to scan all analog channels in selected country automatically.
Function Description DTV Manual search Select channel number by UP/DOWN button or entering number directly. The strength and the quality shows at the bottom .Press OK button on “Start” item to start current channel search .The manual searching UI and the auto searching UI are the same. ATV Manual Search Press UP/DOWN button to select option .Press OK button to enter. Press UP/DOWN button to select these parameters. Select ”Search” item to enter analog channel tune, then press OK button to adjust.
Function Description Lock Lock Channel: On: turn on Lock Channel. User need to enter password to watch the channels which are locked. Also need to enter password when user tries to change setting in items like “reset system”/ “reset databass” etc. Off: turn off Lock Channel Parental Lock: Parents can set age limit level through this function. Change Pin Code: Press OK button to set New Password, then enter a 4- digital number you want to set twice.
Function Description 1.Press UP/DOWN button to select the option that you want to adjust in the setup menu. 2.Press OK button to enter, then press UP/DOWN button to adjust. 3.After finishing your adjustments press MENU/OK button to save and return back to the previous menu. OSD Timer Set up OSD Timer which means how long the menus will exist. The optional periods are 5,10,15,20,25,30 Seconds and Never. PC Setup It is only available in PC source.
Multimedia Press SOURCE button and then press UP/DOWN to choose Media. Plug in a Media on TV, then you can enjoy photo ,movie and eBook through your Media on TV. Photo Press LEFT/RIGHT button to select PHOTO in the main menu, then press OK button enter photo page. Music Press LEFT/RIGHT button to select Music in the main menu, then press OK button enter music page .
Multimedia Movie Press LEFT/RIGHT button to select Movie in the main menu ,then press OK button enter Movie page. eBook Only txt format eBook is supported. Press LEFT/RIGHT button to select eBook in the main menu, then press OK button enter eBook page.
Other Features EPG If you expect to know the schedule or the information of the current playing program or the program that starts in the near future, you can refer to the EPG menu by pressing the button “EPG” on the remote.
Other Features PERSONAL VIDEO RECORDING (PVR) You can record current and upcoming programs using a USB device. However, this is only available for digital channels. Please plug in the USB device before executing recording function and as well do the following settings to save the file recording. 1.
Other Features 2.3 You can check the recorded program through Menu>Feature>PVR/Timeshift>Timer to checkthe detail information of recorded program and make minor modulation.
Other Features * Press red button to delete one program you choose *Press green button to delete all of program you scheduled *Press yellow button to add new schedule recording program, then dialogue box would be popped up as shown below, please note that set the recorder as ON and Type as DTV. Then make adjusting about time and press menu button to save Time shift Recording You can delay the process of broadcasting programs under time shift recording. The maximum time of time shift recording is 2 hours.
Other Features 3.Playing and deleting recording programs Please press PVR.L button on the remote control to enter record list, then choose the program you want and press OK button to playback, you can press hold button to back to record list. Press red button to delete the programs.
Help -23-
machine Technical Specifications Screen Size TV system Video system Preset Channels Input/Output Speaker Output 40 ” PAL/SECAM PAL/NTSC ATV:100, DTV:1000 Input: TV, AV, Y Pb Pr, PC, HDMI1,HDMI2,HDMI3,USB Output: COAXIAL, EARPHONE OUT 8 10W+10W Power requirement AC 100-240V~, 50/60Hz Power consumption 70W Accessories User's manual Remote controller 2 x AAA Batteries NOTE: This user manual is for reference only. Specifications are subject to change without notice.
MD140702-01