Web: www.soniqav.
Please take the time to familiarize yourself with your new system before using it for the first time so that it can bring you best performance over a long and trouble free service life. Important recommendations * * Please keep these operating instructions in a safe place for future reference. Avoid installing the system in the locations described below: Places exposed to direct sunlight or close to heat sources such as electric heaters. Over other stereo system components that release excessive heat.
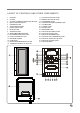
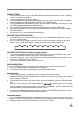
LAYOUT OF CONTROLS AND OTHER COMPONENTS 1. 2. 3. 4. 5. 6. 7. 8. 9. 10. 11. 12. 13. 14. 15. 16. SPEAKER CD TRAY CD TRAY AUTOMATIC OPEN/CLOSE BUTTON MULTIFUNCTION DISPLAY RANDOM BUTTON SLEEP/TIMER BUTTON PRESET EQ BUTTON MUTE BUTTON SNOOZE BUTTON MODE/TIME REMAIN BUTTON ON/STANDBY INDICATOR LIGHT POWER/STANDBY BUTTON INFRARED SENSOR CD BUTTON REPEAT/REVIEW MEMORY BUTTON TUNING/SKIP/SEARCH UP BUTTON 17. 18. 19. 20. 21. 22. 23. 24. 25. 26. 27. 28. 29. 30. 31.
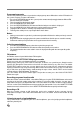
LAYOUT OF CONTROLS AND OTHER COMPONENTS 32. 33. 34. 35. 36. 37. CASSETTE KNOB DOOR MEMORY BACKUP BATTERY COMPARTMENT COVER FM ANTENNA FM ANTENNA TERMINAL (75 OHM - OPTIONAL) AM ANTENNA TERMINAL (OPTIONAL) RESET BUTTON 38. 39. 40. 41. 42.
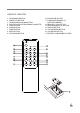
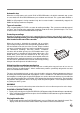
REMOTE CONTROL 1. 2. 3. 4. 5. 6. 7. 8. 9. ON/STANDBY BUTTON PRESET EQ BUTTON TUNING/SEARCH DOWN BUTTON FUNCTION SELECTOR(CD/RADIO/CASSETTE) INTRO BUTTON SLEEP BUTTON TIMER BUTTON MUTE BUTTON STOP/BAND BUTTON 10. PLAY/PAUSE BUTTON 11. TUNING/SKIP/SEARCH UP BUTTON(FORWARD) 12. MEMORY C.-ADJ BUTTON 13. REPEAT/MEMORY UP BUTTON 14. SNOOZE BUTTON 15. VOLUME DOWN BUTTON 16. VOLUME UP BUTTON 17.
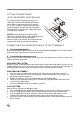
FITTING THE BATTERIES INTO THE REMOTE CONTROLLER Press down the battery compartment cover and slide it open. Place the two LR6 (UM3/AA) batteries into the battery compartment taking care to match the "+" and "--" polarities shown in the compartment and on the batteries. Refit the cover over the battery compartment, pressing down on it slightly and pushing it up until it clicks into place. NOTES: Remove the batteries from the remote control if you do not intend to use it for a prolonged period.
TIMER SETTING 1. 2. 3. 4. 5. 6. 7. Once the clock has been set, press the TIMER button and hold it down for three seconds: "TIMER" is shown on the display and it blinks. In 24 hour display mode, "0:00" is displayed. Press the MEMORY/C-ADJ button and hold it down for three seconds: the hour digits start to blink. Set them by pressing the TUNING/SKIP/SEARCH (UP or DOWN) buttons. Press the MEMORY/C-ADJ button once again: the minute digits start to blink.
Programming presets You can also preset the stations of your choice and program up to ten AM stations and ten FM stations in the system's memory. To store radio stations: 1. Press the STOP/BAND button on the system (or the remote control) to toggle between AM and FM bands to make your selection. 2. Tune the receiver to the desired station. 3. Press the MEMORY/CLK. ADJ button. 4. Press the REPEAT/MEMORY UP button until the desired preset number is displayed. 5. Press the MEMORY/CLK.
Automatic stop When the cassette comes to its end in PLAY or RECORD modes, the built-in automatic stop system ensures that the PLAY or RECORD buttons pressed down are released. This system works whether a RADIO or CD program is being recorded. Only the Cassette function is automatically stopped, the RADIO or CD player continues to operate. Types of cassettes Only use good quality IEC TYPE 1 cassettes for making recordings.
2. To stop playback, press the PLAY/PAUSE button. The elapsed time display starts to blink. 3. To resume playback, press the PLAY/PAUSE button once again. 4. To definitively stop playback, press the STOP/BAND button. Selecting a different track during playback 1. Press the TUNING/SKIP/SEARCH (UP or DOWN) button on the system (or the remote control), until the desired track number appears on the display. 2. Press the PLAY/PAUSE button to start playback. Repeat play 1. 2. 3.
USING THE MODE/REMAIN BUTTON Press the MODE/REMAIN button to change the display as shown below. 1. In radio mode: Frequency display >> Time display >> Timer ON time display. 2. In CD mode: (During playback) Elapsed play time display >> Remaining time display>> Clock display >> Timer ON time. (While stopped) Total time >> Clock display >> Timer ON time.
FROM THE CENTRE TO THE EDGE * Never use benzene, thinners, cleaning fluids for analog (vinyl) records or anti-static sprays. Always ensure that the CD door is closed correctly to avoid contaminating the laser lens with dust. Avoid touching the lens. * MULTIFUNCTION DISPLAY WINDOW A. TRACK NUMBER INDICATOR D. STEREO MODE INDICATOR B. BAND INDICATOR E. PRESET EQ C. TRACK/TIME INDICATOR F.
SPECIFICATIONS ARE SUBJECT TO CHANGE WITHOUT NOTICE. Dripping warning: "Never expose this system to dripping liquids or to splashing and never place any liquid filled object, such as a vase for example, on top of this system". Ventilation warning: "Never interfere with the normal ventilation provided for this system when in normal use". Troubleshooting: If you encounter a problem with your system, first check the possible solutions described in the table below before seeking help from a service center.