TABLE OF CONTENTS TABLE OF CONTENTS...................................................................................................................................................................1 BATTERY INSTALLATION..............................................................................................................................................................2 OVERVIEW OF THE DVD PLAYER &GET A QUICK GLACE OF THE REMOTE CONTROLLER...............................................
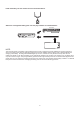
Install the battery into the remote control as illustrated below: + Lithium Cell Cr2025 3V sc2 Attach the rechargeable battery pack onto the play's bottom as illustrated below: BACK VIEW NOTE: This unit works either on the battery pack supplied or the AC power: unplug the AC Power adapter from the DC input jack to work on the battery pack (after fully charged); plugging the AC Power adapter while the battery pack is attached initiates the charging of this battery, the charge LED indicator lights up red
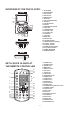
OVERVIEW OF THE DVD PLAYER: 1. TFT SCREEN 2. L&R SPEAKERS 3. DISC COVER 4. DISPLAY KEY 5. SUBTITLE KEY 6. SETUP KEY 7. DISC COVER OPEN KEY 8. STOP KEY 9. PLAY/PAUSE KEY 10. OK KEY 11. NAVIGATION BUTTONS 12. NEXT KEY 13. PREVIOUS KEY 14. VOLUME + KEY 15. VOLUME - KEY 16. AUDIO KEY 17. TITLE KEY 18. MENU KEY 19. SEARCH KEY 20. PHONES SOCKET 21. VIDEO/AUDIO OUT SOCKET 22. S-VIDEO SOCKET 23. COAXIAL SOCKET 24. POWER ON/OFF SWITCH 25. DC 9V INPUT SOCKET 26. POWER INDICATOR 27.
USING THE REMOTE CONTROLLER: o Position the remote controller at a distance NO FARTHER THAN 7m away from and at an angle of 60 in relation to the remote sensor. NOTE: The operating range of this remote controller may vary according to the brightness of the room. Avoid bright light (sunshine or artificial light) aiming directly at the remote sensor. This may cause the remote controller not to work properly. Do not block the remote controller from the remote sensor by solid objects placed between them.
CONNECT DVD PLAYER TO OTHER APPLIANCES It is recommended you connect the player to a multi-system TV. Ensure that this player and other appliances (TV set and amplifier) that will be connected to the player are set to OFF mode and that the AC cords are disconnected from the wall outlet. Avoid blocking ventilation holes of the connected appliances and make sure air around there can circulate freely. Read carefully and follow the instructions before connecting other appliances.
OPERATIONS PROGRAM PLAY(UP TO 16 MEMORIES) 1. Press PROGRAM during playback to display the program menu. 2. Select location(s) to be memorized via navigation buttons and then enter desired Titles/Chapters numbers via numeric buttons. Note: Inputting leading zero is not necessary. Press +10 key to be on the tenth chapter/title/track. If the chapter/title/track number is behind the cardinal 10, press +10 key first and then the unit digit.
OPERATIONS 2. SKIP TO NEXT/PREVIOUS PICTURE Press NEXT button to skip to the next picture or PREV button to the previous picture. If no key is pressed for a few seconds, it will skip to next picture automatically. MULTI-ANGLE VIEWING (DVD ONLY) Press ANGLE button during playback to display the number of angles being played and then select a desired angle to view the scene. Note: only the DVDs shot with multi-angle scenes have this function. 3.
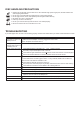
INITIAL SETTINGS 1.SYSTEM SETUP 2.3 SUBTITLE LANG- Select preferred subtitle language. (DVD only, need disc software support) Options: CHINESE/ENGLISH/JAPANESE/FRENCH/SPANISH/ PORTUGUESE/GERMAN/LATIN SYSTEM SETUP TV SYSTEM LCD MODE TV TYPE PASSWORD RATING DEFAULT 2.4 MENU LANG - Select preferred disc menu language. (DVD only, need disc software support) Options: CHINESE/ENGLISH/JAPANESE/FRENCH/SPANISH/ PORTUGUESE/GERMAN/LATIN EXIT SETUP 3. AUDIO SETUP 1.1 TV SYSTEM - it is used to select the TV mode.
DISC HANDLING PRECAUTIONS Hold the disc by the edge so the surface will not be soiled with finger prints. Finger prints, dirt and scratches can cause skipping and distortion. Do not write on the label side with a ball-point pen or other writing utensils. Do not apply benzine, thinner, and liquid that prevents against static electricity. Be careful not to drop or bend the disc. Instal only one disc on the disc tray. Do not try to close the disc tray when the disc is not in stalled properly.
Cautionary Notes When Moving the Player Be sure to remove the disc from the player before packing for moving. It is recommended that you also remove the disc from the player and turn off the power when not using the player. Saving Power It is recommended that you turn off the power to the DVD player when not in use. If you are not going to use it for prolonged period of time, unplug the power cord from the wall outlet.
Cautions on Storing Battery pack Even when not in use, power is consumed continuously. To reduce the power consumption, follow the procedure below. 1. Remove the battery pack from the DVD player after every use. 2. When not using the DVD player, turn off the power. If the player is left in the standby mode, power will be slowly drained from the battery pack and the charging capacity will decrease. 3.