Safety Precautions caution WARNING: THE APPARATUS SHALL NOT BE EXPOSED TO DRIPPING OR SPLASHING AND THAT NO OBJECTS FILLED WITH LIQUIDS, SUCH AS VASES, SHALL BE PLACED ON APPARATUS. RISK OF ELECTRIC SHOCK DO NOT OPEN WARNING: TO REDUCE THE RISK OF ELECTRIC SHOCK, DO NOT REMOVE COVER (OR BACK). NO USER-SERVICEABLE PARTS INSIDE. REFER SERVICING TO QUALIFIED SERVICE PERSONNEL. WARNING: TO REDUCE THE RISK OF FIRE OR ELECTRIC SHOCK, DO NOT EXPOSE THE APPLIANCE TO RAIN OR MOISTURE.
Important Safety Precautions 1. Read these instructions. 2. Keep these instructions. 3. Heed all warnings. 4. Follow all instructions. 5. Do not use this apparatus near water. 6. Clean only with a dry cloth. 7. Do not block any of the ventilation openings. Install in accordance with the manufacturer’s instructions. 8. Do not install near any heat sources such as radiators, heat registers, stoves, or other apparatus (including amplifiers) that produce heat. 9.
Table of Contents Safety Precautions ........................................ 1 Important Safety Instructions.......................... 2 Table of Contents............................................ 3 Accessories ................................................... 3 Disc Formats.................................................. 4 Remote Control ............................................. 5 Control Reference Guide Skip (Forward / Reverse)...............................................13 Audio Selection..
Disc Formats The unit can playback discs bearing any of the following marks: Audio CDs [8cm(3")12cm(5") disc] DVDs [8cm(3")/12cm(5") disc] Compatible Region Management Information Region Management Information: This unit is designed and manufactured to respond to the Region Management Information that is encoded on DVDs. If the region number printed on the DVD does not correspond to the region number of this unit, this unit cannot play that disc. The region number of this unit is 4.
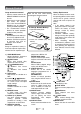
Remote Control Using the Remote Control • Point the remote control at the REMOTE SENSOR located on the unit. • When there is a strong ambient light source, the perform ance of the infrared REMOTE SENSOR may be degraded, causing unreliable operation. • The recommended effective distance for remote operation is about 16 feet (5 meters). Take out the PVC sheet before operating the Remote Control. To Change Remote Battery 1. Open the battery door.
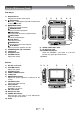
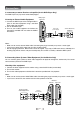
Control Reference Guide DVD Player 1) Remote Sensor Receives the remote control signal. 2) OPEN Button Press the OPEN button and hold the front panel to open the disc door. 3) SEARCH Button Performs fast reverse playback. SEARCH Button Performs fast forward playback. PREV Button Goes backwards to previous chapters/tracks. NEXT Button Advances chapters/tracks. STOP Button Stops playing a disc. PAUSE Button Pauses playback and frame advance. PLAY Button 8) Starts or resumes playback of a disc.
Power Supply A. Using the Car Power Adaptor The included 12V car power adaptor is designed for use with vehicles that have a 12V, negative ground electrical system.
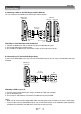
Connections A. Watching a DVD on the DVD Player and the Monitor You can watch the same DVD on the DVD Player and the monitor. DVD player Monitor right side left side right side AV-DC cable (included) To A/V OUT & DC IN 9V-12V jacks To A/V IN & DC OUT 9V-12V jacks Watching on the DVD Player and the Monitor 1. Connect the DVD Player and the monitor using the included DC-AV Cable. 2. Turn on the DVD Player and the monitor. 3. Play a DVD on the DVD Player; the monitor will play at the same time by AV IN.
Connections C. Connecting a Stereo Receiver or Amplifier (for the DVD Player Only) The DVD Player can play two channels Dolby Digital. DVD player right side Listening on External Audio Equipment 1. Connect the DVD Player to the left/right Audio In jacks on the other equipment using a standard Audio cable (not included). 2. Turn on the DVD Player. 3. Turn on your audio equipment and follow the instructions provided with it to select the AUDIO IN function.
Connections E. Using the Monitor with Other Equipment while Playing DVD on the DVD Player You can use a game console or other video equipment on the monitor while playing a DVD on the DVD Player.
Mounting in the Vehicle Use the supplied mounting straps to install the DVD Player and monitor on the back of the vehicle's headrests. Tightly wrap the mounting strap around the headrest. Mounting the DVD Player Mounting the Monitor SAFETY WARNING! • This unit should never be used by the vehicle's driver or left unsecured in the vehicle while driving.
Using the Stand for Desktop Use You can stand the DVD Player up on a desk or table using the stand on the back. Sound System Dolby Digital Dolby Digital is a technology developed by Dolby Laboratories. Soundtracks encoded in Dolby Digital can reproduce from one to 5.1 discrete channels of excellent quality audio. The unit automatically recognizes the Dolby Digital bitstream and provides a downmix suitable for twochannel listening.
Playing a Disc This instructional manual explains the basic instructions for operating this unit. Some DVDs are produced in a manner that allows specific or limited operation during playback. Therefore, this unit may not respond to all operating commands. THIS IS NOT A DEFECT. Please refer to the instructions accompanying the specific DVD in question for more information about the options available on that DVD. “ ” may appear on the screen during operation.
Playing a Disc Subtitle Selection 1. While a DVD is playing, press the SUBTITLE button to display the current language setting, as shown in the example. 2. Press the SUBTITLE button repeatedly to select the desired subtitle language. You can turn subtitles off by pressing the SUBTITLE button repeatedly until the “ ” is displayed. Note: • Some DVDs are set to display subtitles automatically, and you cannot turn them off even if you set the subtitle function to off.
Locating a desired section Locating a Specific Title If a DVD contains title numbers, you can locate a specific title by directly selecting its title number. 1. Press the GOTO button. 2. Press the corresponding number button(s) for the title you want. 3. Press the ENTER button to confirm. Playback starts from the selected section. Note: • If the title numbers you entered is not permited by the DVD, after you press the ENTER button, it will restore to - - -. You should re-enter correct numbers.
DVD Programmable Memory Playing TItles/Chapters in a Favourite Order You can combine your favourite titles/chapters and play them in the order you determine. 1. When a DVD is stopped, press the MEMORY button, the following display appears. 2. Select the items in the order you want by pressing the number buttons.Each time you press the Cursor buttons ( , , , ), the space is highlighted. Highlight where you want to enter, then press the corresponding number buttons. 3.
Viewing JPG files This unit can play JPG files recorded on a CD-R or CD-ROM disc (CD-RW is not recommendable). Viewing JPG Files 1. Open the disc door. 2. Hold a JPG file disc by its edge and gently push it onto the spindle with the label side facing up until you hear a “click”. 3. Close the disc door. A list of folders/files will appear on the screen. 4. Press the or button to select your desired file, the selected picture will appear at the lower right corner. Press the PLAY button to start playback.
Customizing the Function Settings LANGUAGE OSD Language 1. Press the SETUP button in stop mode. 2. Press the button to select OSD Language. 3. Press the ENTER button, then the / button to shift and change the Language. 4. Press the ENTER button. 5. Press the SETUP button or RETURN button to exit the menu. Subtitle 1. Press the SETUP button in stop mode. 2. Press the button, then the / button to select Subtitle. 3. Press the ENTER button, then the / button to shift and change the Language. 4.
Customizing the Function Settings VIDEO Aspect Ratio 1. Press the SETUP button in stop mode. 2. Press the / button to select Video. 3. Press the button, then the / button to select Aspect Ratio. 4. Press the ENTER button, then the / button to shift and change the aspect ratio. 5. Press the ENTER button. 6. Press the SETUP button or RETURN button to exit the menu. Note: • The displayable picture size is preset on the DVD video disc.
Customizing the Function Settings RATING Parental Control DVDs are rated according to their content and some are equipped with a password function. The contents allowed by parental lock level and the way a DVD is controlled may vary from disc to disc. For example, if the disc allows, you could lock out violent scenes unsuitable for children or you could lock out playback of the disc altogether.
Customizing the Function Settings MISC Use Default Settings 1. Press the SETUP button in stop mode. 2. Press the / button to select Misc. 3. Press the button, then press the / button to select “Use Default Settings” dialogue box. 4. Press the ENTER button, then press the / button to select “Yes”. Press the ENTER button and the original setting will be restored. The unit will exit setting menu automatically and re-load the disc in the disc tray.
Troubleshooting Guide SYMPTOM CAUSE (AND REMEDY) No power. • Ensure the car power adapter is connected. • Make sure that the unit is turned on. The remote control does not function. • • • • Very little or no sound is coming from a DVD. • Make sure that you select ON mode. • Make sure the unit is not paused. Press the PLAY button. • Make sure the unit is not in fast-forward or fast-reverse mode. Press the PLAY button. • Make sure the AUDIO/VIDEO input/output connections are correct.