Safety Precautions Caution Marking and rating plate was located at rear enclosure of the apparatus. WARNING: THE APPARATUS SHALL NOT BE EXPOSED TO DRIPPING OR SPLASHING AND THAT NO OBJECTS FILLED WITH LIQUIDS, SUCH AS VASES, SHALL BE PLACED ON APPARATUS. CAUTION RISK OF ELECTRIC SHOCK DO NOT OPEN WARNING: TO REDUCE THE RISK OF FIRE OR ELECTRIC SHOCK, DO NOT EXPOSE THE APPLIANCE TO RAIN OR MOISTURE. CAUTION: TO REDUCE THE RISK OF ELECTRIC SHOCK, DO NOT REMOVE COVER (OR BACK).
Important Safety Precautions 1. Read these instructions. 2. Keep these instructions. 3. Heed all warnings. 4. Follow all instructions. 5. Do not use this apparatus near water. 6. Clean only with a dry cloth. 7. Do not block any of the ventilation openings. Install in accordance with the manufacturer’s instructions. 8. Do not install near any heat sources such as radiators, heat registers, stoves, or other apparatus (including amplifiers) that produce heat. 9.
Table of Contents Safety Precautions................................. 1 Repeat Playback.................................. 14 Important Safety Precautions................. 2 Programmable Memory........................ 15 Table of Contents.................................... 3 Title / Chapter programmed playback........... 15 Disc Formats.......................................... 4 Accessories............................................ 5 Track programmed playback.........................
Disc Formats The unit can playback: DVDs [8cm/12cm disc] Audio CDs [8cm/12cm disc] Compatible Region Management Information This unit is designed and manufactured to respond to the Region Management Information that is encoded on DVDs. If the region number printed on the DVD does not correspond to the region number of this unit, it cannot play that disc. The region number of this unit is 4.
Accessories Please check and identify the supplied accessories. Remote Control . ................................................................................................................................ x 1 2xAAA batteries.................................................................................................................................. x 1 Audio Video cable...............................................................................................................................
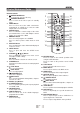
Control Reference Guide 1 Remote Control 1. OPEN/CLOSE Button Press to open or close the disc tray. 2. STANDBY/ON Button Press to turn on the unit or put it in standby mode 3. AUDIO Button Press to select one of the audio sound tracks programmed on a DVD or to select the audio output mode on an audio CD. 4. ANGLE Button Press to switch the camera angle of the video presentation when scenes with multiple camera angles are recorded on a DVD. 5. MEMORY Button Press to create programs of a CD/DVD.
Control Reference Guide Unit 1 2 3 4 5 9 678 1. 2. 3. 4. STANDBY/ON Button Turn the unit on or put it in standby mode. Power Indicator Indicator On: The unit is in standby mode. Indicator Off: The unit is turned on. DISC TRAY Opens or closes the tray by pressing the OPEN/ CLOSE button. REMOTE SENSOR Receives the remote control unit signals. 10 To wall outlet 10. 11. 12. 13. VIDEO OUT jack OPTICAL OUT jack HDMI OUT jack S-VIDEO jack 5. 6. 7. 8. 9. DISPLAY LENS Display units information.
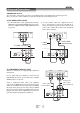
Setup and Connections CONNECTING TO A TV The unit can be connected to your TV in several different ways, depending on the design of your TV. Note: Use only one of the below listed connection method for connecting to your TV. A. RCA AUDIO/VIDEO JACKS 1. Use the Audio/Video cable (supplied). Connect the VIDEO OUT and left/right AUDIO OUT jacks on the unit to the VIDEO IN and left/right AUDIO IN jacks on your TV. 2. Use the S-video cable (not supplied).
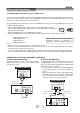
Setup and Connections C. CONNECTING TO A DISPLAY (Using a HDMI cable) For TVs that support it, HDMI can provide the best quality audio and video output (depending on media source), and so is the preferred connection type. The HDMI cable incorporates both audio and video signals, so you will have just one cable running from the unit to your TV. Using the HDMI cable (not included), connect the HDMI OUT jack on your unit to the HDMI IN jack on your TV or HDMI-compatible display.
Setup and Connections Note : • When you connect the unit to other equipment, be sure to turn off the power and unplug all of the equipment from the wall outlet before making any connections. • If the external equipment is television and this audio system is close to it, you may experience the interference if the tuner function is selected while the television is working. • Refer to the instruction manual of the connected equipment as well. TURNING ON THE UNIT 1.
Playing a Disc This user manual explains the basic instructions for operating this unit. Some DVDs are produced in a manner that allows specific or limited operation during playback. Therefore, this unit may not respond to all operating commands. THIS IS NOT A DEFECT. Please refer to the instructions accompanying the specific DVD in question for more information about the options available on that DVD. may appear on the screen during operation.
Playing a Disc Audio Selection On some DVDs, the sound is recorded in two or more formats. Follow the directions below to select the preferred language and sound system. 1. While a disc is playing, press the AUDIO button to show the current audio format number. e.g. 2. Press the AUDIO button repeatedly to select the desired audio format. Note: • If only one audio format is recorded on the DVD, the number does not change. • Some DVDs allow you to change audio selections only via the disc menu.
Playing a Disc Zooming into an image While a disc is playing, press the ZOOM button to enlarge the image in several levels. • While an image is zoomed, you can use the , , or CURSOR button to shift the view and display the part you want. • To return to normal view, press the ZOOM button until the “ZOOM: OFF” shows. The screen will return to normal. • When you reach the edge of the image, the display will not shift anymore in that direction.
Repeat Playback You can play a specific title or chapter repeatedly. (Title repeat, chapter repeat, A-B repeat) Repeating a chapter You can play the same chapter repeatedly. 1. While the disc is playing, press the REPEAT DISC button until the REP: [ CHAPTER ] indicator displays on the screen. The current chapter is played repeatedly. Repeating a title You can play the same title repeatedly. 2.
Programmable Memory The two types of programmed playback provided by this unit are title/chapter programmed playback and track programmed playback. Title / Chapter programmed playback 1. Press the MEMORY button. 2. Enter the title numbers in . Use the button to move the highlight to chapter and enter the chapter numbers in . 3. Use , , or button to move to the other field. 4. Repeat steps 2 to 3. 5. Press the PLAY button to start the programmed playback.
iPod Features iPod Dock Adapters Installing the iPod Dock Adapters Before connecting your iPod, you need to install the appropriate iPod Dock Adapters in the dock of the unit. Below iPod Dock Adapters are included with the unit. 1. Choose a iPod Dock Adapters that fits your iPod. 2. Push to open the iPod docking door. 3. Place your iPod Dock Adapters into the dock until it sits firmly in place.
iPod Features Playing Photos 1. In iPod Home menu, use the / button to select Photos and press the OK button. “Navigate your iPod Photo Library directly from your iPod” will appear on the screen. 2. Use the / button to navigate the iPod menu lists and select a photo, press the OK button to begin playback. (You may also use the control wheel and keys on your iPod to operate it.) • Press the PAUSE button to pause, press the PLAY button to resume . • Press the / button to skip to the previous / next photo. 4.
iPod Features Playing Videos 1. In iPod Home menu, use the / button to select Videos Home and press the OK button. Docking System for iPod Welcom 2. Use the / button to select from Movies, Music Videos, Music TV Shows, Video Podcasts, press the OK button to enter. Photos (“Navigate your iPod Video Library directly from your iPod” Videos will appear on the screen if your are using an iPod touch.) Settings 3.
Customizing the Function Settings There are four options in the main setup menu: System Setup, Language Setup, Audio Setup and Video Setup in DVD mode. In DVD mode, press SETUP to bring up the main menu. Select one of the menu icons across the top of the screen using the or buttons. The menu’s options are displayed on the left side of the screen. Press the , , or buttons to move to the option’s choices on the right. Then press OK to select. Press SETUP or RETURN if you want to exit. SYSTEM SETUP 1.
Customizing the Function Settings PASSWORD Set Password 1. Press the SETUP button in DVD mode. 2. Press the / button to select PASSWORD, then press the OK button. 3. Press the number buttons to input the current password (If the password has not been set yet after you purchase this unit, it is “0000”). Then press the OK button. 4. Press the / button to select RATING, then press the OK button. 5. Press the / button to select parental lock level then press the OK button. 6.
Customizing the Function Settings AUDIO SETUP 1. Press the SETUP button in DVD mode. 2. Select Audio Setup in the main menu using the or buttons. 3. Select a menu option using the , , or buttons and press OK button. AUDIO OUT AUDIO OUT Select the output sound format corresponding to your system connection. When making connection to a TV or stereo system via the analog audio jacks, select PCM or RAW. RAW: Does not have a Dolby Digital Decode.
Troubleshooting Guide SYMPTOM CAUSE (AND REMEDY) No power. • Ensure the AC power cord is connected. • The unit is not turned on. The remote control does not function. • • • • No sound or only a very low-level sound is heard. • Make sure that you select ON mode. • The system is in pause mode. Press the PLAY button to return to normal play mode. • The unit is in fast-forward or fast-reverse mode. Press the PLAY button to return to normal play mode. • Make sure the AUDIO output is correct.