SIZE: 180 X 255 MM
Safety Precautions The lightning flash with arrowhead symbol, within an equilateral triangle, is intended to alert the user to the presence of uninsulated “dangerous voltage” within the product’s enclosure that may be of sufficient magnitude to constitute a risk of electric shock to persons. The exclamation point within an equilateral triangle is intended to alert the user to the presence of important operating and maintenance (servicing) instructions in the literature accompanying the appliance.
Contents SAFETY PRECAUTIONS............................................................................................................................................................. 1 INSTALLATION........................................................................................................................................................................... 3 Installing the Base Stand . ..............................................................................................................
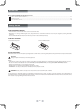
Installation INSTALLING THE BASE STAND WARNING: The display is very fragile, and must be protected at all times when installing the base stand. Be sure that no hard or sharp objects, or anything that could scratch or damage the display come in contact with it. Do NOT place pressure on the rear of the unit at anytime because the screen could crack. 1. Disconnect any cables or cords connected to the unit. 2.
Accessories Please check and identify the supplied accessories. Remote Control (with batteries) ............................................................................................................................................... x 1 AC Power Cord ................................................................................................................................................................................. x 1 Screw for Base Stand ...................................................
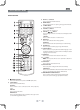
Control Reference Guide REMOTE CONTROL 3) Number (0 - 9) Buttons Press to change the TV/DTV channels. 4) REVEAL Button Press to reveal answers on a quiz or game pages from Teletext. 5) TV MENU Button Press to display the on-screen TV menu. 6) VOLUME (–/+) Buttons Press to adjust the volume level. 7) CURSOR ( , , , ) Buttons Press to highlight selections on a menu screen and adjust certain settings. OK Button Press to confirm selections on a menu screen.
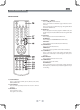
Control Reference Guide REMOTE CONTROL 19) CH/PAGE / Buttons Press to change the TV/DTV channels. Press to go forward or backward the page of Teletext screen in TV mode. Press to go forward or backward the page of Programme Edit & Favourite in TV/DTV mode. 20) FAV Button Press to display the Favourites program in TV/DTV mode. (You should setup your favourite TV/DTV channels in Programme Edit menu. 21) LIST Button Press to display the channel list in TV/DTV mode.
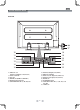
Control Reference Guide FRONT & SIDE VIEWS Control Reference Guide 1. 2. 3. 4. 5. 6. 7. 8. 9. / I (STD.BY / ON) Button Turns the unit on and off. MENU Button Enters the on-screen TV menu. FUNCTION Button Selects DTV / TV / AV1 / AV2/SV / YUV1 / YUV2 / HDMI 1 / HDMI 2 /PC. CH / CH Buttons Changes the TV channels. - VOL + Controls Adjusts the volume level. -7- Removable Stand Color Screen Speaker Remote Sensor Receives the remote control signal.
Control Reference Guide REAR VIEW 18 19 20 10 11 12 13 21 14 15 23 22 10. VIDEO IN 1 Jack AUDIO IN 1 (Left/Right) Jacks (AV/YUV 1) 11. AUDIO Jack (PC IN) 12. AC Socket 13. HDMI IN Jacks (HDMI IN 1 / HDMI IN 2) 14. MONITOR / VGA Jack (PC IN) 15. COMPONENT VIDEO IN 1 (Y / PB / PR) Jacks 16. 17. 18. 19. 20. 21. 22.
Connections CONNECTING A TV ANTENNA To view television channels correctly, a signal must be received from one of the following sources: - An indoor or outdoor aerial antenna - A cable system - A satellite system Note: For receiving over-the-air TV broadcasts, we recommend that you use an external fixed antenna. Should you require the use of a temporary antenna, please ensure that you purchase an antenna with sufficient ability to receive in weak signal areas.
Connections CONNECTING DEVICES WITH A COMPOSITE (YELLOW RCA-TYPE) VIDEO OUTPUT To connect A/V devices such as a VCR, video game system or camcorder: Connecting to a VCR / Video Game System / Camcorder Connect the AUDIO / VIDEO cable (not included) as shown: Make sure you connect the cable from the other equipment (AUDIO OUT and VIDEO OUT) to this unit AV IN 1 (AUDIO IN and VIDEO IN). To operate the connected device and play the source, first press the FUNCTION button to select the AV1 mode.
Connections CONNECTING A HIGH-DEFINITION (HD) SOURCE USING COMPONENT CONNECTION High-Definition (HD) Devices with component video output must be connected to the YUV input. Connect the component video cable and audio cable (not included) as shown. Make sure you connect the component video cable and audio cable from the other equipment (COMPONENT VIDEO OUT and AUDIO OUT) to this unit (COMPONENT VIDEO IN 1 and AUDIO IN 1 - YUV IN 1) / (COMPONENT VIDEO IN 2 and AUDIO IN 2- YUV IN 2) .
Connections CONNECTING A PC Connect the 15-pin D-SUB PC/VGA connector from your computer to the 15-pin D-SUB PC/VGA input on this unit using a monitor cable and audio cable (not included) as shown. Make sure you connect the cable from the computer (PC Connector and PC AUDIO) to this unit (PC IN MONITOR / VGA and AUDIO). NOTE In PC mode, the unit will be power off automatically if no signal has been input for 2 minutes.
Connections CONNECTING THE AC POWER CORD You can power your TV unit by plugging the detachable AC power cord into the AC socket on the back of the unit and into a wall AC power outlet. Check that the rated voltage of your unit matches your local voltage. Make sure that the AC power cord is fully inserted into the unit. NOTES: • When the AC power cord is plugged in, the unit is not completely disconnected from the main power, even when the power is turned off.
Basic Operation Before turning on your television set for the first time, be sure to place it on a solid stable surface. To avoid danger, do not expose the TV to water or a heat source (e.g. lamp, candle, radiator). Do not obstruct the ventilation grid at the rear and be sure to leave sufficient gaps around the unit as shown. 4" 4" 4" TURNING THE UNIT ON FOR THE FIRST TIME The first time you turn the unit on, it will go straight into Auto scan mode.
Basic Operation ELECTRONIC PROGRAMME GUIDE (EPG) FOR DTV (Digital TV) Programmes While watching a DTV programme, you can press the GUIDE button to display the PROGRAMME GUIDE menu, and check for programme information. PROGRAMME GUIDE • Use the , , , button to select a programme, the programme time and name displays, press the INFO button to display detailed information if available. Press the INFO button again to return.
TV Setup TV Setting MENU (only in ATV or DTV mode) 1. Press the TV MENU button. 2. Use the or button to select the TV SETTING. 3. Use the or button to select the options (Auto Tuning, DTV Manual Tuning, ATV Manual Tuning, Programme Edit), and then press the OK button to enter the settings. 4. Press the TV MENU button to return to previous menu, repeat step 2 to adjust other settings. 5. To exit the setup menu and return to the normal screen, press the EXIT button.
TV Setup PICTURE MENU 1. Press the TV MENU button. 2. Use the or button to select the options (Picture Mode, Contrast, Brightness, Colour, Sharpness, Tint, Colour Temp), then adjust them using the or button. (In PC mode, select PC Setup and press the OK button to enter the settings.) 3. Press the TV MENU button to return to previous menu. 4. To exit the setup menu and return to the normal screen, press the EXIT button.
TV Setup time MENU 1. Press the TV MENU button. 2. Use the or button to select the TIME. 3. Use the or button to select the options (Clock, Sleep Timer, Time Zone), then adjust them using the or button. 4. Press the TV MENU button to return to previous menu. 5. To exit the setup menu and return to the normal screen, press the EXIT button. Victoria GMT+10 • Clock Press the ENTER button to enter the Clock menu, use the , , , button to set Date, Month, Year, Hour and Minute.
TV Setup • PDP Setup Use the or button to select the options (Gamma, Power Saving, ISMSetup Method) and adjust them using the or buttons. TV Gamma Level 0 ISM Method Standard Restore Setting Restore Setting • Gamma Setting High gamma values display whitish images and low gamma values display high contrast images. Use the options (Middle, Bright or Dark). • Power Saving Setting This function allows you to reduce the power consumption of the TV. Use the (Level 0~4).
Teletext Teletext is an information system that displays text on your TV screen. Using the Teletext control buttons you can view pages of information that are listed in the teletext index. Please Note On Screen Display is not available in text mode. The contrast, brightness and colour cannot be changed but the volume control is still available. Analog and Digital text look very different and operate differently. For Analogue text press the TEXT button in ATV mode.
Troubleshooting Guide SYMPTOM CAUSE (AND REMEDY) No power. • Make sure the AC power cord is connected. • The unit is not turned on. The remote does not function. • • • • Remove any obstacles between the remote and the unit. Use the remote near the unit. Point the remote at the remote sensor on the unit. Replace the batteries in the remote with new ones. TV Bad Picture (snow, multiple images, distortion, blurry) • Check the location of the antenna and adjust it if necessary.
SIZE: 180 X 255 MM MD090421-01 811-284291W190