Introduction Twist 2.0 combines a spectral synthesis, intelligent performance controls, and cutting-edge GUI (graphical user interface) design to give you control over an endless arsenal of unique sound that you can easily personalize to meet your needs. The innovation found in Twist doesn't stop with its sound. Users will delight at the speed and ease of sound-sculpting and sonic personalization afforded by Twist's unique design. Rip, stretch, and contort with a simple "twist" of a knob.
Installation Important: If you are using a version of Twist that is older than Twist 2.0, this installation will not overwrite or uninstall that version. Also, any files you use or save with either version are neither backward-compatible nor forward-compatible—you cannot use files from Twist 1.0 with Twist 2.0 and vice versa. Windows 1. 2. Right-click the .zip file you downloaded and select Extract All. Follow the on-screen instructions.
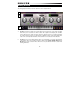
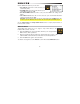
Getting Started The Twist graphical interface has three distinct sections depicted below. 1 2 3 1. Section 1 shows the output level of Twist (at the far left) as well as icons (at the far right) that allow you to load and save Twist sounds. The output meters display the real-time level of Twist's stereo output. Use these meters to gauge how "hot" your signal is. Change the volume knob in Section 3 to adjust Twist's output level.
3. Section 3 contains the Master Volume, Glide control (also known as portamento), a virtual keyboard, and three buttons to switch to the different pages: • The Sound Page is the window with the five big knobs. Move the knobs to change the sound of the Patches. • The Pattern Page contains a full-featured step sequencer, which we call the Pattern Generator since it functions a bit differently than standard step sequencers.
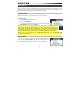
Using Patches Patches are the sounds or instruments inside Twist. Over 200 Patches are included for you to play with, and any of these can be edited using the knobs and sliders and saved as new Patches. Any Twist file with the extension .svx is a Patch file. Loading a Patch To play Twist Patches, you must first load one into the interface. To load a Patch: 1. Click the Load button (folder icon). 2. Choose Load SVX File. 3. Locate and select the Patch file (.
MIDI Learn: Assigning MIDI Controllers to Twist's Controls Learn Twist's MIDI Learn feature lets you to assign or "map" Twist's knobs to any hardware MIDI controller. To do this: 1. Click the Learn button to enter Learn Mode, which lets you to assign hardware MIDI controls to Twist's parameters. 2. While in Learn Mode, adjust a parameter in Twist and then move a knob or slider on your hardware MIDI controller. That knob or slider will now control that parameter. 3.
Operation These sections and controls are visible regardless of which tab you are viewing. Global Controls Level Meters The level meters in the window's upper left corner indicate Twist's audio output volume— both left and right channels. Adjust the audio output level with the Volume knob next to the virtual keyboard. Patch and Preset Controls You can load or save Patches, MIDI Learn Presets, or Pattern Presets by using the buttons in the upper right corner of the window.
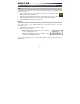
Click the Save button (disk icon) to save a file: • Save SVX File: Select this to name and save your current Patch (.svx). • Save MIDI Learn: Select this to name and save your current MIDI Learn Preset (.sml). • Save Default MIDI Learn: Select this to save your current MIDI Learn settings as the default. • Save Pattern Preset: Select this to name and save your current Pattern Generator settings as a Pattern Preset (.spg).
Settings The Settings Page lets you configure various settings related to the application itself. Click the Settings button (gear icon) in the upper right corner of the main window to open the Settings Page. • Sample Content Directory: This is the file path for your audio samples. Click Change to set a new file path. • Rebuild Browser Database: Click this button to rescan your Patches.
Keyboard At the bottom of the interface is a virtual keyboard and a few additional knobs and sliders. • Volume: This adjusts Twist's main volume. • Glide (portamento): When this slider is all the way at the bottom, portamento is off and Twist operates as a multiphonic instrument. Once you move the Glide slider up, Twist becomes a monophonic instrument and any two notes that are played legato will glide (to play legato, hold the first note down and release it only after pressing the second note).
Sound Page The Sound Page is the heart and soul of Twist. This page contains several controls that adjust Twist's filter, envelopes, tuning, and other harmonic layer controls. This is where most of the textural sound design process will happen. The combination of the two Layers lets you create endless combinations of unheard-of sounds for your project. And remember that any of these knobs is easily assignable to any hardware MIDI controller (see the MIDI Learn section for more information).
• The Tune knob lets you offset each Layer's pitch up to 50 cents up or down. • The On/Off switch turns the Layer on or off. Filter Controls Filter Type Click this drop-down menu to set the type of filter used in the envelope. Filter Frequency The middle large knob is the Filter Frequency knob, which controls the cutoff frequency of the filter assigned to each Patch. Moving the knob counterclockwise closes the filter, while moving it clockwise opens the filter.
LFO Controls The low-frequency oscillator (LFO) is a fundamental tool sound designers use to create their sounds. Twist's LFO lets you control its rate, depth, and resolution or frequency. LFO Shape These LEDs indicate what kind of waveform is used in the LFO. The available types are (from top to bottom) saw-tooth, square, triangle, and sine. LFO Depth This knob controls how much LFO affects the signal's filter frequency. When this knob is set to 0, the LFO is off.
Amp Controls Each Patch has a built-in amp envelope, shown in the Amp Envelope Pane. Twist uses AHDSR envelopes—Attack, Hold, Decay, Sustain, and Release. When you send a signal through this envelope, it passes through each of these five stages, shaping the sound. Adjust the envelope's shape by clicking and dragging points on the curve shown in the Envelope Pane. The five values shown under the curve are numerical representations of the five envelope stages.
Pattern Page Pattern Generator The Pattern Page provides access to Twist's Pattern Generator, which is very similar to a standard step sequencer. With the ability to control pitch, velocity, and several other sound parameters, you can create jaw-dropping sequences with ease. Pattern Generator Basics The Pattern Generator's grid is divided into "steps." Each rectangle, going from left to right, constitutes one step. With each step, you can set a pitch and a velocity.
Sound Parameter Tabs The Sound Parameter Tabs at the top of the Pattern Generator control the different parameters on the Sound Page. The Note Offset tab is the most important one as it sets the pitch of the note played on each step (see the Note Offset section for more information). To enable a Sound Parameter Tab, click the button under the desired tab. The enabled tab button will then be lit. Important: • Enabling the tabs will change the sound of your Patch.
Note Offset The top half of the grid is where you set each step's pitch. Pitches are set as "note offsets" (transpositions) from the pitch you play on the keyboard. The range is 24 semitones, or one octave up and one octave down. Tip: To "copy" the same note offset across multiple steps, click and drag on the step until you reach the desired value. With the mouse still pressed, hold your keyboard's Shift button and drag across the steps you want to copy it to.
Duration The bottom half of the grid also allows you to set the duration of notes, sustaining them for as long as you like within the pattern. To do this, simply Control-click (Windows) or Commandclick (Mac OS X) a step, and drag the mouse to the right. The steps will merge together to show the note in the first step will be sustained across the merged steps. To break steps apart, reverse this operation: Control-click (Windows) or Command-click (Mac OS X) the right-most step, and drag the mouse to the left.
Number of Steps To change the number of steps in the Pattern, click the Steps field on the righthand side of the Pattern Page, and drag the number up or down until you've reached the desired number of steps. If you have more steps drawn in the grid than are allowed by your Steps setting, the extra steps will be grayed out to indicate they will be skipped. Resolution The Resolution knob changes the duration of each step in the Pattern Generator.
Using Pattern Presets Twist includes a variety of Pattern Presets for you to use in your projects. You can also save your own Patterns for later use. To load a Pattern Preset: 1. Click the Folder button and select Load Pattern Preset. 2. Open the Twist Pattern Presets folder in your Twist content directory, and load any of the Preset (.spg) files. To save a Pattern Preset: 1. Click the Save button and select Save Pattern Preset. 2. Select a location and enter a name for the Preset (.spg) file.
IRC: Intelligent Rhythm Control If you've written music with MIDI before, you know how difficult the concept of time can be to realizing an effective and artistically rewarding piece of music, especially if you're capturing a performance or creating a track in real time. What is IRC? IRC is a rhythm-enabling device that automatically adjusts and corrects your playing to make it "in-time" in "real-time," based on your host DAW's tempo and beat setting.
Effects Page Twist offers three fantastic effects—tempo-synced delay, chorus, and reverb—to open up even more sonic possibilities. Effects settings are saved with each Twist Patch. If you edit the settings of a default Twist Patch, remember to save it if you want to use it again. We recommend saving it with a new name to keep the factory default instruments intact.
Chorus and Reverb The chorus and reverb effects are great tools for filling out your sounds or adding an extra dimension to them. They include standard parameters like Wet mix, Dry mix, Feedback, Size (room size), and Width. These effects will give your Patches extra sweetness.
Browser Page The Browser Page lets you view and load your available Patches (.svx) and sort them according to their Attributes. Load a Patch by double-clicking it from the Filename list. Click various Attributes in the Genre, Color, and Character lists to show only the Patches with those characteristics. To change a Patch's Attributes: 1. Double-click it to load it. 2. Click the Attributes button. 3. Click any Attribute(s) you want to select or deselect. 4.
Automation Many of Twist's parameters can be automated inside your DAW. This section has a few tips about automating Twist. If you haven't used automation in your tracks before, though, consult your DAW's reference manual for specific instructions on automating plug-in parameters. When automating Twist parameters, select the desired parameter from the list of Twist's automation parameters and either draw the automation in with your mouse or use a hardware controller to record it.
FAQ: Frequently Asked Questions Through our intensive testing and the feedback we've received from our beta team and users like you, we've compiled a list of some helpful tips in troubleshooting problems. If this guide isn't helpful in solving your issues, please first check sonivoxmi.com for the latest updates and information regarding this product. If this doesn't solve your issue, please contact our support team at sonivoxmi.com/support, and we'll get back to you as soon as possible.
Issue: When I trigger a note with my MIDI controller, there is a noticeable delay in hearing sound. Solution: The audio buffer is set too high. Select a lower audio buffer. This is found in your sound card setup in your host software. Windows users: We recommend ASIO drivers for optimal low-latency performance (many sound cards have these). If your particular sound card does not, you can find a generic, free ASIO driver for your system online.
Issue: My plug-in does not show up. Solution: Before proceeding, make sure that you have the latest Twist updates installed. Once you have the latest updates, try the following for your software: • Steinberg Cubase™ or Nuendo™: From the Devices menu, open the plug-in information window. Make sure that the installed plug-in can be seen. Click the checkbox next to the plug-in name to activate it. Restart Cubase or Nuendo and the changes should take effect.
Trademarks and Licenses Copyright © 2011 Sonic Network, Inc. This SONiVOX product and all its individual components referred to in this document are protected under United States and international copyright laws, with all rights reserved. Twist 2.0 Spectral Morphing Synthesizer is provided as a license to you, the customer. Ownership of Twist is maintained solely by Sonic Network, Inc. All terms of use for Twist are documented in the Twist End-User License Agreement found in the product installer.
sonivoxmi.com Manual Version 1.