
Installation & Assembly


2 of 3
©2019 SONNEMAN - A WAY OF LIGHT
October 31, 2019
Assembly Instructions
INSTRUCTIONS D’INSTALLATION
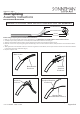
Malibu Discs Series - 7.5", 10" Pendant
Important
• Always disconnect the power before installing or replacing bulbs and before cleaning or other maintenance.
• Consult a qualied, licensed electrician to ensure correct branch circuit conductor.
Consulter un électricien qualié pour vous assurer que les conducteurs de la dérivation sont adéquats.
Note:
• This xture is dimmable with Electronic Low Voltage (Trailing-Edge) type dimmers and Incandescent (Leading-Edge)
type dimmers. For best performance, we recommend using an Electronic Low Voltage Dimmer.
Care Instructions
• Dusting: Use a clean, dry cloth.
• Cleaning: To protect the nish, avoid any harsh abrasives or chemicals.
1765, 1766
1766
1. Shut o power to the outlet box (A).
2. Feed the power cords (B) through the bushings (D) and adjust to desired
height. Use included screwdriver (E) to tighten set screws (F) in bushing to
secure cords. Reserve extra cord in the canopy (L).
3. Make appropriate electrical connections using wire nuts:
a. Connect the LED driver’s (H) live wire (black) to the live outlet box wire.
b. Connect the LED driver’s (H) neutral wire (white) to the neutral outlet
box wire.
c. Connect the xture’s ground wire (green or uncoated) to the ground
outlet box wire. If no ground is present in outlet box, connect
xture’s ground wire to the mounting plate (J) using the green screw
(included).
d. Carefully place connections and driver in outlet box (A).
4. Attach the mounting plate (J) to the outlet box using the outlet box
screws (K).
5. Attach the canopy (L) to the mounting plate (J), secure with screws (M) as
shown in the Detailed View.
6. Restore power to the xture.
A
H
J
M
B
L
1765
E
F
D
J
H
M
L
K
A
Detailed View
K