FUSION D400QR5 ™ 4-Bay Serial ATA Disk Enclosure with Quad Interface User’s Guide For Windows
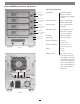
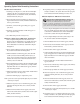
Fusion D400QR5 Specifications and Features Enclosure Specifications Drive Tray (Bay 1) Drive Presence LED (Bay 1) Drive Activity/Fault LED (Bay 1) Drive Tray (Bay 2) Drive Presence LED (Bay 2) Drive Activity/Fault LED (Bay 2) Drive Tray (Bay 3) Drive Presence LED (Bay 3) Drive Activity/Fault LED (Bay 3) Drive Presence LED (Bay 4) Drive Tray (Bay 4) Compatibility Compatible with Mac®, Windows®, and Linux® computers with compatible interface Interface Connectors eSATA, 2 x FireWire 800, FireWire 400
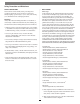
Safety Precautions and Disclaimers SAFETY PRECAUTIONS DISCLAIMERS Please read this section carefully before proceeding. These precautions explain the correct and safe use of this device, thereby helping to prevent injury to you or others, and also help you to minimize the risk of damaging the device. Drive Usage: Sonnet Technologies has qualified the hard drives listed below for use in Fusion D400QR5 storage systems.
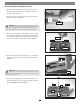
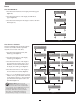
Drive Installation and Enclosure Setup 1. Remove the Fusion D400QR5 and its drive trays from their packaging, and place them near the computer to which the enclosure will be connected. 2. Take one of the drive trays and push its lever release button in until the lever pops out (Figure 3). push in lever release button WARNING: When handling computer products, take care to prevent components from being damaged by static electricity; avoid working in carpeted areas.
Drive Installation and Enclosure Setup WARNING: When inserting drive modules into the enclosure, do not force the levers closed. If a lever does not close easily, remove and reinsert the module, and then push the lever in again. 6. Carefully slide the drive module into the enclosure until its lever starts to close, and then push the lever in until it clicks to secure the drive module inside the enclosure (Figure 7); verify that the drive modules are all plugged in securely.
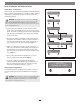
Drive Installation and Enclosure Setup Initial Drive Configuration When you first turn on the Fusion D400QR5 after installing the hard drives, you must configure the drives as a RAID 0 or RAID 5 set before formatting the virtual volume using your operating system drive formatting application. WARNING: Configuring the drives in your Fusion D400QR5 Detecting Disks –Re—Init? Detecting Disks waiting enclosure following the steps below requires you to reformat them.
Operating System Drive Formatting Instructions Mac OS Users’ Instructions 10. Depending on how you configured the RAID group, it may already be available to the system. Once the RAID group has been formatted and finishes building, it is ready to use. 1. Assuming your computer is on, after the Fusion D400QR5 configures the drives a Disk Insertion window will appear stating that there is an unreadable volume; click Initialize, and then Disk Utility will open.
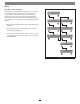
Menus View the RAID Mode Fusion QR5 v1.0 –Menu 1. Press the button under Menu on the display; RAID Mode appears (Figure 10). 2. Press the button under Go on the display; the RAID mode appears (Figure 10). RAID Mode –Next 3. Press the button under Quit on the display to return to the main menu (Figure 10). Go– RAID5 4D – Q uit Fusion QR5 v1.
Menus View Drive S.M.A.R.T. Status Self-Monitoring, Analysis and Reporting Technology, or S.M.A.R.T., is a monitoring system for SATA drives to detect and report on various indicators of drive health. The S.M.A.R.T. feature keeps track and reports the status of SATA drive health using certain parameters recorded by the drives. The Fusion D400QR5 displays two possibilities: good, or failing. Drives marked as Failing should be replaced. Fusion QR5 v1.
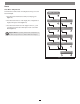
Menus View Drive Temperatures SATA hard drives monitor their own temperature and report it to the Fusion D400QR5. Fusion QR5 v1.0 –Menu 1. Press the button under Menu four times; Disk Temp appears (Figure 13). Go– Drive:1: 37 –Next Error Statistics –Next Go– Drive:2: 36 –Next SMART Status –Next Go– Drive:3: 36 –Next Disk Temp – Q uit Drive:4: 35 – Q uit RAID Mode –Next 2. Press the button under Go on the display; Drive:1 temperature is displayed in degrees Celsius (Figure 13). 3.
Tips and Additional Information Contacting Sonnet Customer Service This section covers some tips for using the Fusion D400QR5 enclosure. USA Customers The Sonnet Web site located at www.sonnettech.com has the most current support information and technical updates. Before you call Sonnet Customer Service, please check our Web site for the latest updates and online support files, and check this User’s Guide for helpful information.
©2010 Sonnet Technologies, Inc. All rights reserved. Sonnet, the Sonnet logotype, Simply Fast, the Simply Fast logotype, Creativity Stored Here, and Fusion are trademarks of Sonnet Technologies, Inc. FireWire, Macintosh, Mac, the Mac logo, and Mac OS are trademarks of Apple Inc., registered in the United States and other countries. Other product names are trademarks of their respective owners. Product specifications subject to change without notice. Printed in the USA.