FUSION F2QR ™ Portable 2-Drive Hardware RAID SATA Storage System User’s Guide For Windows
Introduction The F2QR’s built-in hardware RAID controller supports RAID 0 (striped), RAID 1 (mirrored), JBOD (just a bunch of disks) and SPAN configurations without relying on a separate adapter card. Out of the box, the drives inside Fusion F2QR are unconfigured and unformatted. Continue reading to learn how to set the drive configuration to meet your needs. Thank you for purchasing the Sonnet Fusion™ F2QR portable 2-drive hardware RAID storage system with quad interface.
Fusion F2QR Features, Safety Precautions 1 – Drive Power and Activity LED Indicator, Drive 2 This LED indicates the drive’s ready state (blue LED on), read and write activity (blue LED flashing), drive error and RAID 1 rebuild operation (red LED flashing). 2 – Drive Power and Activity LED Indicator, Drive 1 This LED indicates the drive’s ready state (blue LED on), read and write activity (blue LED flashing), drive error and RAID 1 rebuild operation (red LED flashing).
Set Drive Configuration 2. Go to http://www.sonnettech.com/support/kb/kb.php, click on the Storage Solutions link, and then click on the Fusion F2QR link. The drives included in the Fusion F2QR are shipped unconfigured and unformatted. In order to use the F2QR you must first configure the drives (RAID 0, RAID 1, Span, or JBOD) and then format them (Mac OS Extended or NTFS, for example). 3.
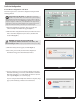
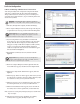
Set Drive Configuration C. RAID Master Application Overview 7 – RAID Configuration Setup and Rebuild Field Click the Delete RAID button to erase the existing drive configuration (including JBOD). Click a RAID Configuration radio button to select a new configuration. Click the Create RAID button to set the new drive configuration (including JBOD and Span). 1 – Detail Tab Default tab for the RAID Master application. When selected, the window above is displayed.
Set Drive Configuration D. Set Drive Configuration—All Users Follow the steps below to set the drive configuration using the RAID Master application. Support Note for Mac Users: The RAID Master application operates only with the Mac OS X 32-bit kernel. If your computer automatically starts with the 64-bit kernel, you must reboot it with the 32-bit kernel in order to use the RAID Master application.
Set Drive Configuration E. Drive Formatting—Mac OS Users’ Instructions After changing the F2QR’s drive configuration using the RAID Master application, you must format the drives using Disk Utility. WARNING: Formatting the drives will erase any data on them! If there is any data on them, back it up before proceeding. 1. In the Disk Utility window, the RAID group will appear as a single volume.
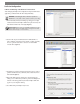
Set Drive Configuration E. Drive Formatting—Windows Users’ Instructions After setting the F2QR’s drive configuration using the RAID Master application, you must format the drives using Disk Management. The procedure listed below describes the process of formatting and configuring drives under Windows 7; steps for formatting under other versions are very similar. WARNING: Formatting the drives will erase any data on them! If there is any data on them, back it up before proceeding. 1.
Specifications, Precautions, FCC Compliance, and Support Information Specifications Compatibility Compatible with Mac® and Windows® computers with compatible interface External Connectors eSATA, 2 x FireWire 800, miniUSB 2.0, 12VDC @ 3A OS Support Mac OS X Version 10.3+; Windows 7, Windows Vista, Windows XP, Windows Server 2008 and 2003 Operating Temperature 32 to 95˚ F (0˚ C to +35˚ C) Dimensions (WxDxH) 5.9 x 6.1 x .95 in (15 x 15,6 x 2,4 cm) Weight 1.