
Owner manual


Drive Installation and Enclosure Setup
5
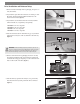
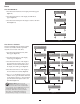
7. Using four of the supplied screws, secure the drive tray to the
drive; tighten each screw to secure the tray snugly to the drive;
do not overtighten the screws (Figure 7).
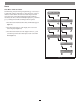
8. Carefully slide the drive module into the enclosure until its lever
starts to close, and then push the lever in until it clicks to secure
the drive module inside the enclosure (Figure 8).
9. Repeat steps 4-8 for additional drives.
10. Install the Fusion R400QR5 into the rack or onto the desktop on
which it will reside.
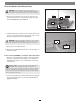
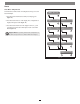
Connect Fusion R400QR5 to Computer and Power Outlet
1. Using one of the supplied cables (eSATA, FireWire 800, FireWire
400, USB), connect the Fusion R400QR5 to your computer. For
maximum performance, connect the R400QR5 to a SATA host
controller card.
2. Connect the supplied power cable between the Fusion R400QR5
and a grounded wall outlet or power strip; verify the cable is
plugged in securely.
WARNING: When inserting drive modules into the enclosure,
do not force the levers closed. If a lever does not close easily,
remove and reinsert the module, and then push the lever in again.
WARNING: When securing the trays to the hard drives, you
must verify the screw heads are flush with the tray. Otherwise,
a screw may catch on the enclosure and prevent you from removing it.
Figure 7
screw
screw
screw
drive tray
screw
Figure 8
push lever
until it clicks
push tray in
until the lever
starts to close
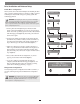
Support Note: The supplied Sonnet locking eSATA cable is
compatible with all eSATA ports and provides a far more
secure connection when used with Sonnet drive enclosures and host
controller cards with the matching connector. If necessary, you may
remove the locking mechanism from the connector by removing the
screws securing the two halves.