
User's Manual


6
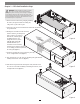
Chapter 3 – PCIe Card Installation Steps
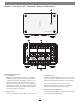
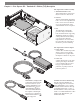
12. Turn the Echo Express SEL T3E right-side-up.
13. Connect the included Thunderbolt cable (or a comparable
Thunderbolt 3 [40Gbps] cable) between a Thunderbolt 3 port on the
Echo chassis and a Thunderbolt 3 port on your computer, or other
Thunderbolt device in the chain connected to the computer
(Figure 8). Note that cables or ports marked with the USB icon
(
) are NOT compatible. Secure the retainer clip to the chassis
if you attached it. If you are daisy chaining additional Thunderbolt
devices, connect another Thunderbolt cable between the downstream
device and the open Thunderbolt port on the Echo chassis.
14. Connect the included power cord between a wall outlet or power strip
and the power adapter; verify the connector is plugged in securely.
Note that the power adapter’s power indicator will light at this time.
15. Connect the power adapter cable to the Echo chassis 12V power socket.
Note that the power indicator on the Echo Express SEL T3E chassis
will not light until the computer, and any other Thunderbolt device
connected between it and the Echo chassis, is powered on.
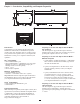
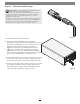
Support Note: Sonnet’s ThunderLok™ 3 Thunderbolt connector
retainer clip secures the included Thunderbolt 3
(40Gbps) cable to the Echo chassis to prevent accidental disconnects. The
included clip is compatible with Sonnet 0.5- and 0.7-meter Thunderbolt
3 (40Gbps) cables, but it is not compatible with Sonnet 1- or 2-meter
Thunderbolt 3 (40Gbps) cables.
To attach the clip to the cable, remove both items from their packaging, and
then insert the connector through the connector clip as shown (Figure 7).
Note that the connector will pass all the way through the clip; when you
connect the cable to the chassis, the clip will secure the connector.
Figure 7
Figure 8