Sonnox Fraunhofer Pro-Codec Operation Manual Version 1.
1. Introduction The Sonnox Fraunhofer Pro-Codec Plug-In is designed for the real-time auditioning, encoding and decoding of audio signals by the Fraunhofer codecs. In the past it has not been possible to critically audition and then encode multiple formats in real time within a host DAW environment. The revolutionary Sonnox Fraunhofer Pro-Codec now makes this possible, and includes extensive monitoring tools and built-in encoding/decoding features.
2.1 Additional Codec Details Please see section 10 for Codec specifications. 2.1.1 Apple AAC iTunes Plus (Mastered for iTunes) (Mac only) The addition of this Apple AAC codec allows real-time audition of files produced under the Mastered for iTunes initiative that are destined for the iTunes store. This codec is available for Mac computers only. It uses the same Apple codecs and resamplers that are used for the current iTunes Catalogue. It very specifically re-samples to 44.
3. The Sonnox Fraunhofer Pro-Codec 3.1 The User Interface and Workflow Overview The primary purpose of the Sonnox Fraunhofer Pro-Codec is to provide a way of monitoring your host session material using the highly regarded Fraunhofer encoders, without the need for offline processing. By auditioning and comparing codecs online, it allows you to make executive decisions on the best codecs to use and, when all is complete, write the encoded audio to disk.
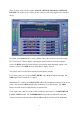
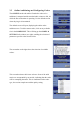
There are three main workflow modes: ONLINE, OFFLINE ENCODE and OFFLINE DECODE. The modes are accessible via tabs at the top of the main graphical user interface (GUI): By default, the ONLINE mode is active, and the centre panel of the GUI provides a large FFT (Fast Fourier Transfer) display, showing the spectral content of the input signal in yellow, the DIFF signal in red (the difference between the input and output signals), and what we refer to as an NMR (Noise-to-Mask Ratio) display in green.
3.2 Input and Output Panels The left hand panel of the plug-in features a large input signal meter. This provides 1dB per LED down to -36dB, and thereafter 3dB per LED. There is a peak hold display by default. The EXPORT SETTINGS button allows access to a panel for configuration of the encoded file data (see below for more details). A window at the base of this panel displays the TOTAL DELAY through the plug-in, and will indicate the maximum of each individual codec delay.
3.3 Online Auditioning and Configuring Codecs The ONLINE encode tab enables Fraunhofer codecs to be auditioned, compared and the encoded audio written to disk, all while the host workstation is operating. It is the default section when the plug-in is instantiated. The default screen will open, displaying the online codec audition screen. To add a custom codec, click on any available slot in the CODEC LIST.
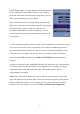
The STATUS window (see right) displays information about the codec, including its version number. In some cases (similar to the bit-rate table entries in the drop-down menu above), the text may be in red, indicating a special condition. Some combinations of bit-rate, quality setting and sample-rate might cause an encoder to down-sample internally (especially at the highest quality settings).
The DECODER OUTPUT (AUDITION) window determines the decoder format when playing back multichannel encoded signals. The two screenshots on the right show the codec configuration options for the two Lossless codecs. Note there are options available for the lossy cores. Also notice that the STATUS of the mp3-HD codec has red text (see lower screenshot). This is another example of a special condition.
In the example shown above, two of the CODEC LIST windows show red text, indicating that a special condition is present. Clicking in the relevant windows will produce the CODEC & SETTINGS window for more information, if required. If you want to add a new codec that is similar to one that is already in the list, you can duplicate it by clicking an existing list element and dragging it to an empty row (Windows systems only).
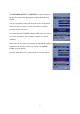
The FFT display shows the signal frequency content. The input signal is displayed in yellow, whereas the red line indicates the spectral content of the difference signal of the selected codec (ie. the difference between the input signal and the encoded/decoded output signal). This is referred to as the DIFF signal. Alternating between the CODEC and DIFF buttons on the output section allows monitoring of the codec output or the audio that is removed by the encoding process.
The NMR display is a useful indication when auditioning the mp3 or AAC codec families. If there are areas where the NMR line is above 0dB, then those are the frequency areas of interest. The display will highlight these frequency areas in red. It is possible, for example, to make very quick comparisons of a selection of different bitrates while auditioning music.
Clicking on the DISPLAY TYPE button on the right hand side of the plug-in will alternate between the FFT display and a phase display (see above). The centre of this display shows the left-right phase behaviour of the output of the codec in green and the phase behaviour of the difference signal in red. This difference phase is also displayed on the right, amplified by a factor of five. The display on the left shows the input and output envelopes.
If the feature is enabled, a help flyout panel can be displayed by hovering over a control or label (see above). Help Flyouts are enabled or disabled via the Sonnox button options menu: This sub-menu also contains several other configuration controls for the plug-in, for example switching between the A-B Audition and A-B-X Test modes.
3.4 Bitstream Level (TRIM tab) Any form of filtering can, under certain circumstances, increase the level of the signal. If your input is hot, this can potentially produce overloads when the signal is decoded. This effect can be very easily demonstrated with this plug-in. The BITSTREAM LEVELS TRIM tab (see above) can be used to monitor this potential for overload. The post-decoder level is continually monitored, and a small meter indicates levels over 0dB.
For convenient trimming, the value in the MAX dB window can be selected, dragged and dropped onto the TRIM dB cell. The MAX dB value can be repeatedly dropped onto the TRIM cell; each time the value is subtracted from the current TRIM value. In the screenshot above, there is a 0.30dB overload from a signal already reduced by 0.90dB. Selecting and dragging the value from MAX dB to TRIM dB will set the latter to -1.20dB.
3.5 Data Compression Factor (COMP tab) All of the available codecs compress an audio data bitstream. Different codecs compress using different algorithms, and will compress to very different degrees. HE-AAC is optimized for the best quality at very low bit-rates, and will produce very small files (potentially around one hundredth of the input file size). Lossless encoders, in contrast, are not so effective at compressing data, and will produce files that are around half the size of the input.
3.6 AB Auditioning and ABX Testing (A-B tab) NOTE: The selection of AB Auditioning or ABX Testing is made via the Sonnox menu button. 3.6.1 AB Auditioning For simple and quick auditioning use AB Mode. Control is via the A-B tab (below the TRIM and COMP tabs): Clicking in the A or B columns will assign a codec to the A or B audition channels. Clicking in the B column adjacent to a selected A codec will automatically set the B column to the input signal (I/P).
3.6.2 ABX Testing For more detailed and statistical listening tests, use ABX mode (for the principles behind ABX testing, there is a good Wikipedia entry). Select the ABX tab via the Sonnox menu button. Unlike hardware ABX systems, there is no switch delay or switching glitches in this implementation. The two AB assignment columns are used in a similar fashion to AB auditioning, but the column headers are now buttons.
X will have been set to a random selection of either A or B. Listen critically, switching between A, B and X; when you think you have identified X as either A or B, leave the selection on the identified A or B, and press CHOOSE. This will increment the number of test cycles but not display whether your choice was correct. The act of pressing CHOOSE also randomly re-allocates either A or B to X.
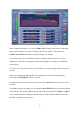
3.7 Online Encoding To encode a file in real time, first you have to record enable the codec. This is done by selecting the ARM buttons to the left of the codec list. Multiple files can be selected for simultaneous recording. To record straight away, press the RECORD button when the host is playing back audio; this will write the output of your selected codecs to disk.
You can also ARM the codec when playback is stopped, so that codecs will start writing the instant you start host playback. Likewise, stopping playback will terminate the writing procedure. Record duration and exact data compression ratios are displayed (see screenshot above).
The CUSTOM STRING is restored on a project/session load. When loading Presets, and if you delete the plug-in and re-insert it, the CUSTOM STRING will default to ‘My Track’. The OUTPUT DIRECTORY is restored on a project/session load. Otherwise, it remains unaltered, even when loading Presets, and even if you delete the plug-in and re-insert it. See section 7 of this manual for more details regarding Presets and session loading. There is limited provision for ID3 metadata.
3.8 Offline Encoding It is possible to encode files offline. To do this, select the OFFLINE ENCODE tab: Select BROWSE and navigate to a desired file. You can also drag and drop chosen files onto the window to the left of the BROWSE button. By default, the output file(s) will be written to the same directory as the source file.
Write enable each codec in the list by selecting its ‘arm’ button on the left: when armed, the buttons will start to flash. Each list element shows its respective output name and file location. Click EXPORT SETTINGS to edit it. Once ready, clicking ENCODE will batch process all write enabled codecs (see above). Only one source file can be processed at a time, but it can be written to multiple output files as a batch job with different codec settings.
3.9 Offline Decoding The Sonnox Fraunhofer Pro-Codec can also decode compressed files for import into the host sequencer (or for general purpose decoding). To do this, select the OFFLINE DECODE tab: Click the BROWSE button and navigate to a compatible encoded file. You can also drag and drop a file into the window to the left of the BROWSE button. Output files can be either wav or AIFF, and have a bit depth of either 16 or 24 bits. Stereo files are interleaved only.
Once decoding has finished, the filename text reverts from red to black, and the output filename box shows a green highlight. This file can then be dragged directly to your host sequencer (Windows only). 4. Additional Information on Workflows 4.1 Processing Sequence The concept underlying the development of this plug-in is was that it should be the very last item in the mastering chain. A 16 or 24-bit master has been finalised and possibly rendered to a wav file.
4.2 Overloading Post Codec (Audition Level Matching) As discussed above, any form of filtering (including encoding and decoding) can increase the peak level of a signal. Some codecs such as the HE-AAC can add several dBs, hence the provision of Bitstream Level Trim to avoid post-decoder clipping in the audition chain. Up to five codecs can be selected for audition, and each could require a different trim setting.
In this case, monitoring the lossless codec can indicate the presence of a significant difference signal under some circumstances, but the Bitstream Level metering will read zero. In this instance, the ‘lossless’ output will be clipping. This situation can be mitigated using the Bitstream Level trim; of course it is always better practice to avoid an overloading input.
Offline encoding has four headroom recording options: • Do not trim. • Use online trim values. • For each codec, prevent decoded levels from clipping by pre-processing the track. • For each codec, normalise the level by pre-processing the track. If a track/encoder combination causes non-repeatable overload problems, and yet the desire is to encode as hot as possible, the third option can be used. This will pre-pass the file, calculate the maximum overload, and trim accordingly.
4.6 Online and Offline Encoding Following the above discussion on bitstream overload repeatability and downsampling, we can now discuss the advantages and disadvantages of online and offline encoding. 4.6.1 Summary of the Differences Between Online and Offline Encoding Offline Encoding is intended to be used primarily as an alternative to Online Encoding.
It is possible with some hosts to render the mix to wav at the same time as online encoding; the codec might be inserted into an ‘aux’ channel for this. If the plug-in is in the master output channel, you will almost certainly not want to render the plug-in monitor output. Put the plug-in into bypass to render to wav, then either offline encode or use a second pass to online encode.
In all other cases of quality setting, a codec uses the same sample rate as the session, except at higher sample rate sessions when the codec will use the highest simple division of the session sample rate that the codec supports. 4.7.1 Mp3 stereo, session 44.1kHz or 88.2kHz Bitrate (kbps) 96 96 128 128 320 320 Supported Sample Rates (kHz) 32 / 44.1 32 / 44.1 32 / 44.1 / 48 32 / 44.1 / 48 32 / 44.1 / 48 32 / 44.1 / 48 Preferred Sample Rate (kHz) 32 32 44.1 44.1 44.1 / 48 44.
4.8 Codec and Session Sample Rate The plug-in and many of the codecs are sensitive to the session sample rate and channel configuration. The plug-in supports a wide variety of host DAW applications, and understandably many of these applications provide differing amounts of session configuration settings to a plug-in. Some applications only present session configuration information to a plug-in when there is an active audio data stream (ie. the transport is set to play).
To avoid these problems after changing the session configuration, it is advisable when using affected host applications to press PLAY, then STOP, before instantiating the plug-in or loading a plug-in Preset. This will ensure that session sample rate and channel configuration data are flushed through the plug-in correctly. It is also advisable to save Presets for the plug-in at a variety of session sample rates and channel configurations. To illustrate this further, consider the following examples.
4.8.2 Example 2. Different session sample rates and incompatible codec bitrates Using WaveLab 7, set up two wav files in the tabbed windows in the audio file workspace. One is stereo 24-bit 32kHz, and is currently selected and playing. The unselected tab has a stereo 24-bit 48kHz wav file associated with it. A Sonnox Fraunhofer Pro-Codec is instantiated. As the HD-AAC codec does not support 32kHz, the HD-AAC option does not appear in the codec selection window.
It is also advisable to save Presets for the plug-in at a variety of session sample rates and channel configurations. It is advantageous to categorise the Presets by channel configuration and session sample rate. 5. Lossless Codecs (mp3-HD and HD-AAC) A lossless codec is intended to produce an output data stream that is an exact duplicate of an input audio data stream.
5.1 Auditioning Lossless Codecs The two lossless codecs from Fraunhofer have a very clever feature; the single compressed lossless file includes a lossy core channel. It therefore acts as a lossless archival format, a lossless distribution format for the masters, and a final playback format for both lossless and lossy decoders — and all of this in a single file.
5.1.1.1 HD-AAC 16/24-bit modes The HD-AAC codec has a 16-bit mode that is selectable in the CODEC & SETTINGS window by selecting CD resolution rather than 24-bit HD resolution For online HD-AAC Operation there are three volatile buttons that appear at the bottom of the Codec Settings window for an HD-AAC codec (see right): 1. A button to enable dithering at whichever resolution is selected by the other buttons. 2. A CD button to select 16-bit resolution 3. An HD button to select 24-bit resolution.
5.1.2 mp3-HD (16-bit lossless) Currently it is not possible to audition in real time the mp3-HD codec. (The codec library itself includes writes-to-file that cannot be used in the DSP thread of a plug-in.) If the mp3HD codec is selected, and its MON button enabled, the audition path is switched to a synthesised version of the codec output.
While encoding/auditioning an mp3-HD signal, attention should be paid to the lossy core. We recommend selecting the appropriate core codec in an adjacent codec window, which will allow correct auditioning of the lossy codec in the mp3-HD channel, and will also allow correct overload monitoring and mitigation.
Naturally, with a 16-bit input you would expect activity in bits 1-16, and with a 24-bit input you would expect activity in bits 1-24. As noted in the introduction to this section, if there is processing before the plug-in, you would expect ‘inters’ and activity on all bits, including bits higher than 24 (even if it’s a 16-bit input signal). The following diagrams show the plug-in FFT displaying the INPUT and DIFF signals with varying degrees of dither and truncation.
HD-AAC 20-bit dither/truncation The noise floor of the input signal is displayed as around -150dB (~30dB down from -120dB). The diff signal is indicating -180dB (the 24-bit input has the bottom four bits zero’ed). The bit meter shows no activity in bits greater than 20. HD-AAC 16-bit dither/truncation The noise floor of the input signal is displayed as around -125dB (~30dB down from -96dB). The diff signal is indicating -180dB (the 24-bit input has the bottom eight bits zero’ed).
5.2.2 mp3-HD mp3-HD 16-bit dither/truncation (correct dither/truncation) The noise floor of the input signal is displayed as around -125dB (~30dB down from -96dB). The diff signal is indicating -180dB (the 16-bit integer input is identical to the 16 bit integer post-codec, with no ‘inters’). The bit meter shows no activity in bits greater than 16. mp3-HD 20-bit dither/truncation The noise floor of the input signal is displayed as around -150dB (~30dB down from -120dB).
mp3-HD 24-bit dither/truncation The noise floor of the input signal is displayed as around -175dB (~30dB down from 144dB). The diff signal is indicating -135dB with overtones at around -100dB (this is an error condition because the 24-bit input contains information that the 16-bit output of the codec cannot reproduce). The bit meter shows incorrect dither activity in bits 17 to 24. 5.
HD-AAC input from 24-bit wav file, with channel processing The diff signal and the bit-meter indicate that processing in the channel has resulted in ‘inters’ up to a level of -144dB. The input to the codec is not correctly dithered and truncated. HD-AAC input from 24-bit wav file, with channel processing, dithered and truncated to 24 bits A dither/truncation plug-in has been added to the signal chain just before the Pro-Codec.
mp3-HD input from 24-bit wav file The bit-meter indicates no activity higher than 24 bits. The red shading indicates that dither is required. The diff signal is indicating the presence of audio data input at bits 17-24. mp3-HD input with channel processing The bit-meter indicates activity in all bits. The red shading indicates dither is required. The diff signal is indicating the presence of audio data input at bits greater than 16.
mp3-HD input with channel processing, dithered and truncated to 24 bits The bit-meter indicates activity higher than 16 bits. The red shading of bits 17-24 indicates incorrect dither. The diff signal is indicating the presence of audio data input at bits 17-24. 5.4 Internal Dither and Truncation in Lossless Codecs The previous examples include the insertion of a dither/truncation plug-in in the audio path to provide correct treatment of the signal prior to the codec.
HD-AAC input using the internal dither/truncation The bit-meter indicates that there is no activity in bits greater than 24. The input to the codec is correctly dithered and truncated. The border for the bottom segment is green to indicate that the dither/truncation is provided internally. HD-AAC input dithered and truncated twice Here a correctly dithered/truncated signal enters the plug-in, but the internal dither is also applied.
The GUI above shows a correctly dithered signal input to the plug-in, but the internal trim is non-zero. The bottom segment of the bit-meter is flashing red to indicate an error condition. If the internal dither is enabled, the bit-meter indicates that the signal is correctly treated (the bottom segment of the meter is hollow — see above) and the active dither is applied internally (indicated by a green border around the segment.
5.5 Overloading Lossless Codecs The screenshot below illustrates the behaviour of lossless codecs under overloading conditions. A typical audio signal is shown with the display zoomed. The input level is such that the input meters show clipping. The behaviour of both codecs is the same; as neither has internal headroom, the signal will clip. Note the DIFF signal at well over -80 dB; this overload condition is clearly audible in the DIFF signal. 5.
5.6.3 Level change: (Section 3.4) If a level change is required in the plug-in, and implemented using the TRIM tab, again it is wise to verify the audition signal. 5.6.4 Dither/Truncation (Section 5.2 and 5.3) It is necessary to correctly dither and truncate the input to the lossless codecs. The audition DIFF signal quickly indicates if correct dither and truncation is being applied.
6. Description of Controls Touch Pad Controls Several controls in this plug-in use a ‘touch pad’ associated with a knob or slider.
Sonnox Menu Button Provides access to a number of useful options: Clip Lights — Can be set to hold for 2 seconds, 5 seconds, or indefinitely. Show Preset Name Path — Shows or hides the Preset name path in the Preset Manager toolbar. Use Host Channel Configuration — Most hosts indicate channel configuration. For those that don’t (such as Sound Forge), the configuration can be forced to mono or stereo.
TOTAL DELAY — This window shows the total delay through the plug-in; click to toggle between samples or milliseconds. The figure given is the maximum of each individual codec delay. This field is updated in the GUI immediately a new codec or other setting is selected. Depending on the host behaviour, the new value may not be available for delay compensation until the plug-in is removed and re-instantiated. Online Encode Tab CODEC LIST — Displays a list of codecs chosen for auditioning.
Export Settings Pop-up OUTPUT DIRECTORY — Selects the destination directory for output files. BROWSE — Opens a file browse directory, prompting you to select an output directory. OUTPUT FILE NAME FORMAT — Displays the complete string that will be written to an output directory. You can re-order any of the fields in red brackets for a completely custom filename. The filename fields are: CUSTOM STRING Displays the identifying name string of the filename, eg. a song name. CODEC Add the codec type.
Codec & Settings Pop-up CODEC — Use the drop-down menu to choose from a list of available codecs. Some codecs will not be available, depending on the host sample rate and the number of channels. For example, HE-AACv2 is stereo only. BITRATE — Choose the bit-rate of the selected codec. Some bit-rates may not be available, depending on the sample rate of the host DAW and the number of channels. If the bitrate is accompanied by an asterisk, the codec is resampling the audio stream.
Output Section MONITOR — Indicates the plug-in’s audio output; either INPUT (ie. the plug-in is bypassed) or CODEC. You can switch between input and codec output by clicking on the LEDs. A special case for the mp3-HD codec, whereby the MONITOR signal is synthesized, is denoted by an INPUT 16 indication. DISPLAY TYPE — Toggles between a Lissajous phase display and the FFT display. DISPLAY LOG/LIN — Toggles between logarithmic and linear scale FFT displays.
Bitstream Levels / Trim Tab METERS (x5) — Indicate when a decoded signal is above 0dB. Includes peak hold. MAX dB (x5) — Indicates the maximum level detected by the decoder. This value is yellow if negative, and red if positive. Clicking in this window resets the peak hold value. TRIM dB (x5) — Indicates the input trim to the individual codecs. This is a Touch Pad control, allowing a fader style movement to determine an attenuation of up to a maximum of 12dB.
A-B-X Test Tab* A (x5) — Selects the codec to be routed through ‘A’. B (x5) — Selects the codec or input to be routed through ‘B’. A-B-X — Glitchlessly switches output routing between active codecs selected in ‘A’ or ‘B’, or the anonymous codec in ‘X’. RESET — Sets the ABX machine back to a start condition. Resets counters to zero and sets X to either A or B. CHOOSE — Increments cycle counter. Examines whether choice of A or B correctly matches X. If correct guess, increments the success counter.
Offline Encode Tab BROWSE — Opens a file browse directory, prompting you to select a wav or AIFF file for offline encoding. ENCODE — Encode all queued files in the list. TRIM BEHAVIOUR — Four possible settings are available: Do not trim: No gain adjustments are made. Use online trim values: The trim values from the online page are used. Prevent Decoded Levels > 0dB: The source file is encoded, then decoded and the maximum sample value is found.
Offline Decode Tab BROWSE — Opens a file browse directory, prompting you to select a compatible compressed file format for offline decoding. DECODE — Decodes all files in the list. BITS — The output file format can be set to 16 or 24-bit depth. Files created with a bit depth of 24 bits will be approximately 50% larger than files created with a depth of 16 bits. FORMAT — The output file format can be set to wav or AIFF.
7. Presets and Project/Session Data Handling The Sonnox Fraunhofer Pro-Codec plug-in contains internal data not normally found in a plug-in, such as filenames and directory paths. This has prompted the adoption of a slightly different preset model in order to allow the creation and utilization of independent libraries of data presets. 7.
Also, note that PM preset loads must match the session sample rate and the session channel configuration to avoid incompatible codec settings (the codecs are sensitive to session sample rate and channel configuration). See section 8 for more on the Preset Manager Toolbar 7.1.3 Rule 3: Persistence for plug-in insertion and deletion: Only the Output Directory, filename Attributes and Offline Encode Headroom selection are remembered across a delete/insert.
8. Preset Manager Toolbar The Sonnox Fraunhofer Pro-Codec plug-in comes equipped with its own onboard Preset Manager, which is displayed at the top of the plug-in window as if the host created it. The reasoning behind this is to allow increased portability of your Presets across all the host applications, while also providing a consistent and versatile interface.
9.
10. Specifications 10.1 Codec Specifications Available bitrates are dependent upon the selected sample rate. Encoder mp3 / mp3surround Channel Configurations mp3: Mono, Stereo mp3surround: 5.1 mp3: 8, 11.025, 12, 16, 22.05, 24, 32, 44.1 & 48 mp3surround: 44.1 & 48 Sample Rates (kHz) mp3 Mono: 8-320 kbps in variable and constant rate mp3 Stereo: 16-320 kbps in variable and constant rate mp3surround 5.
Encoder Channel Configurations AAC (MPS) 5.1 Sample Rates (kHz) AAC-LC: 44.1 & 48 kHz HE-AAC: 44.1 & 48 kHz Bitrates (Stereo, 44.1kHz) AAC-LC: 192-320 kbps HE-AAC: 48-128 kbps Encoder Channel Configurations Sample Rates (kHz) Bitrates Limitations: HD-AAC Mono, Stereo, 5.1 (7.1 not currently supported) 44.1, 48, 88.2, 96, 176.4, 192 Variable (lossless) Supported oversampling modes: 1 for input sample rate 44.1 or 48kHz 2 for input sample rate 88.
The following tables indicate the preferred sample rates of the codecs (see section 4.7). Only supported sample rates from 32kHz and higher are shown. mp3 Bitrate Range (kbps) 40-47 48-55 56-63 64-320 Supported Sample Rates (kHz) 32 32 32 / 44.1 / 48 32 / 44.1 / 48 Preferred Sample Rate (kHz) 22.050 24 32 44.1 Number of Channels 96-111 112-319 320 32 / 44.1 32 / 44.1 / 48 32 / 44.1 / 48 32 44.1 44.1 / 48 2 2 2 128-191 192-320 44.1 / 48 44.1 / 48 44.1 44.1 / 48 5.1 5.
HE-AAC Bitrate Range (kbps) 12-17 18-39 40-56 Supported Sample Rates (kHz) 32 32 / 44.1 / 48 32 / 44.1 / 48 Preferred Sample Rate (kHz) 32 44.1 48 Number of Channels 16-27 28-95 96-128 32 / 44.1 / 48 32 / 44.1 / 48 32 / 48 / 96 32 44.1 48 2 2 2 64-69 70-159 160-319 320-640 32 / 44.1 / 48 32 / 44.1 / 48 32 / 44.1 / 48 64 / 88.2 / 96 32 44.1 48 96 5 , 5.1 5 , 5.1 5 , 5.1 5 , 5.1 Supported Sample Rates (kHz) 32 32 / 44.1 / 48 32 / 44.1 / 48 Preferred Sample Rate (kHz) 32 44.
10.3 Delays and CPU Usage 10.3.1 Sample Delays The sample delay (latency) of the plug-in depends upon the particular codecs selected. The monitor outputs are delay compensated, so if more than one codec is selected in the CODEC LIST, then the reported delay is the maximum of the individual codec delays. This field is updated in the GUI immediately a new codec or other setting is selected.
In particular, the HD-AAC lossless codec creates a heavy CPU load. High sample rates exacerbate this situation; for example, without a powerful CPU, the HD-AAC codec might cause a prohibitively high CPU load at 192kHz. All codecs that are added to the CODEC LIST are always active, in order to report accurately the NMR signal and potential overload state. This is irrespective of which codec is selected for monitoring. Remember that this requires both encoding and decoding of the signal in real time.
10.4 GUI Controls Input Meter: 0dB to -63dB Graphical Display Frequency: 20Hz to 20kHz (44.1 and 48kHz) Graphical Display Gain: +10dB to -120dB (to -180dB with zoom) Bitstream Level Trim: Trim Meter: Trim Display: -12dB to 0dB 0dB to +10dB -144dB to +10dB 10.5 Summary of Codec Features and Applications Codec Features Typical Applications Typical Bitrate 128 kbps (stereo) Roughly half the bitrate of a 16-bit uncompressed wav file.
11. Copyright and Acknowledgements The Sonnox Fraunhofer Pro-Codec plug-in was developed by the design team at Sonnox, in collaboration with Fraunhofer IIS. The Audio Coding software contained in the Sonnox Fraunhofer Pro-Codec plug-in was developed and provided by Fraunhofer IIS of Erlangen, Germany. Trademarks and content copyright © 2007-Present Sonnox Ltd. All rights reserved. Fraunhofer IIS and related logos are registered trademarks.
Under some circumstances the commercial (ie. revenue-generating) use of mp3 content will require a separate licence irrespective of how that content is generated. To summarise: There are no licence fees for private or non-commercial use of mp3 content. Enterprises with a turnover of less than $100,000 per year are exempt from mp3 royalty payments. There are currently no royalties collected for AAC commercial content distribution.
Platform Specific Supplement S1. Supported Platforms Avid Pro Tools (LE, RTAS, M-Powered, Pro Tools HD) and Pro Tools 10 (HDX & Native) VST Native Audio Units Native S2. System Requirements These requirements are current at this revision of manual. For latest system requirements, please see the website www.sonnox.com Pro Tools Pro Tools 7, 8, 9 & 10 Approved Pro Tools CPU, OS and hardware configuration (see www.avid.com) Mac OSX 10.