Contents 1 Introduction 4 2 Principles of Reverberation 5 3 Overview 6 4 Adjustment Procedure 7 5 Realistic Room Simulation 7 5.1 Early Reflection Setup . . . . . . . . . . . . . . . . . . . . . . . . . . . . . . . 7 5.1.1 Additional Important Points on Early Reflections Processing . . . . . 9 5.2 Reverb Tail Setup . . . . . . . . . . . . . . . . . . . . . . . . . . . . . . . . . . 10 5.2.1 Tail Mix Section . . . . . . . . . . . . . . . . . . . . . . . . . . . . . . . 10 5.2.
10 Supported Platforms 30 11 System Requirements 30 12 Copyright and Acknowledgements 31
1 1 INTRODUCTION Introduction The Sonnox Oxford Reverb plug-in is a highly flexible artificial reverberation generator, designed to complement existing Sonnox Oxford applications in providing the professional user with highest technical and sonic performance, coupled with high levels of artistic and creative capability.
2 2 PRINCIPLES OF REVERBERATION Principles of Reverberation Artificial reverberation models tend to fall into two main types, which can best be described as convolution and reflection simulation modelling. Both processes seek to achieve a degree of realism and virtual space by modelling room characteristics.
3 3 OVERVIEW Overview Generally speaking, simulation models employ two sections to generate spatial effects. The first section produces the Early Reflections (see above) that we use to perceive the dimensional space of environments, and a Reverb Tail section is used to produce the longer term diffuse tails that occur in real environments, when the reflection complexity has become so dense that it is no longer possible to discern discrete events.
5 4 REALISTIC ROOM SIMULATION Adjustment Procedure The Sonnox Oxford reverb provides for a very large degree of parameter control so that the professional user has the facility to produce reverberation ranging from subtle ambience and dry spaces, all the way up to the creation of dramatic sound effects. To achieve this degree of user facility, a significant number of controls need to be present on the ‘front panel’.
5.1 Early Reflection Setup 5 REALISTIC ROOM SIMULATION Start with a neutral setting, with WIDTH and TAPER in their mid position, FEED ALONG and FEEDBACK at minimum, and LF ROLL-OFF (in the INPUT section) at minimum (mostly HF content). It should now be possible to perceive the space changing when you adjust the SIZE control. Initially, set this to something appropriate.
5.1 Early Reflection Setup 5 REALISTIC ROOM SIMULATION correct when 100% wet, frequency combing effects may occur when it eventually gets combined with the dry signal in a mix. Generally speaking, simulations with the source and destination at the back wall (minimum setting) will always survive the addition of the dry signal, but under some circumstances, forward settings may not.
5.2 Reverb Tail Setup 5 REALISTIC ROOM SIMULATION panned or natural) better placement within the reverb sound field will be achieved with higher separation settings. 5.2 Reverb Tail Setup The major difference between the early reflection processing and the Reverb Tail is that the latter contains no geometrically based dimensional information. Being constructed of mutually unrelated terms, it is designed to generate almost characterless spectral diffusion and spatial dispersion.
5.2 Reverb Tail Setup 5.2.2 5 REALISTIC ROOM SIMULATION Suggested Setup for the Reverb Tail Set the ER MIX fader to its DRY position, the TAIL INPUT fader to its DLY INP position, and the COMP DELAY fader to its mid position. This ensures that the input drive to the tail section is the compensated version of the input signal. This is a good starting point as it is the character of the input that we need to address first.
5.2 Reverb Tail Setup 5 REALISTIC ROOM SIMULATION static. It keeps your attention on the reverberation because it changes subtly over time – much as in real spaces where natural movement of the air or objects within the space continually modify its characteristics. To give the space a realistic high frequency profile over time, ABSORPTION should be applied in the same manner as in the ‘early reflection’ settings.
5.2 Reverb Tail Setup 5 REALISTIC ROOM SIMULATION Throughout the blending process it is a good idea to go back periodically and adjust the Reverb Tail OVERALL SIZE parameter in order to get the best timbral blending between the sections. The overall size parameter can be adjusted all the way from what sounds like a ‘cymbal resonating’ to a wide open space — without affecting the decay time, so there is great deal of latitude in what can be achieved.
6 6 EQUALISATION Equalisation Equalisation of the reverb signal contribution is included in this comprehensive plug-in to effect changes in the overall character of the simulation, either in response to artistic need or to enhance the realism of real space simulations. Almost all real environments exhibit complex frequency response characteristics that are generated by the reflection timing of the room spaces and objects within the area.
6.1 6.1 Equalisation Setup 6 EQUALISATION Equalisation Setup Because the response of the reverb section is more unpredictable and fragile than the EQ, it is generally better to achieve a convincing setup for the main reverb before starting out on any equalisation. Once you are ready, simply click on the EQUALISER tab to reveal the EQ controls (see above). 6.2 Reverb EQ in Music Production For music production, the role of the EQ is mainly that of subtle modification to the overall sound.
6.3 Reverb EQ in Post Production 6.3 6 EQUALISATION Reverb EQ in Post Production For post-production effects and simulation of real spaces, the EQ serves to accentuate or even insert tonal aberrations that we associate with particular spaces. Often we don’t notice these aberrations when we are actually in the spaces, but when adding simulations to dry sounds in a post-production environment, their absence can be a real limitation to effectiveness.
6.3 Reverb EQ in Post Production 6 EQUALISATION There is a high degree of response interplay between the resonances produced in the reverb and the EQ. Very often extremely small changes to reverb SIZE settings and EQ centre frequencies can produce very significant changes in the overall perception of the space. It is definitely worth experimenting with this when you reach the final stages of creating the desired sound. www.sonnox.
7 7 DESCRIPTION OF CONTROLS Description of Controls The control functions are arranged in logical operational sections, comprising the Early Reflection settings, Reverb Tail settings and a number of contribution mixing functions. These latter functions are also conveniently split into separate sections, for internal signal contribution to the Reverb Tail section and overall level control and mixing functions. A separate Equalisation control area is accessible from the Early Reflections area of plug-in.
7.1 Early Reflections 7 DESCRIPTION OF CONTROLS Size This sets the overall size of the simulated space, as measured between front and back walls. Room shapes remain in proportion with this size. Width This controls the stereo separation of the room reflections depending on their particular direction within the stereo field. Normal position placement occurs with the control at its minimum setting. Increasing the control setting provides wider separation.
7.2 Reverb Tail 7.2 7.2.1 7 DESCRIPTION OF CONTROLS Reverb Tail Reverb Tail Input Mixing The facility is provided to drive the input of the Reverb Tail processor with a combination of signals comprising of; the untreated input signal, the delay compensated input signal and the output of the Early Reflections processing.
7.2 Reverb Tail 7 DESCRIPTION OF CONTROLS Tail Input This provides a crossfade between a delay compensated versions of the input signal provided by the DELAY COMP control and the mixed signal resulting from the ER MIX stage. Note: A combination of the input signal and delayed signal together can cause unwanted frequency combing effects when the ER SIZE is set for smaller spaces.
7.2 Reverb Tail 7.2.2 7 DESCRIPTION OF CONTROLS Reverb Tail Effect Modification All parameters in the Reverb Tail section are fully compensated, so that they may be adjusted in isolation without mutual interaction with other control settings. This means that settings such as REVERB TIME or LF ROLL-OFF will produce constant results even if other factors such as DISPERSION or OVERALL SIZE are varied. Reverb Time This sets the overall reverberation time in seconds as referred to a decay of –60dB ref.
7.2 Reverb Tail 7 DESCRIPTION OF CONTROLS simulated space. Phase Mod This controls the application of internal phase modulation to the reverb algorithm. This adds a very slight variance to the reverb character over time, which enhances realism and presence under many conditions. Absorption This controls the high frequency absorption effect within the reverb section.
7.3 7.3 Equaliser Section 7 DESCRIPTION OF CONTROLS Equaliser Section The Equaliser section (click on the EQUALISER tab to reveal) comprises five bands with the upper and lower sections selectable between band-pass, shelving and 12dB/octave filtering functions. The EQ processing precedes the reverb processing, so the dry signal remains unaffected by Equalisation settings. WET/DRY MIX .
7.4 Overall Controls 7 DESCRIPTION OF CONTROLS BAND-PASS, FILTER and SHELF buttons Select these additional functions for the LF and HF sections. Q control This allows continuous control of the Q value for those sections capable of the band-pass function. Freq control This provides continuous control of the centre frequency for band-pass functions, and the turnover frequency for shelving and filtering functions.
7.4 Overall Controls 7.4.1 7 DESCRIPTION OF CONTROLS Input Controls Input Gain This controls the input level to the reverb. Input Gain These display the peak input level to the reverb processing after the INPUT GAIN control. Stereo Separation This controls the degree of left and right signal mixing at the input of the entire reverberation process. At its minimum setting, the internal input to the reverb is equivalent to a mono mix.
7.5 Options Menu 7 DESCRIPTION OF CONTROLS entry in the Options menu (see next page). Note: The LOCK button works by preventing the wet/dry parameters from being loaded into the DSP, and applies only to preset loads initiated by the onboard Preset Manager (ie. Load, A/B, + and –). Parameter automation, or preset loads initiated by the host will override the LOCK button; this means that project loads will sound the same as when you left them.
8 SPECIFICATIONS Knob Modes Four options determine how the rotary controls (knobs) behave: • With Circular Knob Mode the control is set to the value at which it is first clicked, and the value then increases or decreases with circular mouse movement. • In Relative Circular Knob Mode a control’s value increases or decreases with circular mouse movement relative to its initial value. • Linear Knob Mode increases or decreases a control’s value with up and down mouse movements respectively.
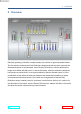
9 9 PRESET MANAGER TOOLBAR Preset Manager Toolbar The Oxford Reverb plug-in comes equipped with its own onboard Preset Manager, which is displayed as a toolbar at the top of the plug-in window, just as if the host created it (see above). The reasoning behind this is to allow increased portability of your presets across all the host applications, while also providing a consistent and versatile interface.
11 10 SYSTEM REQUIREMENTS Supported Platforms • Avid Pro Tools (AAX Native and DSP 32/64-bit) • VST hosts (32/64-bit) • AU hosts (32/64-bit) • Mac Intel OSX 10.6 or higher • Windows 7 and 8 (32/64-bit) 11 System Requirements For latest System requirements, please visit www.sonnox.com. All versions • Free iLok account • Appropriate product licence • iLok2 Pro Tools • Approved Digidesign/Avid CPU and hardware configuration • Pro Tools 10.3.
12 12 COPYRIGHT AND ACKNOWLEDGEMENTS Copyright and Acknowledgements Trademarks and content copyright © 2007-present Sonnox® Ltd. All rights reserved. Sonnox® and the five dots logo are registered trademarks of Sonnox Ltd. This product is manufactured and supplied by Sonnox Ltd. This product is protected by one or more European and/or US patents. DIGIDESIGN, AVID and PRO TOOLS are trademarks or registered trademarks of Avid Technology Inc. VST is a trademark of Steinberg AG.