Bedienungsanleitung Mode d‘emploi
sonoro audio GmbH Unter Goldschmied 6 50667 Köln Germany info@sonoro-audio.com www.sonoro-audio.com 09/09 Der Hersteller arbeitet ständig an der Weiterentwicklung aller Typen und Modelle. Bitte haben Sie Verständnis dafür, dass deshalb jederzeit Änderungen des Lieferumfangs in Form, Ausstattung und Technik möglich sind. Aus den Angaben, Abbildungen und Beschreibungen dieser Bedienungsanleitung können daher keine Ansprüche hergeleitet werden.
1. Sicherheitshinweise .................................................................................................. 5 1.1 Niemals selbst reparieren .................................................................................... 5 1 2 Der CD-Spieler .................................................................................................... 5 1 3 Reinigung und Aufbewahrung ............................................................................. 5 1.4 Betrieb ..........................
Inhalt 7.7 Stummschaltung ............................................................................................... 16 7.8 Ausschaltautomatik ............................................................................................16 8. Weckbetrieb ............................................................................................................ 16 8.1 Alarmfunktion ................................................................................................... 16 8.
Deutsch 1. Sicherheitshinweise Stellen Sie das Gerät auf eine feste, ebene Oberfläche. Achten Sie darauf, dass • • • • • • das Gerät nicht verdeckt wird, damit immer eine ausreichende Luftzirkulation gewährleistet ist; keine direkten Wärmequellen (z. B. Heizungen) auf das Gerät wirken; kein direktes Sonnenlicht auf das Gerät trifft; der Kontakt mit Feuchtigkeit, Wasser oder Spritzwasser vermieden wird (stellen Sie z. B.
1.4 Betrieb Verbinden Sie das Netzkabel mit einer gut zugänglichen Netzsteckdose 230 V ~ 50 Hz. 1.5 Uhren Batterie Dieses cubo Modell verfügt über eine austauschbare Batterie (CLOCK BATTERY) zur Sicherung des Uhrenspeichers. Im Fall einer Stromunterbrechung, etwa durch einen Stromausfall, werden Ihre Weckzeit und Uhrzeiteinstellungen gesichert. Die gesamte Displaybeleuchtung und die Weckalarmfunktionen werden ausgeschaltet.
2.1 Standby/Einschalten/Ausschalten Wenn das Gerät mit Strom versorgt ist, befindet es sich im Standby-Betrieb. Die Uhrzeit im Display leuchtet. Um das Gerät einzuschalten, drücken Sie die Taste STANDBY. Drücken Sie wiederum Standby, um das Gerät wieder auszuschalten. Deutsch 2. Inbetriebnahme 2.2 Kopfhörer anschließen Sie haben die Möglichkeit, einen Kopfhörer anzuschließen. Verbinden sie dazu den Kopfhörer mit der Buchse auf der Rückseite des Gerätes. 2.
3.
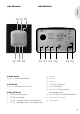
cubo Rückseite: Deutsch cubo Oberseite: 14 15 16 17 18 19 20 21 22 23 im Radio-Betrieb 17 14, 15, 16 Radio-Stationstasten 18 Snooze 24 25 Alarm 1 19 Alarm 2 im CD-Betrieb 20 Kopfhörer Anschluss 14, 15, 16 Direktwahl für Titel 1-6 21 AUX-IN Anschluss 22 Security-lock Anschluss für im MP3-CD-Betrieb Sicherungsschloss 15 10 Titel zurück springen 23 DAB/FM antenna DAB/UKW-Antenne 16 10 Titel vor springen 24 Netzanschlussbuchse 1 Tuning + nächster Ordner / nächstes Album 2 Tuning - vorh
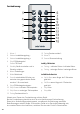
Fernbedienung: 1 Alarm 1 13 Tuning Sendersuchlauf - 2 Volume Lautstärkeregelung - 14 Alarm 2 3 Volume Lautstärkeregelung + 15 Snooze Stummschaltung 4 Play CD Wiedergabe / 5 Pause CD Pause im MP3-CD-Betrieb Standby Gerät einschalten und in 12 Tuning + nächster Ordner / nächstes Album Standby schalten 13 Tuning - vorheriger Ordner / vorheriges Album 6 Menu Einstellungen 7 Mode Betriebsart im DAB Radio-Betrieb 8 Favorite wiederholtes Drücken um 12 Quick Scan wenn länger als 2 Sekunden
4.1 Uhrzeit stellen 1. 2. 3. 4. 5. 6. 7. Schalten Sie das Gerät in den Standby Modus. Drücken Sie Menu, die Uhrzeit blinkt. Drücken Sie erneut Menu, die Stundenanzeige blinkt. Stellen Sie mit den Lautstärketasten die gewünschte Stunde ein. Drücken Sie eine der Skip Tasten, die Minuten blinken. Stellen Sie die Minuten mit den Lautstärketasten ein. Zum Speichern drücken Sie erneut Menu. Deutsch 4. Grundfunktionen einstellen 4.2 Wählen zwischen 12 und 24-Stunden Anzeige 1. 2. 3. 4. 5.
5. FM (UKW) Radiobetrieb Wählen Sie bei eingeschaltetem Gerät mit der Taste Mode den Radiobetrieb. Im Display wird die UKW Radio-Frequenz angezeigt. 5.1 Sender einstellen Drücken Sie Tuning+ oder Tuning-, um manuell Sender zu suchen oder halten Sie die Taste zwei Sekunden gedrückt, bis der automatische Sendersuchlauf startet.
Für einen schnellen Sendersuchlauf (Quick Scan) drücken Sie die Tuning + Taste für mindestens 2 Sekunden. Der DAB cubo startet dann automatisch den Sendersuchlauf in den Kannelen 10 bis 13. Im Display erscheint zuerst Quick Scan und dann der Suchlauffortschritt in % und der DAB Kanal. Dann wird die Anzahl der gefundenen Sender im Display angezeigt, z.B.: 10 Serv Der DAB cubo speichert sich die Anzahl der verfügbaren Sender und springt automatisch auf den ersten verfügbaren Sender. Deutsch 6.
6.6 Sender speichern und aufrufen Halten Sie eine der 6 Stationstasten oberhalb des Lautsprechers gedrückt, bis ein kurzer Piep Ton zu hören ist. Der Sender ist nun auf dieser Position gespeichert. Um den Sender später wieder aufzurufen, drücken Sie nur die entsprechende Stationstaste. 6.7 DAB System zurücksetzen (RESET) Durch das Zurücksetzen des DAB Systems stellen Sie den Auslieferungszustand wieder her. Dabei werden alle persönlichen Einstellungen gelöscht.
Halten Sie während der Wiedergabe eine der Skip Tasten gedrückt und der Suchlauf startet. Lassen Sie die Taste an der gewünschten Position wieder los. Deutsch 7.2 Titelsuchfunktion 7.3 Wiederholfunktion 1. Drücken Sie während der CD-Wiedergabe zweimal die Taste Menu. 2. Wählen Sie mit der Skip Forward Taste REP 1 (momentan gespielter Titel wird endlos wiederholt) oder REP ALL (alle Titel werden wiederholt) aus. 3. Bestätigen Sie die Eingabe mit Menu. 4.
9. Um die Funktion zu beenden, drücken Sie zweimal Menu und anschließend so oft Skip Forward, bis die Anzeige am unteren Rand des Displays erlischt. 10. Drücken Sie abschließend erneut Menu, um die Eingabe zu bestätigen. 7.7 Stummschaltung Drücken Sie während der Audio-Wiedergabe die Taste Snooze, um den Ton auszuschalten. Drücken Sie erneut die Taste, um den Ton wieder einzuschalten, im Display erscheint Mute. Wenn das Gerät stummgeschaltet ist (Mute) sind alle anderen Tasten ohne Funktion! 7.
Deutsch Um den Alarm ein- oder auszuschalten, drücken Sie kurz die STANDBY oder die entsprechende Alarm Taste. Um den Alarm zu unterbrechen, drücken Sie kurz Snooze (Schlummer-Modus). 8.2 Schlummerfunktion (SNOOZE) Die Snooze Zeit können Sie individuell anpassen. Drücken und halten Sie Snooze im ausgeschalteten Zustand. Wählen Sie die gewünschte Dauer und speichern Sie diese mit Snooze.
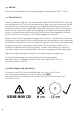
10. Fehlersuche Achtung! Versuchen Sie auf keinen Fall das Gerät selbst zu reparieren; dadurch erlischt der Garantieanspruch. Öffnen Sie das Gehäuse nicht, da die Gefahr von elektrischen Schlägen besteht. Wenn eine Fehlfunktion auftritt, prüfen Sie zuerst die unten aufgeführten Punkte, bevor Sie das Gerät zur Reparatur bringen. Wenn Sie einen Fehler anhand dieser Empfehlungen nicht beheben können, wenden Sie sich bitte an Ihren Händler oder an unseren Kundenservice.
Netzspannung: 230 V ~ 50 Hz AUX-Eingang: 3,5mm Klinkenstecker CD Player: Laser Klasse 1 Laser Klasse 1 Class 1 laser Product Appareil Laser de Categorie 1 Deutsch 11. Technische Daten RF-Fernbedienung, type : RC-3, Betriebsfrequenz: 433,92 MHz Batterie: Lithium-Batterie, Typ: CR 2032 Frequenzbereich FM: 87,5 MHz --- 108,0 MHz DAB : 174 MHz --- 240 MHz Technische Änderungen vorbehalten.
12. Garantieansprüche Für die Geltendmachung von Garantieansprüchen gilt – ohne, dass dadurch Ihre gesetzlichen Rechte eingeschränkt werden – Folgendes: • • • • Garantieansprüche können nur innerhalb eines Zeitraumes von max. 2 Jahren, gerechnet ab Kaufdatum, geltend gemacht werden. Innerhalb dieser Garantiezeit beseitigen wir nach unserer Wahl, durch Reparatur oder Austausch des Geräts, unentgeltlich alle Mängel, die auf Material- oder Herstellungsfehlern beruhen.
0918-609-09
Mode d‘emploi
sonoro audio GmbH Unter Goldschmied 6 50667 Köln Germany info@sonoro-audio.com www.sonoro-audio.com 09/09 Le fabricant développe en permanence tous ces types et modèles de produits. Pour cette raison, des changements peuvent être apportés à tout moment au contenu du coffret, à la forme, à l‘équipement et à la technologie appliquée et nous apprécions votre compréhension à ce sujet. C‘est pourquoi les indications, images et descriptions de ce mode d‘emploi ne constituent pas un engagement contractuel.
1. Consignes de sécurité ................................................................................................ 5 1.1 Ne tentez jamais de réparer l’appareil vous-même ............................................... 5 1 2 Le lecteur de CD ................................................................................................. 5 1 3 Nettoyage et stockage ......................................................................................... 5 1.4 Utilisation ..............................
Inhalt 7.7 Arrêt momentané du son................................................................................... 16 7.8 Arrêt automatique ..............................................................................................16 8. Mode Réveil ............................................................................................................ 16 8.1 Fonction d’alarme ............................................................................................. 16 8.
Français 1. Consignes de sécurité Placez l’appareil sur une surface stable et plane. Veillez à • • • • • • ne pas couvrir l’appareil afin de toujours garantir une circulation d’air suffisante ; éviter de placer l’appareil à proximité des sources de chaleur directes (p. ex.
1.4 Utilisation Raccordez le câble d’alimentation à une prise de courant 230 V ~ 50 Hz facilement accessible. 1.5 Batteries de l’horloge Ce modèle cubo possède une pile (CLOCK BATTERY) remplaçable qui protège la mémoire de l’horloge. Si l’alimentation est coupée, par exemple en cas de panne de courant, l’heure de réveil et les réglages de l’heure sont sauvegardés. Tout l’éclairage de l’écran et les fonctions d’alarme sont désactivées.
2.1 Veille/Mise sous tension/Mise hors tension Lorsque l’appareil est alimenté en courant, il se trouve en mode Veille. L’heure est lumineuse sur l’écran. Pour allumer l’appareil, appuyez sur la touche STANDBY. Appuyez une nouvelle fois sur Standby pour éteindre l’appareil. Français 2. Mise en service 2.2 Raccordement du casque Vous avez la possibilité de raccorder un casque. Pour ce faire, raccordez le casque à la prise prévue à l’arrière de l’appareil. 2.
3.
Face arrière du cubo: Français Face supérieure du cubo: 14 15 16 17 18 19 20 21 22 23 en mode radio 17 14, 15, 16 Touches de stations de radio 18 Snooze 24 25 Alarm 1 19 Alarm 2 en mode CD 20 Raccordement Casque 14, 15, 16 Sélection directe pour les pistes 1 à 6 21 Raccordement AUX-IN 22 Security-lock Raccordement pour en mode CD-MP3 cadenas de sécurité 15 Reculer de 10 titres 23 DAB/FM antenna Antenne DAB/FM 16 Avance de 10 titres 24 Prise de raccordement au secteur 1 Tuning + Dossier
Télécommande: 1 Alarm 1 13 Tuning Recherche de stations - 2 Volume Réglage du volume - 14 Alarm 2 3 Volume Réglage du volume + 15 Snooze Arrêt momentané 4 Play Lecture CD / 5 Pause Pause CD en mode CD-MP3 Standby Pour allumer l’appareil et 12 Tuning + Dossier suivant/album suivant le mettre en veille 13 Tuning - Dossier précédent/album précédent 6 Menu Réglages 7 Mode Mode de fonctionnement en mode radio DAB 8 Favorite Appuyez plusieurs fois pour 12 Quick Scan Si appuyé pendant plu
4.1 Réglage de l’heure 1. 2. 3. 4. 5. 6. 7. Allumez l’appareil en mode Veille. Appuyez sur Menu, l’heure clignote. Appuyez une nouvelle fois sur Menu, les heures affichées clignotent. Réglez l’heure souhaitée en appuyant sur les touches de réglage du volume. Appuyez sur les touches Skip, les minutes clignotent. Réglez les minutes souhaitées en appuyant sur les touches de réglage du volume. Pour mettre en mémoire, appuyez une nouvelle fois sur Menu. Français 4. Réglage des fonctions de base 4.
5. Mode radio FM Alors que l’appareil est allumé, sélectionnez le mode Radio à l’aide de la touche Mode. La fréquence radio des ondes ultracourtes s‘affiche à l‘écran. 5.1 Réglage des stations Appuyez sur Tuning + ou Tuning – pour rechercher manuellement les stations, ou bien maintenez la touche appuyée pendant deux secondes jusqu’à ce que la recherche automatique des stations démarre.
Pour une recherche rapide des stations (Quick Scan), appuyez sur la touche Tuning + pendant au moins 2 secondes. Le cubo DAB lance automatiquement la recherche de stations sur les canaux 10 à 13. Quick Scan s’affiche d’abord à l’écran, puis la progression de la recherche en %, et le canal DAB. Ensuite, le nombre des stations trouvées s’affiche à l’écran, p. ex. : 10 Serv Le cubo DAB mémorise le nombre des stations disponibles et passe automatiquement à la première station disponible. Français 6.
6.6 Mémorisation et rappel des stations Maintenez appuyée l’une des 6 touches de stations située au-dessus du haut-parleur jusqu’à ce qu’un bip se fasse entendre. La station est alors mémorisée sur cette touche. Pour rappeler la station ultérieurement, appuyez simplement sur la touche de station correspondante. 6.7 Réinitialisation du système DAB (RESET) La réinitialisation du système DAB permet de rétablir l’état à la livraison. Tous les réglages personnels seront effacés.
Pendant la lecture, maintenez l’une des touches Skip appuyée, la recherche démarre. Relâchez la touche lorsque la position souhaitée est atteinte. Français 7.2 Fonction de recherche de piste 7.3 Fonction de répétition 1. Pendant la lecture d’un CD, appuyez deux fois sur la touche Menu. 2. À l’aide de la touche Skip Forward, sélectionnez REP 1 (le titre en cours de lecture est répété à l’infini) ou REP ALL (toutes les pistes seront répétées). 3. Appuyez sur Menu pour valider. 4.
9. Pour mettre fin à la fonction, appuyez deux fois sur MENU puis appuyez aussi souvent que nécessaire sur SKIP FORWARD jusqu’à disparition de l’indication en bas de l’écran. 10. Appuyez ensuite sur la touche MENU pour valider. 7.7 Arrêt momentané du son Pendant la lecture audio, appuyez sur la touche SNOOZE pour couper le son. Appuyez une nouvelle fois sur la touche pour réactiver le son. Mute s’affiche à l’écran. Lorsque le son de l’appareil est coupé (Mute), toutes les autres touches sont inactives. 7.
Français Pour allumer ou éteindre l’alarme, appuyez brièvement sur la touche STANDBY ou sur la touche ALARM correspondante. Pour interrompre l’alarme, appuyez brièvement sur la touche SNOOZE (mode Répétition de la sonnerie). 8.2 Fonction Répétition (SNOOZE) Vous pouvez personnaliser l’intervalle SNOOZE (répétition de la sonnerie). Maintenez enfoncée la touche SNOOZE en l’état désactivé. Sélectionnez la durée souhaitée et mémorisez-la en appuyant sur SNOOZE.
10. Dépannage Attention ! Ne tentez en aucun cas de réparer vous-même l’appareil : vous annuleriez vos droits à la garantie. N’ouvrez pas le boîtier car vous risquez des chocs électriques. Si une défaillance survient, vérifiez d’abord les ponts suivants avant d’emmener votre appareil en réparation. Si vous ne pouvez pas supprimer l’erreur à l’aide de ces recommandations, contactez votre revendeur ou notre service clientèle. « NO DISC » s’affiche. • Insérer un CD.
Tension du réseau : 230 V ~ 50 Hz Entrée AUX : connecteur jack 3,5 mm Lecteur CD : laser de classe 1 Laser Klasse 1 Class 1 laser Product Appareil Laser de Categorie 1 Français 11. Caractéristiques techniques Télécommande RF, type : RC-3, Fréquence de service : 433,92 MHz Pile : batterie au lithium, type CR 2032 Gamme de fréquences FM : 87,5 MHz --- 108,0 MHz DAB : 174 MHz --- 240 MHz Sous réserve de modifications techniques.
12. Conditions de garantie Les droits à la garantie peuvent être exercés dans le contexte suivant, sans que vos droits ne s‘en trouvent affectés : • • • • Les droits à la garantie ne peuvent s‘exercer que dans une période de max. 2 ans à partir de la date d‘achat. Pendant la durée de la garantie, nous procédons gratuitement à la suppression des vices dus à des défauts de fabrication ou de matériaux en procédant à la réparation ou au remplacement de l‘appareil selon le choix que nous aurons décidé.
0918-609-09