
Installation Instructions


Sonos Setup
8
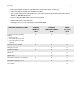
Step 2: Place Sonos products in the rooms of your choice
Place the Sonos products you purchased in the rooms of your choice. You will be prompted to add them to your Sonos system
in step 3.
• If you purchased an all-in-one player (PLAY:1, PLAY:3, PLAY:5), apply power and go to step 3 on page 14.
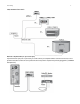
• If you purchased a Sonos CONNECT:AMP, see "Adding a CONNECT:AMP" on page 9 for additional information.
• If you purchased a Sonos CONNECT, see "Adding a CONNECT" on page 10 for additional information.
• If you purchased a Sonos PLAYBAR, see "Adding a PLAYBAR" on page 11 for additional information.
• If you purchased a Sonos SUB, see "Adding a SUB" on page 12. for additional information.
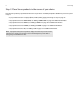
Note: If you prefer to wire your Sonos products, simply connect them to your router or to the
Ethernet port on another Sonos product (or a live network wall plate if you have built-in
wiring) using a standard Ethernet cable.