
Operation Manual


Product Guide
12
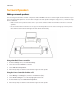
• Be sure that your cable/DSL modem is connected to the router’s WAN (Internet) port.
• Temporarily remove any other components that are wired to your network.
• Connect an Ethernet cable from the computer directly to the back of the Sonos component, and then connect another
Ethernet cable from the Sonos component directly to one of the LAN ports on your router.
• When you make a change to your network configuration, you may need to power cycle the Sonos component by
unplugging the power cord, and then plugging it back in.
• If you are not using a router, you can visit our Web site at http://faq.sonos.com/norouter for more information.
3.
Check the wiring
Check the link/activity lights on both the router and the Sonos component. The link lights should be lit solid and the activity
lights should be blinking.
• If the link lights are not lit, try connecting to a different port on your router.
• If the link lights still do not light, try using a different Ethernet cable.
Not all rooms are visible
You are probably experiencing wireless interference. Change the wireless channel your Sonos system is operating on by
following the steps below.
• Using a handheld Sonos controller: From the Settings menu, touch Advanced Settings, and then Wireless Channel.
Choose another wireless channel from the list.
• Using the Sonos Controller for PC: Select Settings -> Advanced from the Manage menu. On the General tab, select
another wireless channel from the list.
• Using the Sonos Controller for Mac: Select Preferences -> Advanced from the Sonos menu. On the General tab, select
another wireless channel from the list.
It may take several seconds for the switch to take effect. If you have music playing, a short music dropout may occur during
the wireless channel change.