
User Guide Part 1

Sonos Digital Music System User Guide2-8
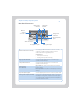
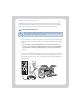
To add a ZonePlayer
1. Place the ZonePlayer in the room you have selected.
2. Attach speakers to your ZonePlayer.
3. If you are making a wired connection, connect a standard Ethernet cable from
either your router, another ZonePlayer, or a ‘live’ network wall plate to any of the
Ethernet switch connections on the back of the new ZonePlayer.
If you are making a wireless connection, skip this step and continue on to step 4.
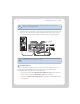
4. Attach the supplied power cord to your ZonePlayer and plug into a wall outlet.
The Mute indicator (green) and the ZonePlayer Status indicator (white) will begin to
flash. (If this ZonePlayer was previously connected to another Sonos Digital Music
System, the ZonePlayer Status indicator may light solid white instead.)
5. Choose one of the following options and then follow the on-screen instructions:
•Use the Sonos Controller to add the ZonePlayer to your Sonos Digital Music Sys-
tem by selecting System Settings→Add a ZonePlayer from the Music menu.
Or,
•Use the Desktop Controller software (Windows users) to add the ZonePlayer to
your Sonos Digital Music System by selecting Zones
→Zone Setup→Add.
Or,
•Use the Sonos Setup Assistant software (Macintosh users) to add the ZonePlayer
to your Sonos Digital Music System by selecting Set up ZonePlayers
→Add
from the Main Menu.
During the setup process, you will be asked to press and release the Mute and Volume
Up buttons simultaneously on the ZonePlayer you are adding to the Sonos Digital
Music System.
• You may release the buttons as soon as the Mute indicator (green) and the Zone-
Player Status indicator (white) start to blink alternately (this takes approximately
one second).
• When the ZonePlayer has been successfully added to your music system, the
Mute indicator will go out and the ZonePlayer Status indicator will change to
solid white.