
User's Guide

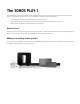
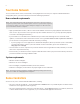
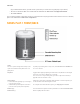
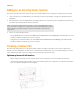
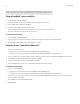
Table Of Contents

Product Guide
4
Selecting a Location for Your PLAY:1
You can locate a SONOS PLAY:1 just about anywhere. For maximum enjoyment, we have a few guidelines:
• The PLAY:1 is designed to work well even when placed next to a wall or other surface. For optimum performance,
maintaining more than 1 inch (2.5 cm) clearance around the back of the unit is recommended.
• Care should be taken if placing the PLAY:1 close to an older CRT television. If you notice any discoloration or
distortion of your picture quality, simply move the PLAY:1 further from the television.
• The PLAY:1 is humidity-resistant so you can use it in the bathroom; however it is not water-resistant so don’t position
it near water or leave it outside during a rain storm.
Wall Mounting the PLAY:1
The SONOS PLAY:1 has a 1/4 inch (6.75mm) integrated, threaded (20 threads per inch) mounting hole. If desired, you can
easily wall mount your PLAY:1 using a suitable mounting bracket (not included). Simply choose a location that’s close to an
electrical outlet, taking care to avoid heat, steam, dripping water or hidden wiring, and follow the instructions included with
the wall mount kit.
Threaded mounting hole
1/4 inch (6.75mm) /
20-thread
The SONOS PLAY:1 has an integrated mounting hole on the back of the unit so it can be
wall-mounted if desired (mounting bracket not included.) See
"Wall Mounting the PLAY:1"
on page 4 for more information.
Ethernet switch connector Use Category 5 Ethernet cable to connect to a router, computer, or additional network
device such as a network-attached storage (NAS) device.
AC power (mains) input
(~100-240 V, 50-60 Hz)
Use the supplied power cord to connect to a power outlet.
Insert the power cord firmly into the PLAY:1 until it is flush with the bottom of the unit.
Note: Be sure the wall mount bracket you purchase will support at least 10lbs. (4.5 kgs).