THIS DOCUMENT CONTAINS INFORMATION THAT IS SUBJECT TO CHANGE WITHOUT NOTICE. No part of this publication may be reproduced or transmitted in any form or by any means, electronic or mechanical, including but not limited to photocopying, recording, information retrieval systems, or computer network without the written permission of Sonos, Inc. Sonos and all other Sonos product names and slogans are trademarks or registered trademarks of Sonos, Inc. Sonos Reg. U.S. Pat. & Tm. Off.
Sonos SUB The Sonos SUB™ takes your audio experience to the next level when you add this wireless subwoofer to an existing Sonos room. • Instantly adds a dimension of deep bass impact to your audio listening experience. • Allows placement anywhere because it’s wireless and compact—position it vertically or horizontally on any floor surface. Note: The Sonos SUB is designed for use with any amplified Sonos player, including the PLAYBAR®, PLAY:1®, PLAY:3®, PLAY:5®, CONNECT:AMP™ or ZP100.
2 Product Guide The Sonos App You can use the free Sonos app with any compatible device, including: • Sonos app (Android)—Android 4.0 and higher; certain features require later versions. Touch the Play Store or Market button on your Android device to download the free Sonos app from Google Play. • Sonos app (iOS)—iPhone, iPad and iPod touch running iOS 8.0 or later; certain features may require later versions.
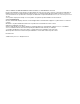
3 Sonos SUB SUB Bottom/Side Acoustic slot Status indicator Join button Ethernet port AC Power (Mains) Join button Press the Join button to associate the SUB with your Sonos Wireless HiFi System. Acoustic slot The top of the acoustic slot doubles as a handle so you can lift it. SUB placement: Make sure at least one side of the slot is free from obstruction. If you place it vertically against a wall, do not block the front opening.
4 Product Guide AC power (mains) input Use only the supplied power cord to connect to a power outlet (using a third party power cord will void your warranty). Be sure to use the proper power adapter for your country. Push the power cord firmly into the SUB until it is flush with the surface. Adding the SUB to Sonos You can easily add the Sonos SUB to an existing Sonos system. • You can pair the SUB with any amplified Sonos player, including a PLAYBAR, CONNECT:AMP, PLAY:1, PLAY:3, PLAY:5, or ZP100.
5 Sonos SUB • The SUB is designed to be located on the floor. You can place it in a corner, against the wall, behind, under, or next to any piece of furniture on any kind of floor surface. Note: The SUB contains strong magnets. Don’t place the SUB near equipment that is sensitive to magnetic fields. 3. Attach the power adapter and plug in the SUB. Be sure to push the power cord firmly into the SUB until it is flush with the surface. 4.
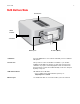
6 Product Guide Attaching the feet for horizontal placement If you are going to use your SUB placed horizontally on a smooth floor, the Sonos SUB includes four (4) permanent felt feet you can attach to the corners of the unit. If you are laying the SUB down on a rug or using it vertically, there’s no need to adhere the felt feet. Note: The felt feet are not adjustable—a strong adhesive will keep them permanently attached to the SUB once you apply them.
7 Sonos SUB SUB Settings The SUB’s settings are determined during the initial setup process. If you wish to make changes, follow the steps below to adjust how the SUB works with the associated Sonos product or stereo pair. Changing SUB Settings Using the Sonos app on a mobile device 1. Select Settings -> Room Settings. 2. Select the room that is associated with the Sonos SUB. It appears as Room (+SUB) on the Room Settings menu. 3. Select Advanced Audio -> SUB Settings. 4.
8 Product Guide 5. Choose one of the following options: • SUB: Check to turn the sound from the SUB on; uncheck to turn it off. • SUB Level: Use the slider to increase or decrease the volume of the SUB. (You can use this setting to match the subwoofer level to the level of your main speakers.) • Placement Adjustment (phase): Check or uncheck the box to adjust the phase. • Speaker Size Adjustment (Crossover): This setting only appears when the SUB is associated with a CONNECT:AMP or ZonePlayer 100.
Sonos SUB 9 3. Select the room that is associated with the Sonos SUB. It appears as Room (+SUB) on the Room Settings menu. 4. Select the Basic tab, and then select Recalibrate SUB. 5. Follow the prompts to optimize your SUB’s performance: • Select the size of your stereo speakers (CONNECT:AMP or ZP100 only). • Press Play to compare the volume of two test sounds, A and B, and then select No Difference, A is louder or B is louder.
10 Product Guide I have a new router If you purchase a new router or change your ISP (Internet service provider), you will need to restart all your Sonos products after the router is installed. Note: If the ISP technician connects a Sonos product to the new router, you only need to restart your wireless Sonos products. 1. Disconnect the power cord from all of your Sonos products for at least 5 seconds. 2.
11 Sonos SUB LED Explanations Indicator Lights Player State Sonos Product Additional Information Flashing white Powering up BRIDGE, BOOST, CONNECT, SUB, CONNECT:AMP, DOCK, PLAY:1, PLAY:3, PLAY:5, PLAYBAR Solid white (dimly lit) Powered up and associated with a Sonos system (normal operation) BRIDGE, BOOST, CONNECT, SUB, CONNECT:AMP, DOCK, PLAY:1, PLAY:3, PLAY:5, PLAYBAR If desired, when the product is in normal operation, you can turn the white status indicator light on or off from Room Settings
12 Product Guide Indicator Lights Player State Sonos Product Additional Information Solid orange During wireless setup, this occurs while the Sonos open access point is temporarily active. If you are not setting up Sonos, this may indicate warning mode. CONNECT, SUB, CONNECT:AMP, PLAY:1, PLAY:3, PLAY:5, PLAYBAR If the orange light is on AND the player’s volume level automatically reduces, this indicates the player is in warning mode.
13 Sonos SUB 6. Clean only with dry soft cloth. Household cleaners or solvents can damage the finish on your Sonos 7. 8. 9. 10. 11. 12. 13. 14. products. Do not install near any heat sources such as radiators, heat registers, stoves, or other apparatus that produce heat. Protect the power cable from being walked on or pinched, particularly at plugs, convenience receptacles, and the point where they exit from the apparatus. Only use attachments/accessories specified by the manufacturer.
14 Product Guide Feature Description Wireless Connectivity Connects to your home WiFi network with any 802.11 b/g/n router. SonosNet™ Extender Functions to extend and enhance the power of SonosNet, a secure AES encrypted, peer-to-peer wireless mesh network dedicated exclusively for Sonos to reduce WiFi interference. General Side Panel Button (Join Button) Join household Side Panel LEDs Indicate SUB status Power Supply 100 - 240 VAC, 50/60 Hz, auto-switchable Dimensions (H x D x W) 15.3 x 6.