3-861-742-12 80-68385-6 Portable Dual Band PCS Telephone Operating Instructions CM-B1200 CM-B2200 CM-B3200 B2200 01-09draft3 1 8/21/98, 12:11 PM
Before operating your portable dual band telephone, please read this manual thoroughly and retain it for future reference. If your usage includes in-vehicle operation, it is recommended that you refer to the Installation/Connections/Operation manual for the optional accessory kits. DISPOSAL OF LITHIUM ION BATTERY LITHIUM ION BATTERY. DISPOSE OF PROPERLY. You can return your unwanted lithium ion batteries to your nearest Sony Service Center or Factory Service Center.
Rules and regulations The U.S. Federal Communications Commission and the Industry Canada regulate cellular/PCS telephone service in their respective countries. It is important for you, the cellular/PCS telephone user, to observe the applicable regulations when operating your cellular/PCS telephone in either country. In addition to these U.S.
Privacy — As a telephone user, you have come to assume a certain standard of privacy when you place or receive a telephone call via the traditional wireline systems. However, because cellular/PCS telephones utilize radio transmissions to effect calls, the same standard cannot always be assured.
Safety precautions IMPORTANT For safe and efficient operation of your phone, observe these guidelines. Your dual band (analog/digital CDMA) hand-held portable cellular/PCS telephone uses both analog frequency modulation (FM) technology and digital Code Division Multiple Access (CDMA) technology. CDMA is a newer radio frequency (RF) technology than the FM technology that has been used for radio communications for decades. Your dual band portable cellular/ PCS telephone is a radio transmitter and receiver.
For your phone to operate at the lowest power level consistent with satisfactory call quality, please observe the following guidelines: Use only the supplied or approved antenna. Unauthorized antennas, modifications, or attachments could impair call quality, damage the phone, and violate FCC regulations. Your phone has an extendable antenna; extend it fully whenever possible for maximum efficiency. Driving Efficient phone operation Hold the phone as you would any other telephone.
Medical devices Children Consult the manufacturer of any personal medical devices (such as pacemakers, hearing aids, etc.) to determine if they are adequately shielded from external RF energy. Your physician may be able to assist you in obtaining this information. Do not allow children to play with your phone. It is not a toy. Children could hurt themselves or others (by poking themselves or others in the eye with the antenna, for example).
Do not transport or store flammable gas, liquid, or explosives in the compartment of your vehicle which contains your phone or accessories. In the United States, vehicles using liquefied petroleum gas (such as propane or butane) must comply with the National Fire Protection Standard (NFPA-58). For a copy of this standard, contact the National Fire Protection Association, One Batterymarch Park, Quincy, MA 02269, Attn: Publication Sales Division.
Quick Ways to Make Calls Advanced Features Additional Information Making calls ....................................................... 21 Receiving calls ................................................... 23 Storing phone numbers in the Phone Book .. 25 Calling from the Phone Book .......................... 31 Searching the Phone Book ............................... 33 Calling from the Calls List ............................... 36 Sending DTMF signals from the Phone Book . 38 About the Features menu ..
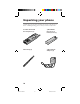
Unpacking your phone Carefully unpack your phone and check the contents using this list. If there is something missing, please contact your nearest Sony dealer.
Getting Started Attaching the hand strap 1 2 11 B2200 10-20draft3 11 8/21/98, 12:11 PM
Looking at your phone 1 2 !¡ !™ 3 4 5 6 7 8 9 END SEND CLR PWR 1 2ABC 3DEF 4GHI 5JKL 6MNO 7PQ RS 8TUV 9WX YZ !£ !¢ 0OPER !º !∞ 12 B2200 10-20draft3 12 8/21/98, 12:11 PM
Telephone 1 Antenna (18) 9 Number buttons, 0 to 9, and / buttons (21, 25, 32) 2 Earpiece Use the number buttons to enter letters and numbers. Press and hold a number button, 0 to 9, for touch dialing. Use the / buttons to move the cursor to the right or left when you are entering letters. 3 Display (14) 4 SEND button (21 to 23) Press to make outgoing calls and to receive incoming calls. 5 Jog Dial™ navigator (19) Push and turn for menu navigation and for changing settings on menus.
Display The top row of the display contains icons that inform you of the current status of your phone. The bottom four rows of the display are for text such as phone numbers, names and operational prompts. Each row displays a maximum of 12 characters. 1 23456 7 888 8 1 Short character display Shows settings such as the number of the currently displayed Features menu, as well as Phone Book and Calls List memory locations.
Charge the battery before using the phone. A new battery is not fully charged. To charge the battery, attach the battery pack to the handset, then connect the supplied AC adapter. Attaching the battery pack 1 2 Hook the battery pack onto the bottom of the phone 1, and ease the battery pack down 2. 2 1 Attach the battery pack by pressing down firmly on the thumb indent. To remove the battery pack 1 Push the battery pack release tab upwards. 2 Lift the top of the battery pack 1, and pull it out 2.
Charging the battery Connect the AC adapter to the phone and the other end to a standard 120V AC outlet as illustrated below. The charging time is about 5 hours. You can charge the battery pack with the phone turned on, but charging will take longer. to an AC outlet display to the connector on the phone (thumb indent faces upwards) When the power is turned on The letters “CH” are shown in the upper left corner of the standby display and flashes. This indicates that the battery pack is being charged.
• When you charge the battery pack, avoid: – charging for long periods of time, since this reduces battery life. – charging in temperatures below 32°F (0°C) or over 104°F (40°C). – charging the battery in direct sunlight or in places with high humidity (such as a bathroom). • Do not use any battery pack other than the one specified in these instructions. • It is normal for the battery pack to become warm during charging or after use. • The supplied AC adapter is not intended to be serviced.
Turning the phone on To use your phone, the power must be turned on. It is preferable to extend the antenna, since this maximizes signal strength and minimizes interference. Pull up Extending the antenna Hold the end of the antenna and pull up until fully extended. To retract the antenna Push the antenna down until it is fully retracted. SEND END PWR CLR PWR Turning the power on Hold down PWR for about one second. A beep sounds and the phone starts searching for a signal.
The Jog Dial™ navigator makes it easy to navigate from one menu to + another. Simply turn the Jog Dial up ( ) or down ( – ) to view the list of menus and submenus. When the flashing arrow ( ) points to the menu item you want to select, press the Jog Dial in toward the phone. Choosing a menu item Operation Illustration Function + Turn – • Scrolls through the current menu, Phone Book or Calls List. Push • Selects the item indicated by the flashing arrow ( ).
Selecting a language Your phone has three interface languages available: English, French and Spanish. To view the menus in French or Spanish, change the menu language as shown below. 1 On the standby display, turn to select “Display”, then push 2 F65 . DISPLAY Sort Book Language Menu Length Turn to select “Language”, . then push The Language menu appears. The current setting is indicated by a check mark (✓) and is displayed in capital letters. 3 4 Turn to select “French” or “Spanish”.
Making calls You can call any number up to 32 digits from within a service area. The out-of-service icon ( ) indicates that you are outside the service area. In the following example, the phone number to be called is 123-456-7890. Use the number buttons to enter the number. 123-456-7890 If you enter the wrong digit, press CLR :Options to back up. To clear all entered digits, press END or hold down CLR to return to the standby display. 2 Press SEND to dial. The phone dials the number you have entered.
To adjust the earpiece volume during a call Turn Turn + – up to increase the volume. down to decrease the volume. Tip You can also adjust the volume using the Sounds menu (see page 43). To mute/unmute the microphone during a call Push and hold . Tip You can also mute the microphone using the Sounds menu (see page 42). To redial the last number On the standby display, press redialed automatically. SEND .
Receiving calls You can receive calls as long as the out-of-service icon ( ) is not icon indicates that you are outside the service area. displayed. The When you receive a call, the ringer sounds and “Incoming Call” flashes. 1 Press SEND to answer the call. When the call is connected, the call timer appears and displays the elapsed call time. 2 Time: 0:01 Press END to end the call when you are finished. The icon disappears and the final elapsed call time flashes for 10 seconds.
If the caller supports caller ID The caller’s phone number appears on the display when you receive a call, if both the caller and the carrier support this feature. Incoming Call From 123-456-7890 If the caller supports caller ID and the number matches a Phone Book entry, the name that you stored with the number (if any) is displayed also. Note When you receive a call waiting alert, the phone number of the caller is displayed if caller ID is supported (similar to a normal incoming call).
Storing phone numbers in the Phone Book Your phone features a built-in Phone Book memory, in which you can store up to 99 (01–99) phone numbers with names. You can dial stored numbers quickly by recalling them from the Phone Book (see page 31). Each phone number can contain up to 32 digits, and each name up to 12 characters. This section shows how to store, edit and erase Phone Book numbers quickly. In the following example, the phone number to be stored is 123-456-7890 and the name is SONY.
5 When you are finished, push phone number and name. to store the A message appears indicating the first available memory location. 6 Push to store the new number in the first available memory location. PHONE BOOK LOCATIONS: 21 used 78 empty If you want to store it in another location, turn to select the desired location or enter the location number, then push . A confirmation message appears followed by the status of the Phone Book.
To enter a hyphen, pause or link In addition to digits, you can insert hyphens, pauses and links into the phone number of a Phone Book entry. Hyphens: Turn off the phone’s autohyphenation feature (see page 68) when you want to enter a hyphen manually, e.g., when you store a foreign number. Pauses: When you want to send DTMF signals (see page 38) for electronic banking, etc., inserting a pause after the first string of digits causes the phone to pause before dialing the second string.
Editing stored information You can edit the name, phone number and memory location of specific entries stored in the Phone Book. 1 On the standby display, turn once. SAVED #S :Calls List :Phone Book :Find Name The Saved #s display appears. 2 Turn down to select “Phone Book”. – The first entry in the Phone Book appears. 3 Turn to select the entry that contains the information you want to edit. The contents of the selected memory location are displayed. 4 Push . The Options menu appears.
Erasing a phone number You can erase stored Phone Book entries. If the selected entry is restricted, you must enter the four-digit lock code before you can erase it (see page 60). 1 On the standby display, turn to select “Phone Book”. – down twice The first Phone Book entry is displayed. 2 Turn to find the Phone Book entry you want to erase. 3 Push Quick Ways to Make Calls The contents of the selected memory location are displayed. . The Options menu appears.
Restricting Phone Book entries You can restrict individual Phone Book entries or the entire Phone Book, so that access can be gained only by entering a lock code (see page 62,63). The phone numbers of restricted entries will not be displayed. 1 Select the Phone Book entry you want to restrict, then push . The Options menu appears. 2 3 L15 My Phone 123-456-7890 :Restrict Turn to select “Restrict”, then push Push entry. to restrict the selected Now the selected entry is restricted.
Calling from the Phone Book You can dial frequently used numbers quickly from the Phone Book using the Jog Dial navigator. Alternatively, by using speed dialing or touch dialing, you only need to press a few buttons to dial these numbers. 1 On the standby display, turn once. The Saved #s display appears. 2 Turn – down to select “Phone Book”. The first entry in the Phone Book appears. 3 Turn to select the desired Phone Book entry.
Speed dialing To dial quickly, you can enter the Phone Book memory location numbers. The phone calls the number stored in the corresponding location. 1 Use the number buttons to enter the memory location number. 2 Press SEND to dial the number. The name and phone number of the memory location appear. The phone dials the number stored in the entered memory location. Touch dialing You can dial a phone number stored in the Phone Book without pressing SEND .
Searching the Phone Book To locate a desired Phone Book entry, you can search by name, phone number or memory location. You can search the Phone Book either alphabetically or for a string of characters. Searching alphabetically When you enter only one character, the phone lists all entries that begin with the entered character. 1 From the standby display, turn once. The Saved #s display appears. 2 Push SAVED #S :Calls List :Phone Book :Find Name .
Searching for a string of characters When you enter two or more characters, the phone searches for entries that contain those characters. The results are displayed starting from the lowest memory location number. 1 From the standby display, turn once. The Saved #s display appears. 2 Push SAVED #S :Calls List :Phone Book :Find Name . The Search display appears. 3 Enter at least two characters. SEARCH FOR NY (Enter Name) :Find 4 Push .
3 Turn push + up to select “Recall Loc#”, then . The Phone Book entry stored in the selected memory location is displayed. If the entered location is empty, a message appears. After a few seconds, the standby display reappears. L15 Phone Book storage location 15 is empty. Tip You can also use the Directory menu to search the Phone Book by memory location (see page 54). Searching for a phone number 1 On the standby display, enter at least the first three digits of the phone number you want to find.
Calling from the Calls List Information on the ten most recent outgoing calls, incoming calls, scratch pad entries and missed calls are stored in the phone’s Calls List. If you call the same number twice in a row, only the most recent call is stored in the Calls List. 1 On the standby display, turn once. The Saved #s display appears. 2 Turn + up to select “Calls List”. Information on the most recent call appears. “Calls List is empty” is displayed if there are no entries.
To view detailed information of Calls List entries You can also view the digits of a phone number that do not fit on the screen, the duration of the call or the time and date of the call by using the Options menu (see step 4 on page 36). To view Select digits that do not fit on the screen View Number the duration of the call Duration the time and date of the call Time/Date Select “Save” from the Options menu (step 4 on page 36) by pushing the Jog Dial navigator.
Sending DTMF signals from the Phone Book You can send DTMF (Dual Tone Multiple Frequency) signals to access electronic services (such as telephone banking) when dialing numbers from the Phone Book. Dual Tone Multiple Frequency is also known as “touch-tone”. A tone is generated when you press a telephone button (number, * or #). It can be used to access answering machines, pagers, telephone banking services, data services and other electronic services.
About the Features menus You can use the Features menus to activate the special features of your phone (e.g., backlighting or display). Menu structure The phone uses a hierarchical on-screen menu structure for setting and editing parameters. For a comprehensive list of submenus and corresponding settings, see “List of menu items” on pages 86 and 87.
3 Turn to select “Backlight”, then push . The Backlight menu appears. The current setting is indicated by a check mark (✓) and is displayed in capital letters. (See page 67 for an additional description on setting the backlight.) 4 Turn to select the setting. The available options appear in a cyclic manner as you turn . 5 Push to enter the new setting. The standby display reappears. To exit from the Features menu Press END or hold down CLR to return to the standby display.
Adjusting the volume You can adjust the volume of the ringer, keybeep and earpiece on the Sounds menu. You can also select the type of sounds heard when the phone rings and when you press buttons. (See page 39 for instructions on how to reach the Sounds menu.) F11 SOUNDS Ringer Vol Mute/UnMute Keybeep Vol Sounds menu Adjusting the ringer volume [F11] 1 Push to select “Ringer Vol.” from the Sounds menu. The Ringer Vol. menu appears. 2 F11 RINGER VOL.
Muting/unmuting the microphone [F12] You can mute/unmute the phone during a call directly, without using . You can also mute/ the Sounds menu, by pushing and holding unmute the microphone during a call using the Sounds menu. This feature is disabled in standby mode. 1 During a call, push to select “Sounds” from the Features menu. F-1 FEATURES Sounds Timers Directory The Sounds menu appears. 2 Push to select “Mute/UnMute”. The following display appears. Now the microphone is muted.
Adjusting the earpiece volume [F14] You can adjust the earpiece volume during a call by turning can also adjust the speaker volume using the Sounds menu. 1 Turn to select “Earpiece Vol” from the Sounds menu, then push . The Earpiece Vol menu appears. 2 . You F14 EARPIECE VOL 7 :Choices To Set Turn up to raise the earpiece volume, and down to lower it. You can select from seven earpiece volume settings, from “1” to “7”. A higher number indicates higher volume. 3 Push to enter the new setting.
Setting the keybeep type [F16] You can set the beep that sounds when you press a button to either a tone or a click. Tones sound similar to DTMF tones and clicks are indicated by single beeps. 1 Turn to select “Key Sound” from the Sounds menu, then push . F16 KEY SOUND TONES :Choices :To Set The Key Sound menu appears. 2 Turn to select the keybeep type. You can select “tones” or “clicks”. 3 Push to enter the new setting. The standby display reappears.
Checking and setting the timers You can check call durations on the Timers menu. You can also set the phone to alert you every minute of a call and make the phone turn itself off automatically. F21 TIMERS All Calls RecentCalls MinuteAlert Timers menu Checking the duration of all calls [F21] You can view the total duration of all calls. This information cannot be reset. 1 Turn to select “All Calls” from the Timers menu, then push . The All Calls display appears.
Setting the minute alert [F23] You can set the phone to alert you ten seconds before every full minute. 1 Turn to select “Minute Alert” from the Timers menu, then push . F F23 MINUTE ALERT OFF :Choices :To Set The Minute Alert menu appears. 2 Turn to select “on” or “off”. 3 Push to enter the new setting. The standby display reappears.
Setting the phone to automatically turn off [F24] You can set the phone to automatically turn itself off after a specified duration. 1 Turn to select “Auto-Off” from the Timers menu, then push . The Auto-Off menu appears. 2 F F24 AUTO-OFF NEVER :Choices :To Set Turn to select the duration before the phone powers off automatically. You can select from five settings: “never”, “in 3 hours”, “in 2 hours”, “in 1 hour” and “in 30 mins”.
Using the Directory You can use the Directory menu to check your phone number, as well as store, erase and edit phone numbers and names in the Phone Book. You can also use this menu to view the Calls List. F31 DIRECTORY My Number Save Erase Directory menu Checking your phone number [F31] 1 Push to select “My Number” from the Directory menu. The My Phone # display appears, showing your phone’s number. 2 Push F31 MY PHONE # 123-456-7890 :Done to exit this feature. The standby display reappears.
4 Use the number buttons to enter the name. Use / to move the cursor or to insert spaces between characters. If you enter the wrong character, press CLR to clear the character highlighted by the cursor. (See the “Alphanumeric table” on page 20.) 5 When you are finished, push phone number and name. to store the A confirmation message appears. 6 Push to store the new number in the first available memory location.
Erasing a phone number [F33] You can erase stored Phone Book entries. If the selected entry is restricted, you must enter the four-digit lock code to erase it (see page 60). 1 Turn to select “Erase” from the Directory menu, then push . The following display appears, prompting you for the Phone Book entry to be erased. 2 F33 to find entry to erase then to select. Turn to select the entry you want to erase, then push .
Editing stored information [F34] You can edit the name, phone number and memory location of specific entries stored in the Phone Book. If the selected entry is restricted, you must enter the four-digit lock code to edit it (see page 60). 1 Turn to select “Edit” from the Directory menu, then push . F34 to find entry to edit then to select The following display appears, prompting you for the Phone Book entry to be edited. 2 Turn to select the entry that contains the information you want to edit.
Searching the Phone Book by name [F35] You can find name entries in the Phone Book by searching alphabetically or for a string of characters. Tip You can also use the Options menu to search the Phone Book by names (see pages 33 and 34). To search alphabetically When you enter only one character, the phone lists all entries that begin with the entered character. 1 Turn to select “Find Name” from the Directory menu, then push . The Search display appears, prompting you for a search string.
To search for a string of characters When you enter two or more characters, the phone searches for entries that contain the entered string. The results are displayed starting from the lowest memory location number. 1 Turn to select “Find Name” from the Directory menu, then push . The Search display appears, prompting you for a search string. F35 SEARCH FOR (Enter Name) :Find 2 Enter at least two characters. 3 Push .
Searching the Phone Book by memory location [F36] 1 Turn to select “Phone Book” from the Directory menu, then push . A display appears prompting you for a search string. 2 Use the number buttons to enter the memory location number. The Phone Book entry that matches the L15 Phone Book search string is displayed. If the storage selected entry is empty, the display location 15 is empty. shows the message “Phone Book storage location XX is empty”. After a few seconds, the standby display reappears.
Viewing the Calls List [F37] You can view Calls List entries easily. 1 Turn to select “Calls List” from the Directory menu, then push . The following display appears, allowing you to view the Calls List. If the Calls List is empty, the display shows the message “Calls List is empty”. 2 Turn F37 for calls list. Then to get each call's time to view the Calls List entries. The most recent entry is displayed first. To view the rest of the ten most recent entries, turn .
Miscellaneous extra features On the Extras menu, you can set the phone to enable touch dialing, redial automatically and answer incoming calls automatically or at the press of any button. You can also use this menu to lock the keypad and to jot down phone numbers. F41 EXTRAS Key Guard Touch Dial Auto-Retry Extras menu Preventing accidental operation [F41] You can lock the keypad from the standby display or using the phone’s menus. Locking the keypad offers low-level security.
Activating touch dialing [F42] If you want to use the touch dialing feature (see page 32), set to “on”. 1 Turn to select “Touch Dial” from the Extras menu, then push . The Touch Dial menu appears. 2 Turn to select “on” or “off”. 3 Push to enter the new setting. F42 TOUCH DIAL ON :Choices :To Set The standby display reappears. Setting the phone to redial automatically [F43] You can set the interval for redialing.
Setting the phone to answer automatically [F44] You can set the phone to answer calls automatically. If you turn autoanswering on, the phone answers incoming calls on the second ring when the phone is used in conjunction with a Sony Hands-Free Car Kit. 1 Turn to select “Auto-Answer” from the Extras menu, then push . F44 AUTO-ANSWER OFF :Choices :To Set The Auto-Answer menu appears. 2 Turn to select “on” or “off”. 3 Push to enter the new setting. The standby display reappears.
Using the scratch pad [F46] Your phone has a scratch pad feature, which is useful for writing down phone numbers temporarily. The phone does not send DTMF tones when you enter digits to the scratch pad. 1 Turn to select “Scratch Pad” from the Extras menu, then push . The Scratch Pad display appears, prompting you to enter a phone number. F46 SCRATCH PAD (enter number) :Options 2 Use the number buttons to enter the digits. 3 Push . The Options menu appears.
Setting security options You can restrict unauthorized access to your phone and the information it holds. In addition, on the Security menu, you can reset menu settings to default and store emergency numbers. Unlike other items on the Features menu, accessing the Security menu requires a lock code when you select it from the Features menu. A typical default lock code is either the last four digits of your phone number or 0000. F-5 SECURITY Enter code for access.
Setting a new lock code [F52] The lock code must be entered every time you want to unlock the phone and also when you want to access restricted numbers. 1 Turn to select “New Code” from the Security menu, then push . The Enter New Code display appears prompting you to enter a new lock code. 2 F52 ENTER NEW CODE: ---:Save Code Use the number buttons to enter a lock code. The lock code must be exactly four digits long. 3 Push to store the new lock code in memory. A confirmation display appears.
Restricting a Phone Book entry [F53] You can restrict access to individual Phone Book entries. 1 Turn to select “Restrict #” from the Security menu, then push . The following display appears, prompting you to specify the Phone Book entry to be restricted. F53 for all book entries or enter the location #. 2 Turn to select the Phone Book entry that you want to restrict. 3 Push entry. to restrict the selected Now the selected entry is restricted.
Restricting all Phone Book entries [F54] You can restrict access to all Phone Book entries. All operations that involve Phone Book entries require the four-digit lock code (see page 60). 1 Turn to select “Restrict All” from the Security menu, then push . The Restrict All menu appears. F54 RESTRICT ALL OFF :Choices :To Set 2 Turn to set restriction of all Phone Book entries on or off. 3 Push to enter the new setting. The standby display reappears.
Reverting to default settings [F55] You can reset all menu settings to the defaults. This does not affect Phone Book or Calls List entries. 1 Turn to select “Master Reset” from the Security menu, then push . F55 MASTER RESET 1:To Reset All Settings :Quit The Master Reset display appears. 2 Press 1 to revert to the factory to keep the defaults, or push current settings. F55 -reset- If you revert to the factory defaults, all your custom menu settings are erased.
Erasing all Calls List entries [F57] You can erase all Calls List entries at once. 1 Turn to select “Erase Calls” from the Security menu, then push . The Erase Calls display appears. 2 Press push 1 F57 ERASE CALLS 1:To Erase Calls List :Quit to erase all Calls List entries, or to quit without erasing. If you erase all entries, the following display appears.
Setting display options You can use the features on the Display menu to change the appearance of the on-screen display. F61 DISPLAY Banner Backlight Auto-Hyphen Display menu Setting the banner [F61] You can change what the banner reads. 1 Push to select “Banner” from the Display menu. F61 BANNER ----SONY---- The Banner display appears. The current banner text is displayed. 2 Push :Edit again to start editing. A message prompts you to enter a new banner.
Setting the backlight [F62] You can adjust the duration of the backlight on the display and keypad. 1 Turn to select “Backlight” from the Display menu, then push . The Backlight menu appears. 2 F62 BACKLIGHT FOR 7 SECS :Choices :To Set Turn to select how long the backlight is on after the last press of a button. You can select “for 15 secs”, “for 7 secs” or “off”.
Setting autohyphenation [F63] You can turn the autohyphenation feature on and off. If you turn it on, entered numbers are hyphenated according to the North American Numbering Plan (eleven digits which include a long distance identifier, a three-digit area code, a three-digit community code and a four-digit location code, e.g., 9-999-999-9999). 1 Turn to select “Auto-Hyphen” from the Display menu, then push . F63 AUTO-HYPHEN ON :Choices :To Set The Auto-Hyphen menu appears.
Setting your phone’s language [F65] See page 20 for information regarding the Language selection menu. Setting the menu length [F66] You can set the menu length (long or short). The short menu displays only the most common items on the Features menu; the long menu displays all items. 1 Turn to select “Menu Length” from the Display menu, then push . The Menu Length menu appears. 2 Turn F66 MENU LENGTH LONG :Choices :To Set to set the menu length. You can select “short” or “long”.
Adjusting network settings On the Network menu, you can set the phone to alert you when the roaming status changes, when a call is dropped, or when enhanced voice privacy is lost. You can set how NAM’s (Number Assignment Modules) are switched, and also activate new services. NAM’s are phone identifier numbers associated specifically with your phone. For example, you may have both a business phone number and also a personal phone number associated with your phone. F71 NETWORK Roam Alert Drop Alert Priv.
Setting the roaming alert [F72] Your phone is roaming when you use it outside of the home area. Roaming access to a different carrier and the types of calls you can make varies with the agreement between your “home” carrier and the current serving carrier. Check with your service provider for details about roaming in a specific area. 1 Push to select “Roam Alert” from the Network menu. The Roam Alert menu appears. 2 Turn to select “on” or “off”. 3 Push to enter the new setting.
Setting the drop alert [F73] If the signal fades, your phone may drop the ongoing call. You can choose to be alerted by an audible alarm when a call is dropped. 1 Turn to select “Drop Alert” from the Network menu, then push . F73 DROP ALERT OFF :Choices :To Set The Drop Alert menu appears. 2 Turn to select “on” or “off”. 3 Push to enter the new setting. The standby display reappears. When a call is dropped The following display appears. A beep will sound if you have turned the drop alert on.
Setting the voice privacy alert [F74] A display appears to indicate if enhanced voice privacy is lost during a call. You can choose to have an audible alarm accompany this display. 1 Turn to select “Priv. Alert” from the Network menu, then push . The Priv. Alert menu appears. 2 Turn to select “on” or “off”. 3 Push to enter the new setting. F74 PRIV. ALERT OFF :Choices :To Set The standby display reappears.
Switching NAM’s automatically [F75] Your phone allows you to store up to two NAM’s (Number Assignment Modules). To add or remove NAM’s, contact your service provider who will change the NAM’s for you. You can set the phone to switch between them automatically. The phone switches from one NAM to the other if it enters a service provider’s coverage area that matches one of your NAM settings. To switch manually, see “Switching NAM’s manually” below. 1 Turn to select “Auto-N.A.M.
Activating phone services (OTASP) [F77] You can use the OTASP (Over-The-Air Service Provisioning) activation feature to self-activate your phone with a new service. Contact your service provider to see if this service is available in your area. Turn to select “Activation” from the Network menu, then push . The Activation menu appears. 2 ACTIVATION on Block A :Choices :To Set Turn to select which system block to activate the service on, then push .
System Preference [F78] Activate the “Home Only” option to ensure that while you are in your home system area, your phone will bypass any other system’s signal that may be stronger than your home system’s signal. This option will help you to avoid higher costs or other calling problems. 1 Turn to select “System Pref.” from the Network menu, then push . F78 NETWORK Activation Force Call System Pref The System Pref. menu appears. 2 Turn to select “Standard” or “Home Only”.
Using the Short Messaging Service This section contains information on the Short Messaging Service (SMS). This feature may allow you receive “text” messages as long as there are enough memory locations available. Contact your service provider to see if this service is available in your area. Receiving messages To receive messages, the phone must be turned on.
If the memory becomes full The phone issues a warning when the memory is approximately 75% full. At this point, you should erase expendable messages (see page 82). Memory is almost full. Please read new messages If the memory becomes completely full or your phone does not have enough memory to receive an incoming message, new messages are rejected and the following display appears. Msg Memory is full. Last Msg(s) rejected. Accessing messages 1 Press from the standby display.
3 To proceed to the next message, push when you reach the end of the message. The Options menu appears. To return to the standby display, press END . 4 Turn to select “Next Msg”, then push The next message is displayed. If there are no more messages, the Messages display reappears. . There are no new text messages. :OK To read old messages 1 From the Messages display, turn “Old Text”, then push . to select 2 Turn to scroll through the list of old messages.
To protect a text message You can lock a message to protect it from being erased. 1 After reading a message, push . OPTIONS Erase Msg Send Next Msg The Options menu appears. 2 Turn to select “Lock Msg”, then push . Message now locked until "Erase Msg" is selected. The following display appears and the message is now locked. Note The phone does not erase locked messages automatically. When there is not enough memory for incoming messages, you must erase the locked messages manually.
To save the callback number 1 After reading a message, push . OPTIONS Erase Msg Send Next Msg The Options menu appears. 2 Turn to select “Save Number”, then push . A message appears prompting you for a name to accompany the number. 3 Use the number buttons to enter the name. If you press the same button in quick succession, the letter you just entered changes. (See the “Alphanumeric table” on page 20.) Use / or to move the cursor and to insert spaces between characters.
To erase a text message 1 After reading a text message, push . OPTIONS Erase Msg Send Next Msg The Options menu appears. 2 Turn to select “Erase Msg”, then push . The message is erased. To erase all old text messages 1 Turn down to select “Erase Old” from the Messages display, then push . – If the Messages display is not shown, press , then select “Erase Old”. 2 Press 1 to erase all old messages. To go back to the Messages display without erasing the messages, push .
Reading voice mail notification messages 1 From the Messages display, turn “Voice”, then push . A message appears indicating the number of voice messages stored in your voice mailbox. Press CLR to go back to the Messages display. 2 Turn to select You have 15 new messages at 123-456-7890 to scroll through the message. A hollow box ( ) indicates the end of the message. To dial a callback number After reading a voice mail notification message, push The Options menu appears. 2 Turn .
To erase a voice message 1 After reading a voice mail notification message, push . The Options menu appears. 2 Turn OPTIONS Erase Msg Send Save Number to select “Erase Msg”, then push The voice mail notification message is erased. The Messages display reappears, indicating that there are currently no voice mail notification messages stored in memory. MESSAGES 0 Voice 8 New Text 3 Old Text 84 B2200 77-84draft3 84 .
Troubleshooting Problem Possible solutions Page • The phone is off. Turn the phone on. 18 • Battery is fully discharged. 16 Recharge the battery. • Battery may not be completely attached. 15 Securely attach the battery. Out-of Service • The phone is outside the service area, or the 18 icon ( ) appears. signal is too weak. Extend the antenna fully. • Check NAM settings on the Network menu. 74 If you set “Auto-NAM” to “off” and you are using two NAM’s, the phone may be ignoring an available service.
List of menu items This section lists the Features menu and its submenus. Use these to set the various parameters that pertain to the operation of the phone. For details on how to navigate from one menu to another, see “About the Features menus” on page 37. Menu Item Settings Page Submenu F-1 Sounds F11 Ringer Vol.
Menu Item Settings Page Submenu F-5 Security F51 Lock Phone never / on power-up / right now 60 F52 New Code 0000 61 F53 Restrict # No default restricted numbers 62 F54 Restrict All on / off 63 F55 Master Reset F56 Erase Book — — 64 64 F57 Erase Calls — 65 F58 Emergency # No default numbers for #1 to #3 65 F61 Banner F62 Backlight No default banner off / for 7 secs / for 15 secs / always on 66 67 F63 Auto-hyphen on / off 68 F64 Sort Book by loc.
Specifications Frequency range CDMA Transmit: CDMA Receive: FM Transmit: FM Receive: 1851.25 to 1908.75 MHz 1931.25 to 1988.75 MHz 824.04 to 848.97 MHz 869.04 to 893.97 MHz Dimensions (h/w/d) 5.7 x 2.0 x 1.5 inches (146 x 50 x 37 mm) (not including antenna) Mass (weight) Approx. 7.
Optional accessories QN-002BCD Dual Slot Battery Charger QN-003BPLH Hi-Cap Li-Ion Battery Pack QN-004BPLS Slim Li-Ion Battery Pack QN-008CLA Rapid Charging Cigarette Lighter Adapter QN-009TA Travel Adapter QN-010LC Carrying Case (for CM-M1300, B1200, S1100 series telephones) QN-012DAS FoneBook PLUS Software with Interface Cable QN-013HC Auto Travel Holder QN-016SKT Starter Kit (QN-010LC Carrying Case, Single Slot Charging Stand, Rapid Charging Cigarette Lighter Adapter) QN-017SKT Starter Kit (QN-019LC Carr
Glossary A D Automatic answer Dropped call Feature that automatically answers calls. A call terminated because of a deep, long fade or because the user left the coverage area. Automatic NAM Feature that automatically selects an available NAM that matches the current serving system (carrier). Automatic retry Feature that automatically redials a call when a “System Busy” indication is received. B DTMF Dual Tone Multiple Frequency, also known as “touch-tone”.
K N Keyguard NAM A feature that allows you to lock the phone’s keypad for low level security. Number Assignment Module. Portion of your telephone’s memory programmed to contain information about your subscription to the carrier. Your telephone can have up to two NAM’s. Lock Prevents unauthorized calls by requiring the user to enter a code to use the phone. Even if the phone is locked, you can call any of the emergency numbers or answer incoming calls.
S V Scratch pad Voice mail Allows you to enter a number and store it in the Calls List. An extended service, offered by carriers, that allows you to retrieve voice mail messages stored in your voice mailbox. Check with your carrier for details. Service area Region covered by a cellular/ PCS service. Also see “Coverage area”. SMS Short Messaging Service. An extended service offered by carriers that allows you to receive text messages on your phone. Check with your carrier for details.
Index A D AC adapter 10, 16 Antenna 18 Automatic Answer 58 Hyphenation 68 Redial 57 Retry 57 Dialing.
F Finding.
Quitting. See Power R Receiving Calls 23 Messages 77 Voice mail 83 Recent number memory Calling recent numbers 36 Clearing call memory 64 Redialing Auto-retry 57 Last dialed number 22 Restriction 30, 60 Ringer Speaker 12, 13 Volume 41 Roam Roam icon 71 Roaming agreement 71 Rules and regulations 3 S Safety precautions 5 Scratch pad 59 Scrolling Menus 19 Message 78 Message list 79 Searching For a message 79 For a name 52 For a number 33-35 Security code.
SONY Wireless Hotline Number (USA only) If you have any questions or comments, please call: SONY WIRELESS HOTLINE 1-800-578-SONY (7669) Visit our website at www.sony.