3-856-767-21 (1) Operating Instructions f CDP-CX270 CDP-CX90ES 1996 by Sony Corporation
WARNING To prevent fire or shock hazard, do not expose the unit to rain or moisture. To avoid electrical shock, do not open the cabinet. Refer servicing to qualified personnel only. This symbol is intended to alert the user to the presence of uninsulated “dangerous voltage” within the product’s enclosure that may be of sufficient magnitude to constitute a risk of electric shock to persons.
TABLE OF CONTENTS Getting Started Unpacking ............................................................................................................................ Hooking Up the System ..................................................................................................... Controlling Another CD Player (Player Control) .......................................................... Inserting CDs ...................................................................................................
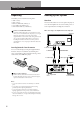
Getting Started Unpacking Check that you received the following items: • Audio cord (1) • Video cord (1) • Remote commander (remote) (1) • Sony SUM-3 (NS) batteries (2) • CD booklet holders (2) and label (1) How to use the CD booklet holder Hooking Up the System Overview This section describes how to hook up the CD player to a TV and an amplifier. Be sure to turn off the power of each component before making the connections.
Getting Playing Started CDs When connecting to an amplifier without a video input jack When connecting to an amplifier with a video input jack CD player CD player LINE IN VIDEO VIDEO IN L L R R AUDIO IN When connecting to an amplifier without a video input jack To an AC outlet To LINE OUT MONITOR OUT OUT Amplifier To MONITOR OUT CD player LINE IN To video input TV MONITOR OUT TV INPUT OUT L L R R VIDEO L AUDIO R Amplifier To audio input CD To an AC outlet Amplifier L R • If
Getting Started • If you have a digital component such as a digital amplifier, D/A converter, DAT or MD Connect the component via the DIGITAL OUT (OPTICAL) connector using an optical cable (not supplied). Take off the cap and plug in the optical cable.
Getting Playing Started CDs 4 What cords will I need? • Audio cord (1) (supplied with the player to be connected) • CONTROL A1 cord (1) (not supplied) 1 Connect the players with the audio cord (see also “Hookups” on page 5). CDP-CX200 etc. CDP-CX270/CX90ES LINE IN 2 LINE OUT Connect the AC power cord of the second player to AC OUTLET on the rear of this player. When you turn on both players and this player detects the second player, “REMOTE” appears in the second player‘s display.
Getting Started 3 Inserting CDs You can insert up to 200 discs into this player. POWER Front cover OPEN Turn the JOG dial until you find the disc slot where you want to insert a disc, while checking the disc number (written beside every five slots and also indicated in the display). JOG Disc number Disc slot at the loading position The disc number at the loading position appears in the front panel display.
Getting Playing Started CDs After inserting the disc, you can replace the disc number with the original disc title (see “Labeling Discs” on page 23) to locate it easily when you start playing. ALL DISC S CD2 SONYHITS Sony Band DISC 93 ART. 5 Repeat Steps 3 and 4 to insert more discs. 6 Close the front cover by pushing up the cover until it clicks. Removing CDs After following Steps 1 through 3 of “Inserting CDs” on page 8, remove the discs. Then close the front cover.
Basic Operations Playing a CD 2 3 4 5 ENTER DISC/CHARACTER PLAYER SELECT ENTER INPUT SORT CONTINUE SHUFFLE PROGRAM REPEAT TIME/TEXT GROUP 1 GROUP 2 GROUP 3 GROUP 4 HIT LIST GROUP 5 GROUP 6 GROUP 7 GROUP 8 X-FADE AMS POWER CHECK CLEAR TIMER OFF PLAY • See pages 4–6 for hookup information. • Make sure you have inserted the discs correctly as indicated on page 8. • You can play all tracks on a disc or on all discs in the original order (Continuous Play).
Basic Operations 5 When you turn off the player The player remembers the last playing disc and the play mode [Continuous, Shuffle (see page 18) or Program (see page 18)]. When you turn on the player again, therefore, the player is ready to play the same disc in the same play mode. Press ENTER to start playing. The selected disc is set to the playing position, and the player plays all the discs from the selected one (ALL DISCS) or all the tracks once (1␣ DISC). Adjust the volume on the amplifier.
Playing CDs Using the Front Panel Display You can check information about the disc using the front panel display. Front panel display Display information while playing a disc Each time you press the TIME/TEXT button, the front panel display shows the current disc information as shown below. Disc title TIME/TEXT ALL DISC S NEXT DISC 1O2 CD-TEXT CD2 Disc number/ Track number/ Playing time SONYHITS 93 1 1.52 DISC TRACK MIN SEC Press TIME/TEXT.
Getting Playing Started CDs You can adjust the on-screen display position on the TV screen Using the On-Screen Display If you connect the player to your TV as indicated on pages 4 and 5, you can control the player while checking information with the on-screen display on the TV screen. After connecting the player and TV, select the video input on the TV. If you have a Sony TV, you can select the video input by pressing the TV/VIDEO button on the supplied remote.
Playing CDs Selecting a disc when connected to the second player 1 Press PLAYER SELECT to select the player in which the disc you want is inserted. When you select the second player, “2nd PLAYER” appears in the front panel display. 2 Sorting Out Discs in Three Ways (Sort) When locating discs, you can select three sorting methods, by disc number, disc title and artist name.
Getting Playing Started CDs When locating a disc by disc number 1 Press SORT repeatedly to select the sorting 2 method. Press M/m on the remote repeatedly to select the first character of the disc title you want. Front panel display Front panel display First character ALL DISC S DISC CD2 SONYHITS SORT/No. 93 ALL DISC S CD2 SONYHITS Sony Band S ART. On-screen display The on-screen display shows disc titles from disc number 91.
Playing CDs 2 Press M/m on the remote repeatedly to select the artist name. 3 Turn the JOG dial (when using the remote, press Â/µ repeatedly) to select the disc you want. 4 Press ENTER to start playing the disc. Locating a Specific Track or a Point in a Track You can quickly locate any track while playing a disc using the ≠/± (AMS: Automatic Music Sensor) buttons or number buttons on the remote. You can also locate a specific point in a track while playing a disc.
Getting Playing Started CDs To locate Press the next or succeeding tracks ± repeatedly until you find the track the current or preceding tracks ≠ repeatedly until you find the track a specific track directly Z TRACK/SPACE, the number button of the track, and then ENTER. When you locate a track with a number over 10, press the tens digit first, then the ones digit.
Playing CDs You can go to the next disc during 1␣ DISC Shuffle Play Playing in Random Order (Shuffle Play) Press DISC SKIP +. You can have the player “shuffle” the tracks and play in random order. The player shuffles all the tracks on all discs or on the disc you specified. SHUFFLE · ENTER JOG You can specify the next disc to play during 1␣ DISC Shuffle Play Turn the JOG dial to specify the next disc. After all the tracks on the current disc are played in random order, the next disc starts playing.
Getting Playing Started CDs 1 2 The programs remain even after Program Play ends Press PROGRAM until the program number you want (PROGRAM␣ 1, 2 or 3) appears in the front panel display. If a program is already stored in the selected program number, the last step of the program appears in the front panel display. When you want to erase the whole program, hold down CLEAR until “ALL CLEAR” appears in the front panel display (see page 20). When you press the · button, you can play the same program again.
Playing CDs 3 Press the number button of the disc. DISC PROGRAM1 2O CD2 *DISC-2O* DISC-[ 2O] 4 To program a whole disc, skip this step and go to Step 6. Press TRACK/SPACE. DISC PROGRAM1 2O CD2 *DISC-2O* TRACK-[ _] 5 Press the number button of the track. Checking the programmed order You can check your program before or after you start playing. Press CHECK. Each time you press this button, the front panel display shows the disc and track numbers of each step in the programmed order.
Getting Playing Started CDs Creating programs while checking the on-screen display information While creating programs You can select the discs/tracks by checking the titles. While selecting a disc, the on-screen display shows the disc titles in the order of the disc number. Disc number Playing Alternately (G-Fade Play) When you connect the second player (see page 6), you can play the discs/tracks in this player and those in the second player alternately in Continuous Play and Shuffle Play modes.
Playing CDs To cancel G-Fade Play Press G-FADE again. Notes • You cannot use the Sort and Group Play functions during G-Fade Play. • During G-Fade Play, the PLAYER SELECT, INPUT and ENTER buttons and the JOG dial do not work. • You cannot use the G-Fade Play function when connected to the CD player CDP-CX153.
Storing Information About CDs (Custom Information Locating Files) a About Scene or CDs Track (Custom You Want Files) Storing When you select a CD-TEXT disc What You Can Do With the Custom Files • The CD-TEXT information (disc title, artist name and track titles) is stored as the Disc Memo automatically. If an entry has more than 16 characters, the first 16 characters are stored (see also page 12).
Storing Information About CDs (Custom Files) 2 Press INPUT. 3 Turn the JOG dial until “DISC MEMO” appears in the front panel display, then press ENTER. The flashing cursor (“) appears. 4 Turn the JOG dial until the character you want appears in the front panel display. The cursor disappears and the first space for the disc title flashes. As you turn the JOG dial clockwise, the characters appear in the following order. Turn the JOG dial counterclockwise to go back to the previous character.
Storing Information Locating a About Scene or CDs Track (Custom You Want Files) Labeling discs/tracks using the remote Z &!? ABC DEF GHI JKL MNO PRS TUV WXY QZ DISC/CAPS TRACK/SPACE GROUP/DEL Characters assigned to each number button Number buttons Example: To select the letter E Press the number button 3 twice. ENTER INPUT CLEAR nD nE Press 3. nF Press 3. Â/µ Press 3. To insert a space, press TRACK/SPACE once.
Storing Information About CDs (Custom Files) If you have made a mistake while inputting a character Grouping Discs (Group File) To correct a character which has been input 1 Press = or + until the cursor moves next to the incorrect character. ALL DISC S CD2 AB SONYHE S New Artist ART. You might find that too many discs make it hard to find the disc you want. This player has a feature that lets you classify discs into eight groups and label each group with category etc.
Storing Information Locating a About Scene or CDs Track (Custom You Want Files) 6 7 8 Press ENTER to select the group. The group file indication lights up in the front panel display and the flashing cursor (“) appears to indicate the first space for the Group Memo. Input the group name (Group Memo) following Steps 4 through 6 in “Labeling discs with disc titles” on page 23. Press INPUT to store the Group Memo.
Storing Information About CDs (Custom Files) Storing Custom File Information Using a Keyboard You can store the Disc Memo and Group File for one disc sequentially using an IBM-compatible PC keyboard* for USA (not supplied). 4 Input the characters you want, then press the ENTER key. To input the other information, repeat Steps 3 and 4. 5 Press the Esc key to store the information. You can delete all characters of selected item * Power consumption must be 120 mA or less.
Storing Information Locating a About Scene or CDs Track (Custom You Want Files) If you want to recover the track, press CLEAR again. 5 Repeat Steps 3 and 4 to delete more tracks. You can recover all the tracks you have deleted Putting tracks into the Hit List Press HIT LIST while playing your favorite track. “LIST IN” appears in the front panel display. Playing tracks in the Hit List 1 Press HIT LIST before you start playing.
Additional Information On transportation Precautions On safety • Caution — The use of optical instruments with this product will increase eye hazard. • Should any solid object or liquid fall into the cabinet, unplug the player and have it checked by qualified personnel before operating it any further. • When transporting the player, press OPEN then remove all the discs from the player and turn the power off.
PlayingAdditional CDs in Various Information Modes Troubleshooting Specifications If you experience any of the following difficulties while using the player, use this troubleshooting guide to help you remedy the problem. Should any problem persist, consult your nearest Sony dealer. Compact disc player Laser Semiconductor laser (λ = 780 nm) Emission duration: continuous Laser output Max 44.
Index by monitoring 17 by observing the display 17 directly 17 discs 13 using AMS 17 Index A, B AMS 16 Automatic Music Sensor 16 C CD-TEXT 12 Connecting 4 Continuous Play 10 Controlling another CD player 6 G-Fade Play 21 Custom Files Delete File 28 Disc Memo 23 Group File 26 Hit List 29 what you can do with M, N Memo Scan O On-screen display Playback Continuous Play 10 G-Fade Play 21 Group Play 27 Program Play 18 Repeat Play 17 Shuffle Play 18 using a timer 22 Player Control 6 Program changing 20 chec