a This is the Internet version of the user’s guide © Print only for private use.
Contents Getting to Know Your Phone . . . . . . . . . . . . . . . . . . 4 User Guide Symbols . . . . . . . . . . . . . . . . . . . . . . . . 5 Calling . . . . . . . . . . . . . . . . . . . . . . . . . . . . . . . . . . 16 Messaging . . . . . . . . . . . . . . . . . . . . . . . . . . . . . . . 33 Imaging . . . . . . . . . . . . . . . . . . . . . . . . . . . . . . . . . 41 Entertainment . . . . . . . . . . . . . . . . . . . . . . . . . . . . 43 Connectivity . . . . . . . . . . . . . . . . . . . . . . . . . .
Sony Ericsson GSM 850/1900 First edition (March 2005) This user guide is published by Sony Ericsson, without any warranty. Improvements and changes to this user guide necessitated by typographical errors, inaccuracies of current information, or improvements to programs and/or equipment, may be made by Sony Ericsson at any time and without notice. Such changes will, however, be incorporated into new editions of this user guide. All rights reserved.
and 6,011,554; Canadian Pat. No. 1,331,057, United Kingdom Pat. No. 2238414B; Hong Kong Standard Pat. No. HK0940329; Republic of Singapore Pat. No. 51383; Euro.Pat. No. 0 842 463(96927260.8) DE/DK, FI, FR, IT, NL, PT, ES, SE, GB; and additional patents are pending worldwide. Java and all Java based trademarks and logos are trademarks or registered trademarks of Sun Microsystems, Inc. in the U.S. and other countries. End-user license agreement for Sun™ Java™ J2ME™.
Getting to Know Your Phone Earpiece Screen Selection key Back key Selection key Navigation key Clear key and On/Off button Microphone Stereo headset and charger connector 4 This is the Internet version of the user’s guide © Print only for private use.
User Guide Symbols The following instruction symbols appear in this user guide: % See also page ... } Use the navigation key to scroll and select % 12 Navigating the Menus. Note This symbol indicates that a service or function is network- or subscription-dependent. Because of this, all menus may not be available in your phone. Consult your service provider for more information. Assembling Your Phone Insert the SIM card, attach and charge the battery to use your phone.
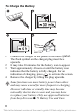
To Remove the Cover and Insert the SIM Card 6 This is the Internet version of the user’s guide © Print only for private use.
1 2 3 4 5 6 Push to release the cover. Lift the cover up. Insert the SIM card. Make sure the SIM card is placed under the silvery holders. Place the battery in the phone with the label side up and the connectors facing each other. Place the cover on the phone. Push to secure the cover. PIN (Personal Identification Number) You may need a PIN (Personal Identification Number) from your service provider to activate the services in your phone.
To Charge the Battery 1 2 3 4 Connect the charger to the phone at the flash symbol. The flash symbol on the charger plug must face upwards. It may take 30 minutes for the battery icon to appear. Wait approximately 4 hours or until the battery icon indicates that the battery is fully charged. For an indication of charging, press to activate the screen. Remove the charger by tilting the plug upwards. Some functions use more battery power than others and may cause a need for more frequent re-charging.
To Turn the Phone On and Off 1 2 3 4 Press and hold to turn on or off. Enter your SIM card PIN, if you have one. At first start-up, select the language for phone menus. } Yes if you want the setup wizard to help you with instructions and tips or } No. The setup wizard is also available in the menu system, } Settings } General tab } Setup Wizard. To Make and Receive Calls Enter the area code and phone number } Call to make the call. } End Call to end the call.
Icons A selection of icons in standby and on the desktop. Icon Description Tells you the strength of the GSM network signal. Tells you the status of the battery. Press to go to the desktop from standby % 12 Navigating the Menus PlayNow™ – download and play music. Internet Services – gives you access to Internet services. Entertainment – games, MusicDJ™, sound recorder. File Manager – handling of pictures, sounds, video, themes, games, applications and other files.
Menu Overview PlayNow™ Internet Services* Entertainment File Manager Messages Organizer Media Player Phonebook** Contacts** Settings Pictures Sounds Videos Themes Games Applications Other Games MusicDJ™ Record Sound Write New Inbox My Friends* Call Voicemail Email Drafts Templates Outbox Sent Items Saved Items Settings Options Speed Dial My Business Card Groups SIM Numbers Special Numbers Advanced New Contact SIM Numbers** Calendar Tasks Notes Applications Alarms Timer Stopwatch Calculator Code
Navigating the Menus The main menus are shown as icons on the desktop. Some submenus include tabs that appear on the screen. • Press the navigation key in the center or in a direction: Press to go to the desktop or to select items. Press , , or to move through menus and tabs. • Press to go back one level in the menus or to end a function or application. Press and hold to return to standby. • Press to select the options shown immediately above these keys on the screen. • Press to delete items.
Help Texts Help texts exist in your phone. To access help texts } Info. More Options } More to enter a list of options. File Manager Files are saved in the folders. Create subfolders to move files to. Unrecognized files are saved in the Other folder. To Manage Files and Folders 1 } File Manager and select a folder. 2 Scroll to a file } More } Manage Files } Move to Folder. 3 Select the folder you want to move the file to, or select New Folder and name the folder } OK.
To Change the Phone Language • } Settings } General tab } Language } Phone Language, select a language. • From standby, press: 0000 for English or 8888 for Automatic language (SIM dependant). To Select Writing Languages 1 } Settings } General tab } Language } Writing Language. 2 Select a language } Save to exit the menu. To Switch Between Writing Languages Press and hold when writing.
To Enter Letters Using T9 Text Input 1 } Messages } Write New } Text Message. 2 For example, if you want to write the word “Jane”, press , , , . 3 If the word shown is the one you want, press to accept and add a space. To accept a word without adding a space, press . If the word shown is not the one you want, press or repeatedly to view alternative words. Accept a word and add a space by pressing . 4 Continue writing your message. To enter a period or other punctuation marks, press and then or repeatedly.
Calling Making and Receiving Calls Turn on the phone and make sure you are within range of a network to make and receive calls % 9 To Turn the Phone On and Off. If your subscription includes the Caller ID service and the caller’s number is identified, the number is displayed. If the number is in the phonebook, the name, number, and picture are displayed. If the number is a restricted number, Withheld is displayed. To Make a Call 1 Enter the area code and the phone number. 2 } Call to make the call.
To Select More Options During a Call Press and select an option. To Turn Off the Microphone 1 Press } Mute Microphone, or press and hold 2 } Replace?, or press again, to resume. . To Check Your Missed Calls 1 From standby } Calls and scroll to the missed calls tab. 2 To call a number from the list, scroll to a number } Call. Emergency Calls Your phone supports the international emergency numbers, 112, 911 and 08.
To Select Your Default Phonebook 1 } Phonebook } Options } Advanced } Default Phonebook. 2 Select Contacts or SIM Numbers. For information and settings in either phonebook } Options. Memory The number of entries you can save depends on the amount of memory available in the phone or on the SIM card. To Check the Memory Status } Phonebook } Options } Advanced } Memory Status. Contacts Save up to 510 numbers, add pictures, ringtones and personal information, such as email, Web and street addresses.
SIM Numbers Save entries as a name with a single number. To Add a SIM Number 1 } Phonebook } New Number } Add. 2 Enter the name } OK and number } OK } Save. Copying Contacts Copy SIM numbers to and from contacts and the SIM card. When copying all contacts from the phone to the SIM card, all existing SIM card information is replaced. To Copy Names and Numbers to the SIM Card 1 } Phonebook } Options } Advanced } Copy to SIM. 2 Select Copy All or Copy a Number.
To Add a Picture or a Ringtone to a Contact 1 } Phonebook and select the contact you want to add a picture or personal ringtone to } More } Edit Contact. 2 Select a tab and then select a Picture: or Ringtone: } Edit. This takes you to File Manager. Select a file } Save. Calling From the Phonebook If contacts is the default phonebook, you can call from contacts or from the SIM card. If SIM numbers is the default phonebook, you can only call the numbers on the SIM card. To Call a Contact 1 } Phonebook.
To Delete a Contact or a SIM Number } Phonebook select a contact or number, press } Yes. To Delete all Contacts 1 } Phonebook } Options } Advanced } Delete All Contacts. 2 } Yes and enter the phone lock code } OK. The default phone lock code is 0000. Names and numbers that are saved on the SIM card are not deleted. Default Number for Contacts Set the phone number to be displayed first for each contact. To Set the Default Item for a Contact } Phonebook and scroll to a contact } More } Default Number.
To Set or Replace Speed Dialing Numbers 1 } Phonebook } Options } Speed Dial. 2 Scroll to a number in the list } Add or Replace. Select a phone number. To Speed Dial From standby, enter a speed dial number (from 1-9) } Call. Voicemail If your subscription includes an answering service, callers can leave a voice message when you cannot answer a call. To Enter your Voicemail Number If you haven’t set your voicemail number, press and hold } Yes enter the number. .
3 4 5 Instructions appear. Lift the phone to your ear, wait for the tone and say the command that you want to record. The voice command is played back to you. If the recording is ok } Yes. If not } No. Repeat step 3. To record another voice command for a contact } New Voice Cmd. again and repeat steps 2-4 above. Turn the Media player off before using voice dialing. to turn off.
To Activate Voice Control and Make a Call 1 From standby, press and hold Calls or with a handsfree, say your magic word or press the handsfree button. 2 Wait for the tone and say the name you recorded earlier, for example “John mobile”, the call connects. To Answer or Reject a Call When the phone rings, say “Answer” or say “Busy”. Play Caller Name Hear your recorded voice commands for contacts names when receiving a call.
To Activate a Call Forward 1 } Settings } Calls tab } Forward Calls. 2 Select a call type and then one of the forward options } Activate. 3 Enter the phone number to which you want your calls to be forwarded, or } Lookup to find the contact } OK. To Deactivate a Call Forward Scroll to the forward option } Deactivate. To Check all Forward Options } Settings } Calls tab } Forward Calls } Check All. More Than One Call Handle more than one call simultaneously.
Handling Two Calls If you have an ongoing call and a call on hold, you can: • } Switch between the two calls. • Press } Join Calls to join the two calls. • Press } Transfer Call, to connect the two calls. You are disconnected from both calls. Contact your service provider to verify whether this function is supported. • } End Call, press Yes to retrieve the held call. • } End Call } No to end both calls.
To Have a Private Conversation 1 Press } Talk To and select the participant. 2 Press } Join Calls to resume the conference call. Two Voice Lines Separate business and private calls on two lines with different numbers if your subscription supports alternate line service. To Select a Line } Settings } Calls tab and select line 1 or 2. To Change the Name of a Line } Settings } Display tab } Edit Line Names and select one of the lines to edit the name. My Numbers View, add and edit your own phone numbers.
Restricted Dialing Restrict outgoing and incoming calls when at home or abroad. You need a password from your service provider. If you forward incoming calls, you cannot activate some Restrict calls options. The following calls can be restricted: • All Outgoing – all outgoing calls. • Outgoing Intl. – all outgoing international calls. • Outgoing Intl Roam – all outgoing international calls except to your home country. • All Incoming – all incoming calls. • Inc.
To Activate or Deactivate Fixed Dialing 1 } Phonebook } Options } Special Numbers } Fixed Dialing. 2 Select Activate or Deactivate. 3 Enter your PIN2 } OK and then } OK again to confirm. To Save a Fixed Number 1 } Phonebook } Options } Special Numbers } Fixed Dialing } Fixed Numbers } New Number. 2 Enter your PIN2 } OK and enter the information. Call Time and Cost During a call, the duration of the call is shown.
Credit Limit for Calls Enter an estimated total amount of money for making calls. No more calls can be made when the total reduces to zero. To Set a Credit Limit 1 } Settings } Calls tab } Time & Cost } Call Costs } More } Set Credit and enter your PIN2 } OK. 2 Select Limited and enter an amount or Unlimited } OK. Call Priority Service Request a certain priority when you make a call, if your subscription supports the call priority service.
To Call Outside a Closed User Group } Settings } Calls tab } Manage Calls } Closed Groups } Open Calls } On. To only call within the group } Off. Tone Signals Use telephone banking services or control an answering machine by sending tone signals during a call. • To send the tones, press , or . • To clear the screen after the call is finished, press . • To turn the tones on or off during a call, press in standby and select Turn On Tones or Turn Off Tones. Notepad Note down a phone number during a call.
To Create a Group of Numbers 1 } Phonebook } Options } Groups } Send DTMF Tones } Add. 2 Enter a name for the group } Continue. 3 } New Number } Add to find and select a contact number. 4 Repeat step 3 to add more numbers. } Done to save. Business Cards Add your own business card to the phonebook. To Add Your Own Business Card } Phonebook } Options } My Business Card and enter the information for your business card } Save. To Send Your Business Card } Phonebook } Options } My Business Card } Send My Card.
Messaging Your phone supports various messaging services. Contact your service provider about the services you can use or for more information, see www.SonyEricsson.com/support. Text Messages Text messages can contain pictures, animations, melodies and sound effects. Text messages can be sent to one person, several recipients or to a group saved in the phonebook. Before You Start A service center number is provided by your service provider to send and receive text messages.
To Insert an Item in a Text Message 1 While writing your message } More } Add Item. 2 Select an item type and then an item. Formatting Text Change style, size, alignment and create new paragraphs. To Format the Text in a Text Message 1 While writing your message } More } Text Format. Then select Text Size, Text Style, Alignment or New Paragraph. 2 Select a text format. Text formatting only applies when Latin characters are applied. To Call a Number Contained in a Text Message Select the phone number } Call.
To Delete a Message or all Messages } Messages } Inbox } More } Delete or Delete All Msgs. Long Messages The number of characters allowed in a text message depends on the language you are writing in. You can send a longer message by linking two or more messages. You are charged for each of the messages linked in a long message. You may not receive all parts of a long message at the same time. Check with your service provider for the maximum number of messages that can be linked.
To Set a Message Option for a Specific Message 1 When you have selected a recipient } More } Advanced. 2 Select an option } Edit and select a setting } Done. To Check the Delivery Status of a Sent Message } Messages } Sent Items and select a text message } View } More } Details. Picture Messages Picture messages can contain text, pictures, video clips sound recordings and business cards and are sent via MMS (Multimedia Messaging Service) to a mobile phone or via email.
To Set a Default Message Option } Messages } Settings } Picture Msg. and select an option. Additional Send Options Request a read report, a delivery report and set a priority for a specific message. You can also add more recipients to the message. To Select Additional Send Options 1 When you have entered the recipient’s phone number } More. 2 Select Add Recipient or Recipients to add more recipients, Advanced to select an additional send option or Add Attachment.
Templates Base your message on one of the predefined templates. You can also add new templates. To Use a Predefined Template for a Picture Message 1 } Messages } Templates and select a template. 2 } Use } Add to make changes or add new items. 3 } More } Send to send the message. Automatic Download Select how to download your picture messages. } Messages } Settings } Picture Msg. } Auto Download to view the following: • Always – automatically download messages.
To Receive and Read Email Messages 1 } Messages } Email } Inbox } Send&Rec (when inbox is empty) or } Messages } Email } Inbox } More } Send & Receive to download new messages. 2 Select a message to read it. To Reply to an Email Message 1 Open the email message } Reply. 2 Write your message. } More to view options. 3 } Send to send the message. To Save an Email Address or a Phone Number in an Email Message 1 Select the email address or phone number } More. 2 } Save Email or } Use } Save Number.
To Delete an Email Message 1 } Messages } Email } Inbox and select the message } More. 2 } Mark for Deletion or } Mark Several to delete several messages. Select more messages by pressing Mark or Unmark. } More } Mark for Deletion. Messages are deleted the next time you connect to your email server. 3 For IMAP4 users only. } More } Clear Inbox. and press With Send & Rec. or No Send & Rec. to delete messages. My Friends For more information, contact your service provider or see www.SonyEricsson.com/support.
Imaging Pictures Your phone comes with a number of pictures. All pictures are saved in File Manager } Pictures. You can use a picture as a screen saver, wallpaper, or item in your phonebook % 20 To Add a Picture or a Ringtone to a Contact. You can send pictures using picture messages or email. Handling Pictures Add, edit or delete pictures in File Manager. The number of pictures that you can save depends on the size of the pictures. There is support for GIF, JPEG, WBMP, PNG and BMP.
To Delete a Picture } File Manager } Pictures. Select a picture } More } Delete or press . Exchanging Pictures Exchange pictures using cable, picture messages or email. You are not allowed to exchange copyright-protected material. For more information on sending pictures in messages % 33 Messaging. To Send a Picture } File Manager } Pictures, select a picture } More } Send. To Receive and Save a Picture 1 Open the message you received with a picture. 2 For a picture in a message } More } Save Items } Save.
Entertainment Media Player The media player can play both music and video. You can play music and video clips that you download or receive in a picture message. You can also stream music and videos from Web sites. There is support for MP3, WAV (up to 16 kHz as maximum sample rate) and 3GP. Music and Video Clips Play music and video clips saved in your phone. The music list keeps on playing until you press Pause.
PlayNow™ } PlayNow™ to pre-listen, buy and download music via the Internet. If settings are not already in your phone % 48 Settings. For more information, contact your service provider or see www.SonyEricsson.com/support. Streaming Online Music and Videos Play videos and listen to music on a Web site by streaming them to your phone. Select a link for streaming and the media player opens automatically. These links can be saved as bookmarks. If settings are not already in your phone % 48 Settings.
To Set the Ringtone Volume } Settings } Sounds & Alerts tab } Ring Volume and press or to decrease or increase } Save. To Set the Vibrating Alert 1 } Settings } Sounds & Alerts tab } Vibrating Alert. 2 Set this alert to On, On if in Silent or Off. To Set Sounds and Alerts Options } Settings } Sounds & Alerts tab, you can set: • Message Alert – select message notification. • Key Sound – select the key press sound. Composing Ringtone Melodies Compose and edit melodies to use as ringtones using the MusicDJ™.
To Send and Receive a Melody 1 } File Manager } Sounds and select a melody. 2 } More } Send and select a transfer method. When you receive the melody, follow the instructions that appear. You cannot send a polyphonic melody or an MP3 file in a text message. Sound Recorder Record your own memos or calls which can be set as ringtones. Recording of all sound stops automatically if you receive a call. Recordings are saved in the phone.
Themes, Games and Applications Your phone comes with predefined themes, games and applications. You can download new content to your phone. For more information, see www.SonyEricsson.com/support. To Select or Change a Theme } File Manager } Themes and select a theme. To Send a Theme } File Manager } Themes and select a theme } More } Send. To Receive and Save a Theme When you receive the theme, follow instructions that appear. To Download a Theme } File Manager } Themes and scroll to a direct link } Go To.
Connectivity Settings Before you start using Internet, Messages, My Friends or PlayNow™ settings are required in your phone. Settings may already be entered when you buy your phone. If not, contact your network operator, service provider or see, www.SonyEricsson.com/support for more information. In order to use the Internet, and send and receive picture and email messages, you need the following: • A phone subscription that supports data transmission. • Settings entered in your phone.
To Stop Browsing } More } Exit Browser. Options When Browsing } More and select from the following: • Exit Browser – disconnect and go to standby. • Go to the homepage set for the current Internet profile. • Bookmarks – add the site to your list of bookmarks. • Enter Address – enter the Web page address of a site. • History – list of previously visited sites. • Refresh Page – refresh the contents of the Web page. • Save Picture – save a picture from the site.
The following information can be saved: • Cookies – improve site access efficiency. • Passwords – improve server access efficiency. To Allow or Clear Cookies in Your Phone } Settings } Connect } Internet Settings } Cookies and select an option and confirm. To Clear the Password List } Settings } Connect } Internet Settings } Clear Passwords and } Yes to confirm. Using Applications for Java™ You can run applications for Java™ on your phone. Most applications need an HTTP Internet profile.
Trusted Certificates These verify the WAP gateway or the HTTP server. They are contained in your phone and can also be downloaded. To check the certificates in your phone } Settings } Connect } Internet Settings } Security } Trusted Cert. Synchronizing You can use a cable to synchronize your mobile phone files, contacts, appointments, tasks and notes with similar programs in, for example, a PC. For more information, see www.SonyEricsson.com/support.
1 2 3 4 5 6 To Enter the Remote Synchronization Settings } Settings } Connect } Synchronization. If no account exists } Yes and enter a name for the new account } Continue. A list of options to enter will appear. Add the server address of the synchronization server, a server username and a server password. } OK when you have entered each setting. Select Connection and select the WAP or HTTP profile. Select Applications and select the applications that you want to synchronize, for example, Phonebook } OK.
More Features Time and Date • To set the time } Settings } General tab } Time & Date } Time. Enter the time } Save. • To set the time format } Format and select an option. • To set the date and date format } Settings } General tab } Time & Date } Date. Alarm Clock The alarm rings even if the phone is set to silent or turned off. To Set and Use an Alarm • } Organizer } Alarms } Alarm and enter the time } Save. • To turn the alarm signal off when it rings, press any key.
Calendar Reminder Options } Always if you want the reminder to sound even though the phone is turned off. When the reminder sounds } Yes to read the appointment. } No to turn off the reminder. A reminder option set in the calendar affects a reminder option set in tasks. To View an Appointment } Organizer } Calendar and select a day. Scroll to the appointment } View. Navigating in Your Calendar Use the navigation key to move between days or weeks.
To Search for Appointments 1 } Organizer } Calendar } More } Advanced } Find. 2 Enter the text you want to search for } OK. Exchanging Appointments Send and receive appointments using picture messaging. To Send an Appointment Select an item, } More } Send. Receiving an Appointment When Add appointment? is displayed } Yes. Tasks Save and set a reminder for up to 80 tasks. To Add a New Task 1 } Organizer } Tasks } New Task } Add. 2 Select a category.
To View a Task } Organizer } Tasks and select a task } View. To Send a Task In the list of tasks for a certain day, select the item you want to send } More } Send. Receiving a Task When Add task? appears } Yes. Notes Make up to 10 notes in your phone. To Add a Note } Organizer } Notes } New Note } Add, enter the note } Save. To Handle the Notes 1 } Organizer } Notes and a list of notes appears. 2 Select the note that you want to handle.
Profiles Your phone has predefined profiles that are set to suit a certain environment. You can reset all profile settings to the way they were set when you bought your phone. To Select a Profile } Settings } General tab } Profiles } Select Profile. To Change a Profile Setting } Settings } General tab } Profiles } Edit Profile and select the setting that you want to change. To Rename a Profile } Settings } General tab } Profiles } Edit Profile } Profile Name:. The normal profile name cannot be changed.
To Set the Timer } Organizer } Timer and enter the hours, minutes and seconds after which you want the timer to go off. Screen Light Automatic is a setting for the screen light to turn off a few seconds after you last press a key. Power save is designed to optimize standby time. The screen turns off completely a few seconds after you last press a key. To Set the Screen Light 1 } Settings } Display tab } Light. 2 Set screen light to On, Off, Automatic or Power save. To activate the screen Press .
SIM Card Lock The SIM card lock protects your subscription, but not your phone itself, from unauthorized use. If you change SIM cards, the phone still works with the new SIM card. Most SIM cards are locked at the time of purchase. If the SIM card lock is on, you have to enter a PIN (Personal Identity Number) every time you turn on your phone. If you enter your PIN incorrectly three times in a row, the SIM card is blocked. This is indicated by the message PIN blocked.
To Turn the SIM Card Lock On or Off 1 } Settings } General tab } Locks } SIM Lock } Protection and select On or Off. 2 Enter your PIN } OK. Keypad Lock Lock the keypad to avoid dialing a number by accident. You can still answer an incoming call and the keypad locks again after it. The keypad remains locked until you unlock it manually. Calls to the international emergency number 112 can still be made, even when the keypad is locked. To Lock and Unlock the Keypad Manually • Press } Lock Keys.
Automatic Phone Lock If the phone lock is set to automatic, you do not need to enter your phone lock code until a different SIM card is inserted in the phone. It is important that you remember your new code. If you should forget it, you will need to bring your phone in to your local Sony Ericsson retailer. To Set the Phone Lock 1 } Settings } General tab } Locks } Phonelock } Protection and select an alternative. 2 Enter the phone lock code } OK.
To Add a New Code 1 } Organizer } Code Memo and enter your passcode } Continue } New Code } Add. 2 Enter a name associated with the code, for example, the name of the credit card company } Continue. 3 Enter the code } Done. To Change the Passcode 1 } Organizer } Code Memo and enter your passcode } Continue } More } Change Passcode. 2 Enter your new passcode } Continue. 3 Re-enter the new passcode } Continue. 4 Enter a checkword } Done.
Troubleshooting Some problems require that you call your service provider, but most of the problems you can easily correct yourself. Before handing your phone in for repair, copy all saved files, messages and information to another device as content may be lost during repair. Gray Menu Options Gray text indicates a function that is temporarily unavailable. Since you cannot send themes, pictures and sounds that are copyright-protected, the Send menu may be unavailable.
Menu Language If the wrong language is shown, you can select from standby: • Press 0000 for English. • Press 8888 for Automatic – SIM card determined. Insert SIM There is no SIM card in the phone or you may have inserted it incorrectly. Insert a SIM card % 6 To Remove the Cover and Insert the SIM Card. Insert Correct SIM Card The phone only works with certain SIM cards. Insert the correct SIM card. SOS Calls Only You are within range of a network, but you are not allowed to use it.
PUK Blocked You entered your personal unblocking key code (PUK) incorrectly 10 times in a row. Contact your service provider. Phone Locked The phone is locked. To unlock the phone % 60 Phone Lock. Phone Lock Code Your phone comes with the phone lock code, 0000. You can change it to any four- to eight-digit code % 60 Phone Lock. Number Not Permitted Fixed dialing is activated and the number you have dialed is not on your fixed numbers list % 28 Fixed Dialing.
Exchangeable Front Covers To Change the Front Cover 1 Use a match to press the catch down and push the cover forward to release the front cover. 2 Gently pull the front cover away and remove the keypad. 3 Place the keypad on the new front cover. Insert the notches into the corresponding slots on the phone and gently lift the new front cover over the catch. 4 Press to secure the front cover into place. 66 This is the Internet version of the user’s guide © Print only for private use.
Additional Information Sony Ericsson Consumer Web Site At www.SonyEricsson.com/support there is a support section where help and tips are only a few clicks away. Here you find the latest PC software updates and tips on how to use your product more efficiently. Accessible Solutions/Special Needs You can use your TTY terminal with your Sony Ericsson mobile phone (with the necessary accessory).
• Do not use your product in an area where a potentially explosive atmosphere exists. • Do not place your product or install wireless equipment in the area above your car’s air bag. • Do not attempt to disassemble your product. Only Sony Ericsson-authorized personnel should perform service. Antenna Only use an antenna that has been specifically designed by Sony Ericsson for your mobile phone.
power level in laboratory conditions, but the actual SAR level of the mobile phone while operating can be well below this value. This is because the mobile phone is designed to use the minimum power required to reach the network. Variations in SAR below the radio frequency exposure guidelines do not mean that there are variations in safety. While there may be differences in SAR levels among mobile phones, all Sony Ericsson mobile phone models are designed to meet radio frequency exposure guidelines.
Personal Medical Devices Mobile phones may affect the operation of cardiac pacemakers and other implanted equipment. Please avoid placing the mobile phone over the pacemaker, e.g. in your breast pocket. When using the mobile phone, place it at the ear opposite the pacemaker. If a minimum distance of 6 inches (15 cm) is kept between the mobile phone and the pacemaker, the risk of interference is limited.
Power Supply Connect the AC power adapter only to designated power sources as marked on the product. Make sure the cord is positioned so that it will not be subjected to damage or stress. To reduce risk of electric shock, unplug the unit from any power source before attempting to clean it. The AC power adapter must not be used outdoors or in damp areas. Never alter the cord or plug. If the plug will not fit into the outlet, have a proper outlet installed by a qualified electrician.
• Do not disassemble or modify the battery. • Do not expose the battery to extreme temperatures, never above +140°F (+60°C). For maximum battery capacity, use the battery at room temperature. • Turn off your mobile phone before removing the battery. • Keep out of children’s reach. • Use the battery for the intended purpose only. • Do not allow the battery to be put into the mouth. Battery electrolytes may be toxic if swallowed.
will, at their option, either repair or replace the Product in accordance with the terms and conditions stipulated herein. Sony Ericsson and its service partners reserve the right to charge a handling fee if a returned Product is found not to be under warranty according to the conditions below. Please note that some of your personal settings, downloads or other information may be lost when your Sony Ericsson Product is repaired or replaced.
4 5 6 7 8 can be charged and discharged hundreds of times. However, it will eventually wear out – this is not a defect. When the talk-time or standby time is noticeably shorter, it is time to replace your battery. Sony Ericsson recommends that you use only batteries and chargers approved by Sony Ericsson. Minor variations in screen brightness and color may occur between phones. There may be tiny bright or dark dots on the screen.
Some countries/states do not allow the exclusion or limitation of incidental or consequential damages, or limitation of the duration of implied warranties, so the preceding limitations or exclusions may not apply to you. The warranty provided does not affect the consumer's statutory rights under applicable legislation in force, nor the consumer’s rights against the dealer arising from their sales / purchase contract.
Index A alarm clock 53 alerts 45 answering service 22 applications 47 B battery alien 67 charging and inserting 7 bookmarks 49 business cards 32 C calculator 58 calendar 53 call credit limit 30 call list 21 call time and cost 29 call waiting 25 calls accepting 27 answering 16 emergency 17 from phonebook 20 handling two calls 26 hold 25 making 9, 16 receiving 9 recording 46 restricting 28 certificates 51 closed user groups 30 code memo 61 codes PIN 8 PUK 7, 65 conference calls 26 contacts 18 groups of 31 sy
G games 47 groups 31 H HTTP 48 I icons 10 Internet 48 J Java™ 50 K keypad lock 60 L language phone 14 writing 14 light 58 locks phone lock 65 SIM card 59 M magic word 23 media player 43–44 melodies 44 memory file manager 13 phonebook 18 menus 11 messaging 33 microphone, off/on 17 music 43 MusicDJ™ 45 My friends 40 N navigation key 12 networks 16 notepad 31 notes 56 P phone lock 60, 65 phonebook adding contacts 18 checking memory 20 default 17 synchronizing 51 picture messages 36–38 pictures 41–42 PIN code
PlayNow™ 43 power save 58 profiles 57 PUK 59, 65 R recording calls 46 sounds 46 voice commands 22–24 reset the phone 65 restricted dialling 28 ringtones 44 S safety guidelines 67 screen light 58 screen saver 42 security code memo 61 Internet 50–51 SIM card lock 59 sending appointments 56 business cards 32 contacts 19 melodies and ringtones 46 notes 56 pictures 42 tasks 56 themes 47 settings Internet, picture messages, email 48 Java™ 50 setup wizard 9 time and date 53 Shortcuts 12 SIM card copying to/from 1
T T9™ Text Input entering letters 14 tasks 55–56 templates for picture messages 38 for text messages 35 text input 14 text messages 33–36 themes 47 time 53 timer 57 troubleshooting 63 turning on/off phone 9 phone lock 61 ringtones, melodies 44 SIM lock protection 60 two voice lines 27 volume changing 16 setting ringtone 45 W WAP 48 V vibrating alert 45 video clips 43 voice answering 24 voice control 22 voice dialling 22 voicemail 22 79 This is the Internet version of the user’s guide © Print only for pri