
Operating Instructions
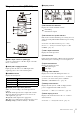
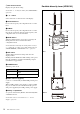
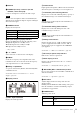
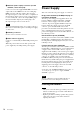
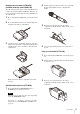

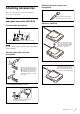
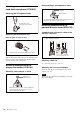
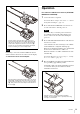
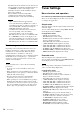
Table Of Contents

Attaching Accessories
18
Attaching accessories to the
hand-held microphone (UTX-M40)
Attaching the microphone holder
Replacing the microphone unit
Removing the microphone unit
Attaching the microphone unit
Turn the microphone unit in the opposite direction from
when you removed it, and make sure that the unit is
securely attached to the microphone.
Attaching accessories to the
plug-on transmitter (UTX-P40)
Attaching a microphone or cable
Disconnecting a microphone or cable
Attaching accessories to the
portable diversity tuner (URX-P40)
Connecting the conversion cable to the
OUTPUT connector
Attaching a belt clip
See “Attaching a belt clip” (page 17).
Attaching the shoe mount adapter
Attach the belt clip before attaching the shoe mount
adapter (page 17).
Attach belt clips upside-down if planning to attach the
shoe mount adapter.
Insert the base of the
microphone into the holder.
Turn the microphone unit in the direction of the arrow.
Push the microphone or cable connector (XLR-3-12C
connector) into the audio input connector of the
UTX-P40 until it clicks into place.
Microphone or
cable connector
Note
Microphone or cable
connector
Release button
Press the release button firmly until the lock is fully released,
and pull the microphone or cable out slowly.
Example: XLR-BMP conversion
output cable for the URX-P40
For a secure connection,
turn to lock the connector.