
Operating Instructions
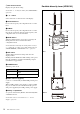
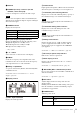

Table Of Contents

Tuner Settings
20
Information about the channel set on the tuner is sent
to the transmitter, and then the transmit channel is set.
“COMPLETE” is shown on the display of the
transmitter and tuner, and the transmitter vibrates
when setup is finished.
If the transmitter is turned off when NFC
communication is initiated, the transmitter
automatically turns on and starts transmitting.
• NFC communication lasts approximately
20 seconds. Perform step 4 within 20 seconds of
performing step 3. If 20 seconds have elapsed, you
can reestablish NFC communication using the
SYNC RX->TX menu on the tuner.
• Communications using NFC may be adversely
affected, depending on the surrounding
environment. If this occurs, use the SYNC
RX->TX menu on the tuner to reestablish the link.
• If “COMPLETE” is shown on the display of the
tuner but the transmitter does not vibrate, the setup
may not be finished. If this occurs, use the SYNC
RX->TX menu on the tuner to reestablish the link.
If noise is generated
Depending on the environment where the devices are
installed, external noise or radio waves may disrupt
transmission on certain channels. When selecting a
channel under these circumstances, turn off the
transmitter. Then, on the tuner, select a channel for which
the RF indicator does not light up (i.e., a channel free
from noise or radio wave interference). Set the same
channel on the transmitter.
To prevent interference or noise, take the following
precautions.
• Do not use two or more transmitters on the same
channels.
• When operating two or more UWP-D series packages
simultaneously, set each package to a different channel
within the same channel group.
• Keep the antennas on the tuner and transmitter
separated by at least 3 meters (about 10 feet).
• When operating two or more UWP-D series packages
simultaneously with different channel groups, make
sure that they are at least 100 meters (330 feet) apart if
they are used within clear sight of each other (actual
distance may vary depending on the circumstances).
Tuner Settings
Menu structure and operation
Procedure for portable diversity tuner (URX-P40)
There are two menu display modes that can be selected
according to the application.
Simple mode
This mode displays only the required settings for the tuner
and audio output.
You can enable simple mode by setting MENU MODE
(menu display mode) to SIMPLE.
Configuration menus
• GP/CH (group/channel) select
• PHONES (monitor audio) setting
• BAND (frequency band) select (Not available on
Japanese and Korean models)
• CLR CH SCAN (clear channel scan) function
• OUTPUT LEVEL (audio output level) setting
• SYNC RX->TX (NFC communication) function
• SYNC TX->RX (NFC communication) function
• POWER LOCK (POWER button lock) function
• RUNNING TIME (accumulated running time) display
• MENU MODE (menu display mode) setting
Extended mode
This mode displays all configuration menus.
You can enable extended mode by setting MENU MODE
(menu display mode) to ADVANCED.
The existing settings configured in extended mode are
active even when using simple mode.
Configuration menus
• GP/CH (group/channel) select
• PHONES (monitor audio) setting
• BAND (frequency band) select (Not available on
Japanese and Korean models)
• CLR CH SCAN (clear channel scan) function
• OUTPUT LEVEL (audio output level) setting
• SYNC RX->TX (NFC communication) function
• SYNC TX->RX (NFC communication) function
• POWER LOCK (POWER button lock) function
• RUNNING TIME (accumulated running time) display
• MENU MODE (menu display mode) setting
• MONITOR MODE (monitor audio level screen lock)
function
• CH MEMORY (store previous channel) function
• POWER SOURCE (external power selection) setting
• ACT CH SCAN (active channel scan) function
• COMPANDER (compander mode) setting
• BATTERY TYPE (battery type) setting
• DISPLAY MODE (display setting) function
• BRIGHTNESS (display brightness) setting
• FCT RESET (factory default setting) function
Notes
Note
Note