& FB8*B(1 &KLQDB B B ERRN 3DJH 7KXUVGD\ $SULO 30 Thank you for purchasing a Sony Ericsson C902c Cyber-shot™. For additional phone content, go to www.sonyericsson.com/fun. Register now to get a suite of tools, free online storage, special offers, news and competitions at www.sonyericsson.com/myphone. For product support, go to www.sonyericsson.com/cn.
& FB8*B(1 &KLQDB B B ERRN 3DJH 7KXUVGD\ $SULO 30 Accessories – More for your phone Bluetooth™ Headset HBH-PV712 A powerful wireless handsfree with extra Style-up™ cover in lime green – choose colour to match your mood! GPS-Enabler HGE-100 Get more from your phone – add GPS technology. Know where you are, where you’re going and how to get there.
& FB8*B(1 &KLQDB B B ERRN 3DJH 7KXUVGD\ $SULO 30 Contents Getting started ................... 6 Calling ............................... 28 Assembly ........................................ 6 Turning on the phone ..................... 7 Help ................................................ 8 Charge the battery .......................... 8 Phone overview ........................... 11 Menu overview ............................. 13 Navigation ....................................
& FB8*B(1 &KLQDB B B ERRN 3DJH 7KXUVGD\ $SULO 30 Media player and music.... 45 More features.................... 62 Transferring content to and from a computer .................................. Stereo portable handsfree ........... Music player ................................ PlayNow™ ................................... TrackID™ ...................................... Online music and video clips ........ Flight mode .................................. Location services ....
& FB8*B(1 &KLQDB B B ERRN 3DJH 7KXUVGD\ $SULO 30 Sony Ericsson C902c Cyber-shot™ GSM EDGE 850/900/1800/1900 This User guide is published by Sony Ericsson Mobile Communications AB or its local affiliated company, without any warranty.
& FB8*B(1 &KLQDB B B ERRN 3DJH 7KXUVGD\ $SULO 30 Java and all Java based trademarks and logos are trademarks or registered trademarks of Sun Microsystems, Inc. in the U.S. and other countries/regions. End-user license agreement for Sun™ Java™ J2ME™. Restrictions: Software is confidential copyrighted information of Sun and title to all copies is retained by Sun and/or its licensors.
& FB8*B(1 &KLQDB B B ERRN 3DJH 7KXUVGD\ $SULO 30 Notice Required for the License Granted under Articles 2.1 and 2.6. As a condition to the licenses granted pursuant to Articles 2.1 and 2.
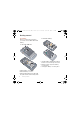
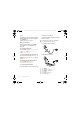
& FB8*B(1 &KLQDB B B ERRN 3DJH 7KXUVGD\ $SULO 30 Getting started Assembly To insert the battery Before you start using your phone, you need to insert a SIM card and the battery. To insert the SIM card 1 Insert the battery with the label side up and the connectors facing each other. 2 Align the silvery edge of the battery cover properly. 3 Gently press battery cover into place. 1 Lift the battery cover slightly. 2 Slide the battery cover off.
& FB8*B(1 &KLQDB B B ERRN 3DJH 7KXUVGD\ $SULO 30 Turning on the phone To turn on the phone You can save contacts on the SIM card before you remove it from your phone. See To copy names and numbers to the SIM card on page 31. PIN You may need a PIN (Personal Identification Number) to activate the services in your phone. Your PIN is supplied by your network operator. Each PIN digit appears as *, unless it starts with emergency number digits, for example, 112 or 911.
& FB8*B(1 &KLQDB B B ERRN 3DJH 7KXUVGD\ $SULO 30 Help Charge the battery In addition to this User guide, Getting started guides and more information are available at www.sonyericsson.com/cn. Your phone battery is partly charged when you buy it. It may take 30 minutes for the battery icon to appear on the screen. Help in your phone Help and information are available in your phone. See Navigation on page 15.
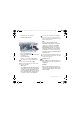
& FB8*B(1 &KLQDB B B ERRN 3DJH 7KXUVGD\ $SULO 30 Using the USB charger To remove the charger To connect the charger and charge the battery 1 Connect the USB cable plug to the AC adapter USB socket, as shown in the above illustration. The USB cable is supplied with your phone. 1 Charge your battery until the battery icon indicates a full charge. 2 Tilt the USB charger connector upwards to remove it. 2 Connect the USB cable connector to your phone.
& FB8*B(1 &KLQDB B B ERRN 3DJH 7KXUVGD\ $SULO 30 3 Sony Ericsson strongly recommends that you use only Sony Ericsson branded original batteries, the part of power supply device in accordance with YD/T 1591-2006 specifications of Communications Industry Standards of P. R. China (Part A in the new-type charger illustration) and the USB cable supplied with your phone to charge the phone.
& FB8*B(1 &KLQDB B B ERRN 3DJH 7KXUVGD\ $SULO 30 Phone overview 1 Ear speaker 2 Screen 3 Selection keys 4 Call key 5 Activity menu key 6 Connector for charger, handsfree and USB cable 7 End, on/off key 8 C key (Clear) 9 Navigation key 10 Silent key 1 2 3 7 8 4 5 6 9 10 Getting started 11
& FB8*B(1 &KLQDB B B ERRN 3DJH 7KXUVGD\ $SULO 30 11 Flash/Light 12 Camera lens 13 Camera key 14 Volume, digital zoom keys 15 Self-portrait mirror 16 Strap holder 11 12 15 13 14 16 12 Getting started
& FB8*B(1 &KLQDB B B ERRN 3DJH 7KXUVGD\ $SULO 30 Menu overview PlayNow™* Monternet* Entertainment Online services* TrackID™ Location services Games VideoDJ™ PhotoDJ™ MusicDJ™ Remote control Record sound Demo tour Cyber-shot™ Messaging Write new Inbox Email Drafts Outbox Sent messages Saved messages My friends* Call voicemail Templates Manage messages Settings Alarms Contacts Media Photo Music Video Games Web feeds Settings Radio Myself New contact Getting started 13
& FB8*B(1 &KLQDB B B ERRN 3DJH 7KXUVGD\ $SULO 30 Calls** All Organizer Answered Dialled Missed Sounds & alerts Ring volume Ringtone Silent mode Increasing ring Vibrating alert Message alert Key response Display Wallpaper Main menu layout Theme Startup screen Screen saver Clock size Brightness Edit line names* Calls Speed dial Smart search Divert calls Switch to line 2* Manage calls Time & cost* Show/hide my no.
& FB8*B(1 &KLQDB B B ERRN 3DJH 7KXUVGD\ $SULO 30 Navigation The main menus are shown as icons. Some submenus include tabs. To navigate the phone menus To return to standby • Press . To end a function • Press . To navigate your media 1 From standby select Menu > Media. 2 Scroll to a menu item and press the navigation key right. 3 To go back, press the navigation key left. To delete items • Press to delete items such as numbers, letters, pictures and sounds.
& FB8*B(1 &KLQDB B B ERRN 3DJH 7KXUVGD\ $SULO 30 To go directly to a main menu • From standby select Menu and press – , , or . The Main menu layout must be set to Grid. See To change the main menu layout on page 67. To use navigation key shortcuts • From standby press , , or to go directly to a function. To edit a navigation key shortcut 1 From standby select Menu > Settings > the General tab > Shortcuts. 2 Scroll to an option and select Edit.
& FB8*B(1 &KLQDB B B ERRN 3DJH 7KXUVGD\ $SULO 30 To insert a memory card Phone language You can select a language to use in your phone. To change the phone language 1 From standby select Menu > Settings > the General tab > Language > Phone language. 2 Select an option. Entering text You can use multitap text input or T9™ Text Input to enter text. The T9 Text Input method uses a built-in dictionary. To change text input method • When you enter text, press and hold down .