: FB'HHQDB8*B(Q &KLQD ERRN 3DJH 7XHVGD\ -XQH $0 Congratulations on your purchase of the Sony Ericsson W760c. A slim and stylish phone with everything you need to enjoy your music wherever you go. For additional phone content, go to www.sonyericsson.com/fun. Register now to get a suite of tools, free online storage, special offers, news and competitions at www.sonyericsson.com/myphone. For product support, go to www.sonyericsson.com/support.
: FB'HHQDB8*B(Q &KLQD ERRN 3DJH 7XHVGD\ -XQH $0 Accessories – More for your phone Stereo Bluetooth™ Headset HBH-DS205 Enjoy wireless music without missing a call. Active Speaker MAS-100 Share your music while protecting your phone. Portable Bluetooth™ Speaker MBS-100 A wireless sphere of music. These accessories can be purchased separately but may not be available in every market. To view the full range go to www.sonyericsson.com/accessories.
: FB'HHQDB8*B(Q &KLQD ERRN 3DJH 7XHVGD\ -XQH $0 Contents Getting started ................... 6 Assembly ........................................ 6 Turning on the phone ..................... 7 Help ................................................ 8 Charge the battery .......................... 9 Phone overview ............................ 11 Menu overview .............................. 13 Navigation ..................................... 15 Phone language ............................
: FB'HHQDB8*B(Q &KLQD ERRN 3DJH 7XHVGD\ -XQH $0 Internet............................... 47 More features.................... 62 Internet security and certificates .................................... 48 Web feeds ..................................... 48 Flight mode ................................... File manager ................................. Alarms ........................................... Calendar ....................................... Notes ...............................
: FB'HHQDB8*B(Q &KLQD ERRN 3DJH 7XHVGD\ -XQH $0 Sony Ericsson W760c GSM EDGE 850/900/1800/1900 This User guide is published by Sony Ericsson Mobile Communications AB or its local affiliated company, without any warranty. Improvements and changes to this User guide necessitated by typographical errors, inaccuracies of current information, or improvements to programs and/or equipment, may be made by Sony Ericsson Mobile Communications AB at any time and without notice.
: FB'HHQDB8*B(Q &KLQD ERRN 3DJH 7XHVGD\ -XQH $0 Java and all Java based trademarks and logos are trademarks or registered trademarks of Sun Microsystems, Inc. in the U.S. and other countries/ regions. End-user license agreement for Sun™ Java™ J2ME™. Restrictions: Software is confidential copyrighted information of Sun and title to all copies is retained by Sun and/or its licensors.
: FB'HHQDB8*B(Q &KLQD ERRN 3DJH 7XHVGD\ -XQH $0 Notice Required for the License Granted under Articles 2.1 and 2.6. As a condition to the licenses granted pursuant to Articles 2.1 and 2.
: FB'HHQDB8*B(Q &KLQD ERRN 3DJH 7XHVGD\ -XQH $0 Getting started Assembly To insert the battery Before you start using your phone, you need to insert a SIM card and the battery. To insert the SIM card 1 Insert the battery with the label side up and the connectors facing each other. 2 Slide the battery cover into place. To attach the battery cover 1 Remove the battery cover. 2 Slide the SIM card into its holder with the gold-colored contacts facing down.
: FB'HHQDB8*B(Q &KLQD ERRN 3DJH 7XHVGD\ -XQH $0 To remove the battery cover Turning on the phone To turn on the phone • Use the slots to detach cover. To remove the SIM card 1 Press and hold down . 2 Enter your SIM card PIN, if requested and select OK. 3 Select a language. 4 Select Yes to use the setup wizard. If you want to correct a mistake when you enter your PIN, press . Before turning the phone off, you must return to standby. 1 Remove the battery cover.
: FB'HHQDB8*B(Q &KLQD ERRN 3DJH 7XHVGD\ -XQH $0 You can save contacts on the SIM card before you remove it from your phone. See To copy names and numbers to the SIM card on page 30. PIN You may need a PIN (Personal Identification Number) to activate the services in your phone. Your PIN is supplied by your network operator. Each PIN digit appears as *, unless it starts with emergency number digits, for example, 112 or 911.
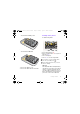
: FB'HHQDB8*B(Q &KLQD ERRN 3DJH 7XHVGD\ -XQH $0 Charge the battery Your phone battery is partly charged when you buy it. It may take 30 minutes for the battery icon to appear on the screen. Non-USB Charger (old type) USB Charger (new type) A1 A A2 B1 Using the USB charger To connect the charger and charge the battery 1 Connect the USB cable plug to the AC adapter USB socket, as shown in the above illustration. The USB cable is supplied with your phone.
: FB'HHQDB8*B(Q &KLQD ERRN 3DJH 7XHVGD\ -XQH $0 Note: 1 The USB cable for the new USB charger shown in the illustration (Part. B in the new-type charger illustration) on page 9 is only intended for charging your phone. Do not use it for transferring data. 2 The USB cable for the USB charger shown in the illustration (Part. B in the new-type charger illustration) is only intended for connection to the AC adapter (Part. A in the new-type charger illustration) to charge your phone.
: FB'HHQDB8*B(Q &KLQD ERRN 3DJH 7XHVGD\ -XQH $0 Phone overview 1 Ear speaker 2 Photo keys 3 Screen 4 Selection keys 5 Call key 6 Activity menu key 7 Navigation key 8 Volume keys 9 Battery cover slot 10 End key, on/off key 11 C key (Clear) 1 2 3 4 8 5 6 7 9 10 11 Getting started 11
: FB'HHQDB8*B(Q &KLQD ERRN 3DJH 7XHVGD\ -XQH $0 12 Memory card slot 13 Charging indicator 14 Connector for charger, handsfree and USB cable 15 GPS antenna 16 Walkman® key 17 Strap holder 12 13 14 15 16 17 12 Getting started
: FB'HHQDB8*B(Q &KLQD ERRN 3DJH 7XHVGD\ -XQH $0 Menu overview PlayNow™* Monternet* Entertainment Online services* Radio TrackID™ Games VideoDJ™ PhotoDJ™ MusicDJ™ Remote control Record sound Demo tour Camera Messaging Write new Inbox Email Drafts Outbox Sent messages Saved messages My friends* Call voicemail Templates Manage messages Settings Location services Navigation Tracker My favorites Status info Log Settings Contacts Media Photo Music Video Games Web feeds Settings WAL
: FB'HHQDB8*B(Q &KLQD ERRN 3DJH 7XHVGD\ -XQH $0 Calls** All Organizer Answered Dialed Missed Sounds & alerts Ring volume Ringtone Silent mode Increasing ring Vibrating alert Message alert Key sound Display Wallpaper Main menu layout Theme Startup screen Screen saver Clock size Brightness Edit line names* Calls Speed dial Smart search Forward calls Switch to line 2* Manage calls Time & cost* Show/hide my no.
: FB'HHQDB8*B(Q &KLQD ERRN 3DJH 7XHVGD\ -XQH $0 Navigation The main menus are shown as icons. Some submenus include tabs. To navigate the phone menus To return to standby • Press . To end a function • Press . To navigate your media 1 From standby select Menu > Media. 2 Scroll to a menu item and press the navigation key right. 3 To go back, press the navigation key left. To delete items • Press to delete items such as numbers, letters, pictures and sounds.
: FB'HHQDB8*B(Q &KLQD ERRN 3DJH 7XHVGD\ -XQH $0 To go directly to a main menu • From standby select Menu and press – , , or . Memory card To use navigation key shortcuts • From standby press , , or to go directly to a function. Your phone supports Memory Stick Micro™ (M2™) memory card adding more storage space to your phone. It can also be used as a portable memory card with other compatible devices. The Main menu layout must be set to Grid.
: FB'HHQDB8*B(Q &KLQD ERRN 3DJH 7XHVGD\ -XQH $0 To remove a memory card Entering text You can use multitap text input or T9™ Text Input to enter text. The T9 Text Input method uses a built-in dictionary. To change text input method • When you enter text, press and hold down . • Open the cover and press the edge of the memory card to release and remove it. To view memory card options 1 From standby select Menu > Organizer > File manager > the On memory card tab. 2 Select Options.
: FB'HHQDB8*B(Q &KLQD ERRN 3DJH 7XHVGD\ -XQH $0 3 Press each key only once, even if the letter you want is not the first letter on the key. For example, to write the word “Jane”, press , , , . Write the whole word before looking at the suggestions. 4 Use or to view suggestions. 5 Press to accept a suggestion. To enter text using multitap 1 From standby select, for example, Menu > Messaging > Write new > Text message.
: FB'HHQDB8*B(Q &KLQD ERRN 3DJH 7XHVGD\ -XQH $0 If the character you want is not displayed in the candidate row, press to present another candidate row. Continue pressing until the character you want is displayed. Alternatively, you can enter the next stroke or Pinyin letter and a new set of characters will immediately be displayed in the candidate row. To go back to the previous row, press .
: FB'HHQDB8*B(Q &KLQD ERRN 3DJH 7XHVGD\ -XQH $0 Number Stroke Basic Stroke Key Category Stroke Name Right SlopeHook DownOverHook DownOverCurvedHook DownOver-Left Slope DownOverDownHook DownOverDown OverHook OverDown OverDownHook OverLeft Slop e OverDownOverLeft Slop e OverLeft Slop eCurvedHook 20 Getting started Character Number Stroke Basic Stroke Key Category Stroke Name ᖗ ᖙ ᗱ ᖬ ⬉ г ↯ ܘᄨ ϧ Ӵ 䕀 偀 Ϣ ᓴ ো 䌍 哢 哤 ݭᄫ Ⲃ 䗮 ܡ ষ Ꮖ ᠋ к 偼 д г ৠ ∌ জ П ⱏ ⼒ ঞ ᵕ ᓋ ᓎ 䰓 䯳 䰜
: FB'HHQDB8*B(Q &KLQD ERRN 3DJH 7XHVGD\ -XQH $0 For example, to enter “ ֵᙃ ” 1 Enter “ ”, “ ” and “ ”. 2 Move the cursor to “ ֵ ”, press Select. Move the cursor to “ ᙃ ”, press Select again to select “ ᙃ ”. Example of using the wild card key The wild card key , is used to supplement unclear strokes in entering characters.
: FB'HHQDB8*B(Q &KLQD ERRN 3DJH 7XHVGD\ -XQH $0 Walkman® and music You can listen to music, audio books and podcasts. Use Sony Ericsson Media Manager to transfer content to your phone. For more information go to the Getting started section at www.sonyericsson.com/support. Sony Ericsson Media Manager software is available for download at www.sonyericsson.com/support.
: FB'HHQDB8*B(Q &KLQD ERRN 3DJH 7XHVGD\ -XQH $0 To change the volume • Genre – list music by genre. • Year – list music by year. • Audio books – list audio books you have transferred from your computer. • Podcasts – list all podcasts. Playlists You can create playlists to organize music files. Files can be added to more than one playlist. • When you listen to music, hold the phone out in front of you facing upwards.
: FB'HHQDB8*B(Q &KLQD ERRN 3DJH 7XHVGD\ -XQH $0 To create a playlist by mood 4 For each track you want to add, scroll to the track and select Mark. 5 Select Add to add the tracks to the playlist. To remove tracks from a playlist 1 From standby select Menu > Media and scroll to Music > Playlists. 2 Select a playlist. 3 Scroll to the track and press . To create playlists by mood, your music tracks must be transferred to your phone using Media Manager.
: FB'HHQDB8*B(Q &KLQD ERRN 3DJH 7XHVGD\ -XQH $0 PlayNow™ You can connect to PlayNow™ to download ringtones, games, music, themes and wallpapers. You can preview or listen to content before you purchase and download it to your phone. This service is not available in all countries/regions. Before you use PlayNow™ You must have the required Internet connection settings in your phone. See Settings on page 56. To use PlayNow™ 1 From standby select Menu > PlayNow™.
: FB'HHQDB8*B(Q &KLQD ERRN 3DJH 7XHVGD\ -XQH $0 Calling Making and receiving calls You need to turn on your phone and be within range of a network. Calling contacts To call a phone contact To call a contact written in Chinese characters 1 Menu > Contacts. Then enter the entire multi-letter name, pure initial or mixed initial pinyin of Chinese contacts you want to call.
: FB'HHQDB8*B(Q &KLQD ERRN 3DJH 7XHVGD\ -XQH $0 2 When the contact is highlighted, press or to select a number and press . Note: Phone supports Chinese and English contacts mixed search. When a contact is written in Latin characters, the entered letter can reach the Latin contact you want to call; when a contact is written in Chinese characters, the entered letter can reach the pinyin of Chinese contact you want to call. You can call numbers from your contacts and call list.
: FB'HHQDB8*B(Q &KLQD ERRN 3DJH 7XHVGD\ -XQH $0 Default contacts You can choose which contact information is shown as default. If Phone contacts is selected as default, your contacts show all the information saved in Contacts. If you select SIM contacts as default, your contacts show names and numbers saved on the SIM card. any country/region, with or without the SIM card inserted, if GSM network is within range.
: FB'HHQDB8*B(Q &KLQD ERRN 3DJH 7XHVGD\ -XQH $0 Calling contacts To call a phone contact 1 From standby select Menu > Contacts. 2 Scroll to a contact and press . To go directly to the contacts list • From standby press and hold down – . To call with Smart search 1 From standby press – to enter a contact name or a phone number. All entries which match the sequence of digits or letters are shown in a list. 2 Scroll to a contact or a phone number and press .
: FB'HHQDB8*B(Q &KLQD ERRN 3DJH 7XHVGD\ -XQH $0 To save contacts on a memory card 1 From standby select Menu > Contacts. 2 Scroll to New contact and select Options > Advanced > Back up to m. card. SIM contacts SIM contacts can contain names and numbers only. They are saved on the SIM card. 1 2 3 4 5 6 To add a SIM contact From standby select Menu > Contacts. Scroll to New contact and select Add. Enter the name and select OK. Enter the number and select OK.
: FB'HHQDB8*B(Q &KLQD ERRN 3DJH 7XHVGD\ -XQH $0 Groups You can create a group of phone numbers and email addresses from Phone contacts to send messages to. See Messaging on page 37. You can also use groups (with phone numbers) when you create accepted callers lists. 1 2 3 4 5 6 7 To create a group of numbers and email addresses From standby select Menu > Contacts. Scroll to New contact and select Options > Groups. Scroll to New group and select Add.
: FB'HHQDB8*B(Q &KLQD ERRN 3DJH 7XHVGD\ -XQH $0 To enter your voicemail number 1 From standby select Menu > Messaging > Settings > Voicemail number. 2 Enter the number and select OK. To call your voicemail service • From standby press and hold down .
: FB'HHQDB8*B(Q &KLQD ERRN 3DJH 7XHVGD\ -XQH $0 3 Select Yes to accept or No for a new recording. 4 Follow the instructions that appear and select Continue. Wait for the tone and say “Busy”, or another word. 5 Select Yes to accept or No for a new recording. 6 Follow the instructions that appear and select Continue. 7 Select where your voice answering is to be activated. To answer a call using voice commands • Say “Answer”. To reject a call using voice commands • Say “Busy”.
: FB'HHQDB8*B(Q &KLQD ERRN 3DJH 7XHVGD\ -XQH $0 To reject a second call • During the call, press and continue with the ongoing call. To end an ongoing call and answer a second call • During the call, select Replace active call. Handling two voice calls You can have calls ongoing and on hold at the same time. To switch between two calls • During the call, press . To join two calls • During the call, select Options > Join calls.
: FB'HHQDB8*B(Q &KLQD ERRN 3DJH 7XHVGD\ -XQH $0 Restricted dialing Call time and cost You can restrict outgoing and incoming calls. A password from your service provider is required. During a call, the duration of the call is shown. You can check the duration of your last call, outgoing calls and the total time of your calls. If you forward incoming calls, you cannot use some restrict calls options.
: FB'HHQDB8*B(Q &KLQD ERRN 3DJH 7XHVGD\ -XQH $0 Messaging Receiving and saving messages You are notified when you receive a message. Messages are automatically saved in the phone memory. When the phone memory is full, you can delete messages or save them on a memory card or on the SIM card. To save a message on a memory card • From standby select Menu > Messaging > Settings > General > Save to > Memory card.
: FB'HHQDB8*B(Q &KLQD ERRN 3DJH 7XHVGD\ -XQH $0 Before you use picture messaging You must set an MMS profile and the address of your message server. If no MMS profile or message server exists, you can receive all the settings automatically from your network operator or at www.sonyericsson.com/support. To copy and paste text in a text message 1 When you write the message, select Options > Copy & paste. 2 Select Copy all or Mark & copy. Scroll to and mark text in the message.