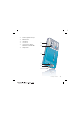
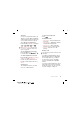
3 Volume, digital zoom keys 14 Main camera 15 Camera key 16 Cover lock 17 Connector for charger, handsfree and USB cable 18 Strap holder 13 14 15 16 17 18 Getting started 11
Menu overview PlayNow™* Internet* Entertainment Online services* TrackID™ Games VideoDJ™ PhotoDJ™ MusicDJ™ Remote control Record sound Demo tour Cyber-shot™ Messaging Write new Inbox Email Drafts Outbox Sent messages Saved messages My friends* Call voicemail Templates Manage messages Settings Location services Google Maps* Navigation* Tracker My favorites Status info Log Settings 12 Getting started Contacts Myself New contact Media Photo Music Video Games TV* Web feeds Settings Radio
Calls** All Organizer Answered Dialed Missed Sounds & alerts Ring volume Ringtone Silent mode Increasing ring Vibrating alert Message alert Key sound Display Wallpaper Main menu layout Theme Startup screen Screen saver Clock size Brightness Edit line names* Calls Speed dial Smart search Forward calls Switch to line 2* Manage calls Time & cost* Show/hide my no.
Navigation The main menus are shown as icons. Some submenus include tabs. To navigate the phone menus To scroll between the tabs • Scroll to a tab by pressing the navigation key left or right. To return to standby • Press . To end a function • Press . To navigate your media 1 From standby select Menu > Media. 2 Scroll to a menu item and press the navigation key right. 3 To go back, press the navigation key left. Center navigation key 1 From standby select Menu.
Shortcuts You can use keypad shortcuts to go directly to a menu. Menu numbering starts from the top left icon and moves across and then down row by row. To go directly to a main menu • From standby select Menu and press – , , or . The Main menu layout must be set to Grid. See To change the main menu layout on page 65. To use navigation key shortcuts • From standby press , , or to go directly to a function.
To insert a memory card To view memory card options 1 From standby select Menu > Organizer > File manager > the On memory card tab. 2 Select Options. Phone language You can select a language to use in your phone. • Open the cover and insert the memory card with the gold-colored contacts facing up. To remove a memory card To change the phone language 1 From standby select Menu > Settings > the General tab > Language > Phone language. 2 Select an option.
To enter periods and commas • When you enter text, press . To enter a symbol 1 When you enter text, select Options > Add symbol. 2 Scroll to a symbol and select Insert. To enter text using T9™ Text Input 1 From standby select, for example, Menu > Messaging > Write new > Text message. 2 If is not displayed, press and hold down to change to T9 Text Input. 3 Press each key only once, even if the letter you want is not the first letter on the key. For example, to write the word “Jane”, press , , , .
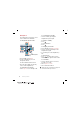
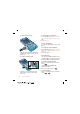
Imaging Using the camera Camera and video recorder You can take pictures and record video clips to view, save or send. You find your saved pictures and video clips in Media > Photo > Cam. album and File manager. Viewfinder and camera keys 1 2 Your Cyber-shot™ phone has 3.2 MP with auto-focus, face detection and photo light. You can use photo light when taking pictures and recording videos. To activate the camera • From standby press .
Face detection You can use face detection to bring an off-center face into focus. The camera automatically detects up to three faces, indicated by white frames. A green frame shows which face has been selected when auto-focus is used. As a rule, focus is set to the face closest to the camera. To set face detection • From standby select Menu > Cyber-shot™ > > Focus > Face detection. To record a video clip 1 Activate the camera and press or to scroll to . 2 Press fully down to start recording.
Camera icons and settings Zoom Icons on the screen show what the current setting is. More camera settings are available in Settings.
Transferring pictures Transfer to and from your computer You can use Bluetooth™ wireless technology and the USB cable to transfer pictures and video clips between your computer and phone. See Bluetooth wireless technology on page 54 and Transferring content to and from a computer on page 40 for more information. You can view, enhance and organize your pictures and video clips on your computer by installing the Adobe™ Photoshop™ Album Starter Edition.
Camera printing Pictures You can print camera pictures using the USB cable connected to a compatible printer. You can view and tag your pictures in Media. You can also print using a Bluetooth compatible printer. 1 2 3 4 5 6 7 8 To print camera pictures using the USB cable From standby select Menu > Media > Photo > Cam. album. Scroll to a month and a picture. Select Options > Print. Select an option. Connect the USB cable to the phone. Connect the USB cable to the printer.
Photo tags You can tag pictures to categorize them. They are saved in Photo tags. To tag pictures 1 From standby select Menu > Media > Photo > Cam. album. 2 Scroll to a month and a picture. Select View. 3 Press and scroll to a tag. 4 Press the center navigation key. 5 For each picture you want to tag, use or to scroll to the picture and press the center navigation key. 1 2 3 4 5 6 To create a new photo tag From standby select Menu > Media > Photo > Cam. album. Scroll to a month and a picture. Select View.
To edit and save a video clip 1 From standby select Menu > Organizer > File manager > Videos. 2 Scroll to a video clip and select Options > Edit in VideoDJ™. 3 Edit the video clip. 4 Select Options > Save. To trim a video clip 1 From standby select Menu > Organizer > File manager > Videos. 2 Scroll to a video clip and select Options > Edit in VideoDJ™ > Edit > Trim. 3 Select Set to set the starting point and select Start. 4 Select Set to set the ending point and select End. 5 Select Trim > Options > Save.
To answer a call • Press . To reject a call • Press . To change the ear speaker volume during a call • Press the volume key up or down. To mute the microphone during a call 1 Press and hold down . 2 Press and hold down again to resume. To turn the loudspeaker on during a call • Select SpkrOn. Do not hold your phone to your ear when using the loudspeaker. This could damage your hearing. To view missed calls from standby • Press to open the call list.
Contacts You can save names, phone numbers and personal information in Contacts. Information can be saved in the phone memory or on the SIM card. Default contacts You can choose which contact information is shown as default. If Phone contacts is selected as default, your contacts show all the information saved in Contacts. If you select SIM contacts as default, your contacts show names and numbers saved on the SIM card. To select default contacts 1 From standby select Menu > Contacts.
Editing contacts 1 2 3 4 5 To add information to a phone contact From standby select Menu > Contacts. Scroll to a contact and select Options > Edit contact. Scroll between the tabs and select Add or Edit. Select an option and an item to add or edit. Select Save. If your subscription supports Calling Line Identification (CLI) service, you can assign personal ringtones and pictures to contacts. To copy names and numbers to phone contacts 1 From standby select Menu > Contacts.
Deleting contacts To delete all contacts 1 From standby select Menu > Contacts. 2 Scroll to New contact and select Options > Advanced > Delete all contacts. 3 Select an option. • Windows Address Book (Outlook Express) • Sony Ericsson PC Suite proprietary contact & calendar manager For more information see Synchronizing on page 57. Groups You can create a group of phone numbers and email addresses from Phone contacts to send messages to. See Messaging on page 34.
Call list You can view information about recent calls. To call a number from the call list 1 From standby press and scroll to a tab. 2 Scroll to a name or a number and press . To add a call list number to contacts 1 From standby press and scroll to a tab. 2 Scroll to the number and select Save. 3 Select New contact to create a new contact or select an existing contact to add the number to. Speed dial Speed dialing lets you select nine contacts that you can dial quickly.
2 Select Yes > New voice command and select a contact. If the contact has more than one number, select the number to add the voice command to. 3 Record a voice command such as “John mobile”. 4 Follow the instructions that appear. Wait for the tone and say the command to record. The voice command is played back to you. 5 If the recording sounds OK, select Yes. If not, select No and repeat steps 3 and 4. Voice commands are saved in the phone memory only. They cannot be used in another phone.
Forwarding calls You can forward calls, for example, to an answering service. When Restrict calls is used, some forward call options are not available. See Restricted dialing on page 33. To forward calls 1 From standby select Menu > Settings > the Calls tab > Forward calls. 2 Select a call type and a forward option. 3 Select Activate. 4 Enter the number to forward calls to and select OK. More than one call You can handle more than one call at a time.
To connect two calls • During the call, select Options > Transfer call. You are disconnected from both calls. To end an ongoing call and return to the call on hold • First press and then . Conference calls With a conference call, you can have a joint conversation with up to five people. To add a new participant 1 During the call, select Options > Hold call. This puts the joined calls on hold. 2 Select Options > Add call. 3 Enter the number to call and press .
Restricted dialing Call time and cost You can restrict outgoing and incoming calls. A password from your service provider is required. During a call, the duration of the call is shown. You can check the duration of your last call, outgoing calls and the total time of your calls. If you forward incoming calls, you cannot use some restrict calls options.
Messaging Receiving and saving messages You are notified when you receive a message. Messages are automatically saved in the phone memory. When the phone memory is full, you can delete messages or save them on a memory card or on the SIM card. To save a message on a memory card • From standby select Menu > Messaging > Settings > General > Save to > Memory card. To save a message on the SIM card 1 From standby select Menu > Messaging and select a folder.
To write and send a text message 1 From standby select Menu > Messaging > Write new > Text message. 2 Write the message and select Continue > Contacts lookup. 3 Select a recipient and select Send. If you send a text message to a group, you will be charged for each member. See Groups on page 28. To copy and paste text in a text message 1 When you write the message, select Options > Copy & paste. 2 Select Copy all or Mark & copy. Scroll to and mark text in the message.
To create and send a picture message 1 From standby select Menu > Messaging > Write new > Picture msg. 2 Enter text. To add items to the message, press , scroll and select an item. 3 Select Continue > Contacts lookup. 4 Select a recipient and select Send. Receiving picture messages You can select how to download your picture messages. Standard options when you download picture messages are: • Always – automatic download. • Ask in roaming – ask to download when not in home network.
Voice messages You can send and receive a sound recording as a voice message. The sender and recipient must have a subscription supporting picture messaging. To record and send a voice message 1 From standby select Menu > Messaging > Write new > Voice message. 2 Record the message and select Stop > Send > Contacts lookup. 3 Select a recipient and select Send. Email You can use standard email functions and your computer email address in your phone.
To save an email message 1 From standby select Menu > Messaging > Email > Inbox. 2 Scroll to the message and select View > Options > Save message. To reply to an email message 1 From standby select Menu > Messaging > Email > Inbox. 2 Scroll to the message and select Options > Reply. 3 Write the reply and select OK. 4 Select Cont. > Send. To view an attachment in an email message • When you view the message, select Options > Attachments > Use > View.
To enter My friends server settings 1 From standby select Menu > Messaging > My friends > Configure. 2 Scroll to a setting and select Add. To log in to the My friends server • From standby select Menu > Messaging > My friends > Log in. To log out of the My friends server • Select Options > Log out. To add a chat contact 1 From standby select Menu > Messaging > My friends > the Contacts tab. 2 Select Options > Add contact.
To save a conversation 1 From standby select Menu > Messaging > My friends > the Conversations tab. 2 Enter a conversation. 3 Select Options > Advanced > Save conversation. Area and cell information Area and cell information are text messages about, for example, local traffic reports that are sent to subscribers within a certain network area. To turn area information on 1 From standby select Menu > Messaging > Settings > Area info. 2 Scroll to Reception and select Edit > On.
To transfer content using Media Manager 1 Connect the phone to a computer with a USB cable supported by your phone. 2 Computer: Start/Programs/ Sony Ericsson/Media Manager. 3 Phone: Select Media transfer. Do not remove the USB cable from your phone or computer during transfer, as this may corrupt the memory card or the phone memory. 4 Computer: Wait until the phone appears in Media Manager. 5 Move files between your phone and the computer in Media Manager.
Playlists You can create playlists to organize music files. Files can be added to more than one playlist. Deleting a playlist, or a file from a playlist, does not delete the file from the memory, just that reference to the file. To create a playlist 1 From standby select Menu > Media and scroll to Music > Playlists. 2 Scroll to New playlist and select Add. 3 Enter a name and select OK. 4 For each track you want to add, scroll to the track and select Mark. 5 Select Add to add the tracks to the playlist.
PlayNow™ You can connect to PlayNow™ to download ringtones, games, music, themes and wallpapers. You can preview or listen to content before you purchase and download it to your phone. To search for song information • When you hear a song through a loudspeaker, from standby select Menu > Entertainment > TrackID™ > Start. • When the radio is playing select Options > TrackID™. This service is not available in all countries.