Basic Manual Illustrations and Screenshots in This Manual Notes on Cell Phone Use Contents Getting Ready Making and Answering Calls Character Input Phone Book Pair Function Mail Camera EZweb EZ News Flash/ au one Gadget EZ Navi TV (1 Seg) In Case of Loss of Your Premier3 Troubleshooting Index
Introduction Thank you for purchasing the Premier3. Before using your Premier3, be sure to read the Premier3 Basic Manual (this PDF manual) to ensure correct usage. After you have finished reading this manual, store this PDF manual and the printed manuals in safe places so you can retrieve them whenever you need them. Manuals for the Premier3 The Premier3 comes with the Basic Manual and Instruction Manual. ● For learning the basics: Read the Premier3 Basic Manual (this manual).
Illustrations and Screenshots in This Manual Illustrations and Screenshots in This Manual ■ Note on Illustrations The illustrations in this manual may look different from the actual cell phone in shape, color and typeface. The key illustrations are also simplified as shown below.
Notes on Cell Phone Use Notes on Cell Phone Use Cell Phone Etiquette The cell phone always emits weak radio waves when power is on. Use the cell phone in an enjoyable and safe manner without forgetting to be considerate of others around you. ● Use of cell phones is not allowed in some places. • Do not use the cell phone while you are driving. Doing so is both dangerous and prohibited by law. • Using a cell phone in an aircraft is prohibited by law. Be sure to turn the cell phone off.
Disaster Message Board Service Registering safety information Inquiring for safety information Access • When a big scale disaster occurs, from an au phone, you can register your safety information (i.e. your condition and comments) to the 災害用伝言板 (Disaster Message Board) created on the EZweb.
Contents Introduction Contents Illustrations and Screenshots in This Manual 1 Notes on Cell Phone Use 2 Cell Phone Etiquette…………………………………… 2 Do not use the cell phone while driving! …………… 2 Disaster Message Board Service …………………… 3 Contents 4 Getting Ready 6 Checking the Contents of the Box ………………… Names of Parts ………………………………………… Charging the Battery Pack …………………………… Learning the Basics …………………………………… Turning On Power ……………………………………… Switching the Display Language to English ……… Initial Setup of E
Camera Photo Taking Tips ……………………………………… About Photo Modes …………………………………… Taking a Photo ………………………………………… Viewing Photos ………………………………………… EZweb Accessing Sites ………………………………………… Bookmarking Frequently Accessed Pages ………… Viewing Bookmarked Pages ………………………… Checking Charges …………………………………… Downloading Chaku-Uta-Full®/Chaku-Uta® ……… EZ News Flash/au one Gadget 30 30 30 31 31 32 33 34 34 35 35 Evacuate Navi to Guide You Home or to Nearby Evacuation Areas during Disasters ………………… 40 TV (1 Seg) Initial Setup
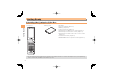
Getting Ready Checking the Contents of the Box The box contains the cell phone and accessories.
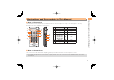
Names of Parts Lux Sensor ■ From the Sides ■ From the Back ■ From the Front Incoming LED/ Charge indicator Earpiece Side key 2 Memory card slot Side key 1 Sub-display Music key Cross controller Phone book key/ Soft key 1 Mail key Send key/ Pair key Keypad, key, key Multi key EZapps key/ Soft key 2 EZ key Memo key/ Clear key Power key/ End key Illumination light area Camera(lens) Infrared port Mobile light Speaker Built-in antenna Battery pack cover Battery pack (built-in) Power terminal Get
Charging the Battery Pack The battery pack is not fully charged at the time of purchase. Be sure to charge the battery pack before using the cell phone for the first time. • An AC adapter is not included. Purchase a common AC adapter 01/02 (sold separately). Getting Ready Charge indicator Common AC adapter 01/02 100 V AC power outlet Power terminal Desktop holder Connector ➡ Connect the common AC adapter 01/02 to the desktop holder.
Learning the Basics ■ Key Assignments : Display Incoming History. : Use Phone Book. : Send/receive e-mail/c-mail. : Make/answer calls. Use the Pair function. : Set/cancel Answer memo. Delete characters. Cancel operation. Getting Ready : Display Alert window/Shortcut menu. : Display the ticker field, info pane and gadget (setting) icon. : Display Outgoing History. : Display Main menu. : Activate EZapps. : Display EZ Service menu. : Turn power on/off. End call/communication.
■ Hiding/Redisplaying the Alert window Alert Window ➡ Use G to select Set Language and then press [ (選択 [Select]). Getting Ready When the alert window is displayed on the standby screen, you can temporarily hide it by pressing K (Back) and then display the Main menu by pressing [. To redisplay the hidden alert window, press B when the standby screen is displayed. ➡ Use G to select English and then press [ (Set). Initial Setup of E-mail and EZweb Turning On Power Hold down S for at least one second.
Display Indicators Display indicators inform you of mail arrival, current settings, etc.
■ Sub-display ① ② XXXXX Getting Ready Indicator XXXXX XXXXX Description ① Signal strength ② Battery level ③ Current date and time XXXXX XXXXX XXXXX XXXXX XXXXX XXXXX XXXXX XXXXX XXXXX XXXXX XXXXX XXXXX XXXXX XXXXX XXXXX Using Main Menu XXXXX XXXXX XXXXX You can access various functions from the Main menu. The Main menu patterns vary by model color. The screenshots for the XXXXX models are used in this manual.
Changing Your E-mail Address You can change the account name of your e-mail address. E-mail address △△△@ezweb.ne.jp Domain name When the standby screen is displayed, press L. ➡ Use G to select E-mail Setup and then press [ (Select). ➡ Use G to select Other and then press [ (Select). The cell phone connects to the server. • For details on entering e-mail addresses, see page 21. ➡ Use G to select 送信 (Send) and then press [ (Select). ➡ Use G to select OK, press [ (Select) and then [ (OK).
Security Code and Passwords You can use a security code and other passwords described below. Take care not to forget your security code and passwords, because they are required for performing various operations and using subscription services.
Making and Answering Calls Making a Call When the standby screen is displayed, use 0 to 9 to enter a phone number. • When calling to a fixed-line phone, you also need to enter the area code. • To end the call, press S. • After you enter a phone number, you can add 184 or 186 to the phone number as follows: ➡ Press {[ (Call). ➡ Use gG to select Add Extra No. and then press {[ (Select). ➡ Use gG to select 184 or 186 and then press {[ (Select).
■ 001 KOKUSAI MOBILE TALK Answering a Call Application required. For inquiries, contact the KDDI Customer Service Center. To answer a call, press Q. 0077-7160 (toll-free; open 9:00 to 20:00 everyday including weekends and national holidays) 001 Making and Answering Calls 16 ↑ KDDI international access code 010 1 ↑ Country code (USA) 212 ↑ Area code 123-XXXX ↑ Phone number • Charges for 001 KOKUSAI MOBILE TALK are charged separately from monthly au telephone charges.
Returning a Call (Outgoing History/ Incoming History) Example: Returning a call to a phone number in the incoming history When the standby screen is displayed, press D. • Press C while the standby screen is displayed to display the Outgoing History screen. • Press C to display the Outgoing History screen. ➡ Press Q. • The cell phone can store up to 50 phone numbers in each of the incoming and outgoing history.
• Even in manner mode, the cell phone still emits a sound when autofocusing, a shutter sound when you take a photo. Adjusting the Incoming Ring Tone Volume When the standby screen is displayed, press [. Changing the Incoming Ring Tone When the standby screen is displayed, press [. Making and Answering Calls ➡ Use E to select Function and then press [ (Select). ➡ Use G to select Sound/Vib/Lamp and then press [ (Select). ➡ Use G to select Incoming Setup and then press [ (Select).
Turning On the Answer Memo When the standby screen is displayed, hold down R for at least one second. is displayed on the standby screen. ■ Turning Off the Answer Memo • The cell phone can record a maximum of ten messages, each up to 60 seconds long. • Answer memo is a function that automatically answers calls and allows callers to record messages. Use the Answering Service (Voice Mail) when your phone is turned off or when you are in a location where a signal cannot be received.
Character Input Number of Times to Press the Key key Character Input 4 5 6 Character Entry Modes :1 . @ − _ / : When a character entry screen is displayed, you can select a character entry mode if you press K (Char.Type).
■ Entering Two or More Characters Assigned to the Same Key After you enter the first character, press C and then enter the next character. Entering E-mail Addresses ■ E-mail Address Compatible Characters ■ Starting a New Line ■ How to Enter E-mail Addresses Press ;. Example: Entering "taro.23@kddi.co.jp" ■ Deleting Characters • Certain functions such as c-mail do not support entering new lines. Enter "taro.23". t: a: r: o: .: 2: 3: Press 8 once. Press 2 once. Press 7 three times.
➡ Press J (SubMenu). ➡ Use G to select Phrase and then press [ (Select). ➡ Use J (Category) to select Internet and then press [ (Select). ➡ Use G to select .co.jp and then press [ (Select). ".co.jp" is entered. Character Input Entering Pictograms When a character entry screen is displayed, press K (Char.Type). ➡ Use E to select [ (Select). and then press ➡ Use E to select the pictogram you want to enter and then press [ (Select).
Phone Book Saving a Phone Book Entry When the standby screen is displayed, hold down K for at least one second. ➡ Use G to select [ (Select). [Name] and then press Dialing from the Phone Book ➡ Enter a name and then press [ (OK). The [Reading] for the name is entered automatically. [Phone No.1] and then ➡ Enter a phone number and then press [ (OK). • If the phone number is for a fixed-line phone, enter the phone number starting with the area code.
Saving a Phone Number from the Incoming or Outgoing History Example: Saving a phone number from the incoming history to the phone book When the standby screen is displayed, press D and use G to select the phone number you want to save. ➡ Press J (SubMenu). ➡ Use G to select Reg to Adrs Book and then press [ (Select). Phone Book 24 ➡ Use G to select Register New and then press [ (Select). ➡ Use G to select a phone number type and then press [ (Select).
Pair Function You can register a maximum of five pair partners you contact often to easily call or send mail. Making a Call to a Pair Partner When the standby screen is displayed, press Q. ➡ Use F to select the person you want to call. Registering a Pair Partner ➡ Use G to select Call and then press [ (Select). When the standby screen is displayed, press Q. Sending Mail to a Pair Partner ➡ Use F to select a blank screen and then press [ (Select). When the standby screen is displayed, press Q.
Mail Using E-mail To use e-mail, you need to apply for an EZweb subscription. If you did not apply for an EZweb subscription at the time of purchase, contact an au shop or the au Customer Service Center. Also, before use, you need to configure initial settings. You can send and receive e-mail with other cell phones that support e-mail, and with PCs. In addition to text messages of up to 5,000 double-byte (or 10,000 singlebyte) characters, you can also send photos and movies by e-mail.
Reading Received E-mail Messages ➡ Use G to select the file name and then press [ (Receive). When you receive an e-mail message, E-mail appears on the standby screen. ➡ Press [ (Play). ➡ Use F to select E-mail and then press [ (Select). • Selecting the file name or pressing {[ (Receive) may be unnecessary for some files to be displayed, depending on the file size. ➡ Press [ (Select). • • : Indicates a read message. : Indicates an unread message.
Rejecting Spam Setting mail filters to reject spam is recommended. The サポート設定 (Supportive Settings) helps you to set mail filters easily by answering questions that appear on the screen. ■ Setting Mail Filters Example: Connecting to サポート設定 (Supportive Settings) When the standby screen is displayed, press L. ➡ Use G to select E-mail Setup and then press [ (Select). ➡ Use G to select Mail Filter and then press [ (Select). Mail ➡ Use G to select 次へ (Next) and then press [ (Select).
Using C-mail C-mail is a service that uses phone numbers as addresses to exchange messages between au cell phones that support c-mail. A c-mail message can contain up to 50 double-byte (or 100 single-byte) characters. ➡ Use E to select a phone book entry and then press [ (Detail). ➡ Use E to select an address and then press [ (Select). ➡ Press K (Send). • The c-mail send charge applies when sending c-mail.
■ Landscape Position Camera .PCJMF MJHIU $BNFSB MFOT Your cell phone has a CMOS camera with X.XX effective megapixels for shooting photos and movies. You can use the self-timer and autofocus. Shot images can be used for the standby screen, and attached to e-mail messages. Photo Taking Tips When taking photos, position the cell phone so that is not displayed upside down or inclined. Frame the subject within the display and hold the cell phone steady with both hands to avoid shaking.
Taking a Photo ➡ Use G to select a folder and then press [ (Select). When the standby screen is displayed, hold down N for at least one second. ➡ Use E to select the photo you want to view and then press [ (Select). The monitor screen appears. ➡ Point the AF frame at the subject and then press [ (Shoot). The camera focuses automatically and the shutter clicks. The preview screen is displayed.
EZweb &;XFC 4VCTDSJQUJPO 3FRVJSFE EZweb is an information service that allows you to enjoy browsing the Internet on your cell phone. You can also download Chaku-Uta-Full®, Chaku-Uta®, news, and other contents from web pages. To use EZweb, you need to apply for an EZweb subscription. If you did not apply for an EZweb subscription at the time of purchase, contact an au shop or the au Customer Service Center. Also, before use, you need to configure initial settings.
Accessing Sites ■ Viewing the au one Top You can access EZweb from the au one Top. A variety of useful and fun sites are available on EZweb. When the standby screen is displayed, press M, use G to select au one Top and then press [ (Select). au one Top キーワード検索機能 (Search by Keyword) Provides a search function for searching for information by keyword. 集まる (Community) Provides interesting and useful information that you can use for SNS or blogs.
■ Basic Operations Use G to select the site you want to access and then press [ (Select). Press L or R to return to the previous screen. Hold down either key for at least one second to return to the au one Top. The following describes the basic operations that are available while accessing sites. Key Operation S Description Exits EZweb. EZweb G Moves the cursor up and down. When there is data available above or below the current screen, scrolls up and down the screen one line at a time.
Checking Charges When the standby screen is displayed, press [. ➡ Use E to select Function and then press [ (Select). ➡ Use G to select Time/Toll/Sub and then press [ (Select). ➡ Use G to select Inquire Toll and then press [ (Select). ➡ Use G to select YES and then press [ (OK). • Select the item you want to check and then follow the on-screen instructions. Downloading Chaku-Uta-Full®/ Chaku-Uta® ➡ Use G to select au one Top and then press [ (Select).
EZ News Flash/au one Gadget &;XFC 4VCTDSJQUJPO 3FRVJSFE EZ News Flash/au one Gadget Use the EZ News Flash/au one Gadget to display flash news, or activate the set gadget on the standby screen. You can check the news details and other information by selecting the ticker field. You can use the EZ News Flash and au one Gadget by making a few simple settings following the EZweb initial setup. Basic Operations Select the ticker field. Check the news. Press A on the standby screen. Select the info pane.
■ Canceling EZ News Flash When the standby screen is displayed, select the ticker field and then press [ (ニュース[News]). ➡ Follow the on-screen instructions. ■ Changing the Reception Settings for EZ News Flash Information You can change the ring tone, vibrator and LED settings under M216 NewsFlash Receive for reception of EZ News Flash information. If you do not want the ring tone to sound when receiving EZ News Flash information, set the volume to OFF.
EZ Navi &;XFC 4VCTDSJQUJPO 3FRVJSFE Using GPS (Global Positioning System), EZ Navi provides useful positional information services. When the standby screen is displayed, press M and then use F to select the EZnavi. • The packet communication charges for using EZ Navi services apply to the amount of data sent and received. Some services may require a separate information fee. • Before using EZ Navi, you must configure initial settings of EZweb (page 10).
EZ Navi Walk for When You Go Out ■ View Your Current Location Displays various useful menu items for when you are out. ★ represents your initial location. As you start moving, changes of your location are tracked by continuous positioning and indicated in real time by . ナビをする*1 Voice guide leads the way to your destination (音声ナビ [voice navigation]). Search for local stores or facilities. 地図を見る (FREE)*1 Check out maps of your current location and places you like to go.
Evacuate Navi to Guide You Home or to Nearby Evacuation Areas during Disasters Nearby public evacuation areas or the direction to your home can be determined using the map data pre-installed on the Premier3 (避難所マップ [Evacuate Area Map] ). Other useful contents can be downloaded from the 災害時 ナビ (Evacuate Navi) section of the EZweb site, including 帰宅支援マップ (Route Home Map) which can guide you between two locations you specify, such as 会社から自宅 (Office to Home) .
TV (1 Seg) &;XFC 4VCTDSJQUJPO 3FRVJSFE "1 Seg", a mobile terrestrial digital television service in Japan, is available on the Premier3. • The continuous viewing times of TV (1 Seg) are as follows. The figures vary according to the usage of data broadcasts. ■ Using the TV Antenna When watching TV (1 Seg), fully extend the TV antenna to ensure good reception. Using earphones DBEX ON: Approx. XX hrs XX min. DBEX OFF: Approx. XX hrs XX min. Using the speaker DBEX ON: Approx. XX hrs XX min.
Initial Setup of au Media Tuner Watching TV (1 Seg) To watch TV (1 Seg) using the au Media Tuner, you need to configure initial settings. When the standby screen is displayed, hold down ! for at least one second. When the standby screen is displayed, hold down ! for at least one second. Disclaimer notes are displayed. ➡ Use G to check the disclaimer notes, use G to select OK, and then press [ (選択 [Select]). The initial setting screen for using the au Media Tuner is displayed.
Basic Operations Launch TV (1 Seg) to start receiving data broadcasts. The data operation screen appears when a data broadcast is received. Press K (Vol/ch) on the data operation screen to switch to the TV operation screen. On the TV operation screen, pressing Q switches the display. %BUB PQFSBUJPO TDSFFO 57 PQFSBUJPO TDSFFO (Vol/ch) (戻る[Return]) Exiting the au Media Tuner TV (1 Seg) • On the TV operation screen, use gG to adjust the volume. Press S, use G to select YES and then press [ (OK).
In Case of Loss of Your Premier3 In Case of Loss of Your Premier3 44 ➡ Use G to select Direct Input, press [ (Select), enter a phone number, and then press [ (OK). The Remote Ctrl Lock allows you to remotely activate the Auto Lock, FeliCa Lock, and Address Book Lock, preventing others from using your cell phone. ➡ Press J (Comp). Setting Conditions for Activating the Remote Ctrl Lock ➡ Enter a time and then press [ (Set).
Activating the Remote Ctrl Lock by the Security Lock Service • You must fill out an application to use au Customer Support (the application can be filled out even after your cell phone is lost). Even if the Remote Ctrl Lock is not set in advance, the Remote Ctrl Lock can be activated by calling au Customer Service Center or completing the application process on au Customer Support from a PC. The Security Lock Service is available free of charge.
Troubleshooting Symptom Remedy Page Charge the battery pack. 8 ● Did you hold down S for at least one second? Hold down S for at least one second. 10 ● Is power turned on? Hold down S for at least one second. 10 ● Is Move to a location where (out of range indicator) is no longer displayed, and try again. 10 ● Is your hand or a metal object covering the area around the built-in antenna? Make sure your hand or any other metal object is not covering the area around the built-in antenna.
Symptom Cannot hear the other party. When making a call, a beeping sound is heard from the earpiece and a connection cannot be established. The incoming LED flashes but the ring tone does not play. Cannot charge the battery pack. Remedy Page ● Is the earpiece volume too low? Press A during a call to increase the earpiece volume. 17 (out of range indicator) ● Is displayed? Or are you in a location where the signal is too weak? (out of range Move to a location where indicator) is no longer displayed.
Index Numeric 1 Seg ………………………………………………………… 41 A Accessories …………………………………………………… 6 Alert window………………………………………………… 10 Answer memo ……………………………………………… 19 Playback …………………………………………………… 19 Turning off ………………………………………………… 19 Turning on ………………………………………………… 19 au one Gadget ……………………………………………… 36 Gadget setting icon ……………………………………… 36 B Battery level ………………………………………………… 11 Battery pack ………………………………………………… 6,8 Battery pack cover …………………………………………… 7 C Index 48 Camera ……………………………………………………… 30 Photo taking tips ……
Entering …………………………………………………… Entering pictograms ……………………………………… Evacuate Navi ……………………………………………… EZ Navi ……………………………………………………… EZ Navi Walk ……………………………………………… EZ News Flash ……………………………………………… Canceling ………………………………………………… Changing the Reception Settings ……………………… Info pane …………………………………………………… Setting ……………………………………………………… Ticker field ………………………………………………… EZ password ……………………………………………… EZweb ……………………………………………………… Accessing sites …………………………………………… au one Top ………………………………………………… Basic operations ……………………………
Sending mail to a pair partner …………………………… Passenger Seat Navi ……………………………………… Passwords ………………………………………………… Phone (call) ………………………………………………… 184/186 …………………………………………………… Answering ………………………………………………… International Call ………………………………………… Making……………………………………………………… Returning ………………………………………………… Phone book ………………………………………………… Dialing ……………………………………………………… Editing ……………………………………………………… Saving ……………………………………………………… Saving a phone number from the incoming or outgoing history … Phone number ……………………………………………… Pho
Radio Wave Exposure and Specific Absorption Rate (SAR) Information ■ United States & Canada THIS PHONE MODEL HAS BEEN CERTIFIED IN COMPLIANCE WITH THE GOVERNMENT’S REQUIREMENTS FOR EXPOSURE TO RADIO WAVES. The Premier3 mobile phones have been designed to comply with applicable safety requirements for exposure to radio waves. Your wireless phone is a radio transmitter and receiver. It is designed to not exceed the limits* of exposure to radio frequency (RF) energy set by governmental authorities.
at http://www.ctia.org. difference in safety based on difference in SAR value. * In the United States and Canada, the SAR limit for mobile phones used by the public is 1.6 watts/kilogram (W/kg) averaged over one gram of tissue. The standard incorporates a margin of safety to give additional protection for the public and to account for any variations in measurements. Products with radio transmitters sold in the US must be certified by the Federal Communications Commission (FCC).
be operated in temperatures below +5°C (+41°F) or above +35°C (+95°F). Do not expose the battery to temperatures above +35°C (+95°F). • Do not expose to flames or lit tobacco products. • Do not drop, throw or try to bend the product. • Do not paint or attempt to disassemble or modify the product. • Consult with authorized medical staff and the instructions of the medical device manufacturer before using the product near pacemakers or other medical devices or equipment.
and the manufacturer. Driving Some vehicle manufactures forbid the use of phones in their vehicles unless a handsfree kit with an external antenna supports the installation. Check with the vehicle manufacturer's representative to be sure that the mobile phone or Bluetooth handsfree will not affect the electronic systems in the vehicle. Full attention should be given to driving at all times and local laws and regulations restricting the use of wireless devices while driving must be observed.
does not test third-party accessories. Accessories may influence RF exposure, radio performance, loudness, electric safety and other areas. Third-party accessories and parts may pose a risk to your health or safety or decrease performance. Disposal of old electrical and electronic equipment Electronic equipment and batteries should not be included as household waste but should be left at an appropriate collection point for recycling.
• We recommend that you make a backup copy of important data. We are not responsible for any loss or damage to content you store on the memory card. • Recorded data may be damaged or lost when you remove the memory card or memory card adapter, turn off the power while formatting, reading or writing data, or use the memory card in locations subject to static electricity or high electrical field emissions. Protection of personal information Erase personal data before disposing of the product.
This device complies with RSS-210 of Industry Canada. Operation is subject to the following two conditions: (1)this device may not cause interference, and (2)this device must accept any interference, including interference that may cause undesired operation of the device.
For inquiries, call: au Customer Service Center For general information and charges (toll free) From fixed-line phones: From au cellphones: area code not required PRESSING ZERO WILL CONNECT YOU TO AN OPERATOR AFTER CALLING 157 ON YOUR au CELLPHONE For loss, theft or damage and operation information (toll free) From fixed-line phones: From au cellphones: area code not required From EZweb: Access Method EZ au one Top au߅ቴߐ߹ࠨࡐ࠻ (au Customer Support) ߅วࠊߖ (Inquiries) Menus are subject to change witho