3-859-005-32 (1) FM/AM Compact Disc Player Operating Instructions Owner’s Record The model and serial numbers are located on the bottom of the unit. Record the serial number in the space provided below. Refer to these numbers whenever you call upon your Sony dealer regarding this product. Model No. CDX-4160 Model No. CDX-3160 Serial No. Serial No. For installation and connections, see the supplied installation/connections manual.
EN Warning Welcome ! This equipment has been tested and found to comply with the limits for a Class B digital device, pursuant to Part 15 of the FCC Rules. These limits are designed to provide reasonable protection against harmful interference in a residential installation. This equipment generates, uses, and can radiate radio frequency energy and, if not installed and used in accordance with the instructions, may cause harmful interference to radio communications.
Table of Contents Getting Started Additional Information Resetting the unit ................................................ 4 Detaching the front panel .................................. 4 Setting the clock .................................................. 5 CD Player Listening to a CD ................................................ 5 Playing a CD in various modes ........................ 6 Radio Precautions ........................................................... 8 Maintenance ..................
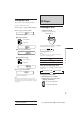
Attaching the front panel Getting Started Align part A of the front panel to part B of the unit as illustrated, and push until it clicks. Resetting the unit Before operating the unit for the first time or after replacing the car battery, you must reset the unit. Press the reset button with a pointed object, such as a ball-point pen. Reset button EN Notes • Pressing the reset button will erase all the memorized program and memory functions.
Setting the clock The clock has a 12-hour digital indication. CD Player Example: Set the clock to 10:08 1 Press (OFF) or (DSPL) during operation. 2 Press (DSPL) for two seconds. Listening to a CD Simply insert the CD. Playback starts automatically. 100 Labelled side up The hour digit flashes. 1 Set the hour digits. To go forward To go back 1000 If a CD is already inserted, press (SOURCE) repeatedly until “CD” appears. MIN EN SEC 215 Elapsed playing time 1000 The minute digits flash.
Locating a specific point in a track — Manual Search During playback, press and hold either side of (SEEK/AMS) for two seconds. Release the button when you have found the desired point. To search forward SEEK AMS To search backward Note If “_ _ ” or “ _ _” appears in the display, you have reached the beginning or the end of the disc and you cannot go any further. Playing a CD in various modes EN Searching for the desired track — Intro Scan Press (1) during playback. “INTRO” appears in the display.
3 4 Press either side of (SEEK/AMS) to tune in the station that you want to store on the number button. Press the desired number button ((1) to (6)) for two seconds until “MEM” appears. The number button indication appears in the display. Note If you try to store another station on the same number button, the previously stored station will be erased. Receiving the memorized stations 1 Select the desired band (page 6).
You can hear the bass line moe clearly even if the vocal sound is the same volume. You can emphasize and adjust the bass sound easily with the D-bass control. This effect is similar to the one you get when you use an optional subwoofer system. Moeover, the Digital D-bass* function creates even shaper and more powerful bass sound than Analog D-bass. * Digital D-bass is available during CD playback.
Before playing, clean the discs with an optional cleaning cloth. Wipe each disc from the center out. Do not use solvents such as benzine, thinner, commercially available cleaners or antistatic spray intended for analog discs. Cleaning the connectors The unit may not function properly if the connectors between the unit and the front panel are not clean. To prevent this, open the front panel by pressing (RELEASE), then detach it and clean the connectors with a cotton swab dipped in alcohol.
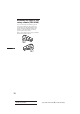
Attaching the label to the rotary remote (CDX-4160) You can control this unit with the optional rotary remote (RM-X2S) (CDX-4160 only). Several labels are supplied with the rotary remote. Attach the label that matches the functions of this unit and the mounting position of the rotary remote. After you mount the rotary remote, attach the label in the illustration below.
Location of controls SOURCE MODE SENS SEEK AMS SEL A.MEM OFF 1 2 DSPL 3 D-BASS RELEASE MUTE OFF INTRO REPEAT SHUF 1 2 3 4 5 6 Refer to the pages for details.
Specifications AUDIO POWER SPECIFICATIONS POWER OUTPUT AND TOTAL HARMONIC DISTORTION 12 watts per channel minimum continuous average power into 4 ohms, 4 channels driven from 20 Hz to 20 kHz with no more than 1% total harmonic distortion.
Troubleshooting guide The following checklist will help you remedy the problems that you may encounter with your unit. Before going through the checklist below, check the connection and operating procedures. General Problem Cause/Solution No sound. •Adjust the volume with (+). •Set the fader control to the center position for two-speaker systems. The contents of the memory have been erased. • The power cord or battery has been disconnected. • The reset button has been pressed.
Index A M, N, O Automatic Memory 6 Automatic Music Sensor (AMS) Automatic tuning 7 B 6 Power select 8 C R Caution alarm 4 CD playback 5 Clock 5 D, E Radio 6 Repeat Play 6 Reset 4 Rotary remote (CDX-4160 only) 10 S D-BASS 7 Display 5, 7 Shuffle Play 6 F, G, H T, U Fader 7 Front panel Fuse 9 Treble 7 4 V, W, X, Y, Z I, J, K Intro Scan Manual search 6 Manual tuning 7 Memorizing a station Monaural mode 7 Mute 7 P, Q Balance 7 Bass 7 Beep tone 8 EN 5 Volume 7 6 L Local seek 7 Locatin
Sony Corporation Printed in Korea Actual total number: Sony CDX-4160/3160 (E) 3-859-005-32(1)