filename[E:\BDV2011\Models\E2WFE8WF_UC\4261379111\4261379111BDV780WUC\Cover\01cov-cel.fm] masterpage:Right gb_book.
filename[E:\BDV2011\Models\E2WFE8WF_UC\4261379111\4261379111BDV780WUC\gb02saf.fm] masterpage:Left specdef v20070110 gb_book.book Page 2 Thursday, November 25, 2010 6:04 PM comply with FCC technical regulations. WARNING Do not install the appliance in a confined space, such as a bookcase or built-in cabinet. To reduce the risk of fire, do not cover the ventilation opening of the apparatus with newspapers, tablecloths, curtains, etc.
filename[E:\BDV2011\Models\E2WFE8WF_UC\4261379111\4261379111BDV780WUC\gb02saf.fm] masterpage:Right specdef v20070110 gb_book.book Page 3 Thursday, November 25, 2010 6:04 PM Important Safety Instructions 1) 2) 3) 4) 5) Read these instructions. Keep these instructions. Heed all warnings. Follow all instructions. Do not use this apparatus near water. 6) Clean only with dry cloth. 7) Do not block any ventilation openings. Install in accordance with the manufacturer’s instructions.
filename[E:\BDV2011\Models\E2WFE8WF_UC\4261379111\4261379111BDV780WUC\gb02saf.fm] masterpage:Left specdef v20070110 gb_book.book Page 4 Thursday, November 25, 2010 6:04 PM For the wireless transceiver (EZWRT50) This device complies with part 15 of the FCC rules. Operation is subject to the following two conditions: (1) this device may not cause harmful interference, and (2) this device must accept any interference received, including interference that may cause undesired operation.
filename[E:\BDV2011\Models\E2WFE8WF_UC\4261379111\4261379111BDV780WUC\gb02saf.fm] masterpage:Right specdef v20070110 gb_book.book Page 5 Thursday, November 25, 2010 6:04 PM the Gracenote logo and logotype, and the “Powered by Gracenote” logo are either registered trademarks or trademarks of Gracenote in the United States and/or other countries. • The Wi-Fi CERTIFIED™ Logo is a certification mark of the Wi-Fi Alliance. • The Wi-Fi Protected Setup™ Mark is a mark of the Wi-Fi Alliance.
filename[E:\BDV2011\Models\E2WFE8WF_UC\4261379111\4261379111BDV780WUC\gb_TOC.fm] gb_book.book Page 6 Thursday, November 25, 2010 6:04 PM masterpage:Left specdef v20070110 Table of Contents About These Operating Instructions ....... 5 Unpacking ............................................... 7 Index to Parts and Controls................... 10 Getting Started Step 1: Installing the System .......16 Step 2: Connecting the System ...20 Step 3: Connecting to the Network ....................................
filename[E:\BDV2011\Models\E2WFE8WF_UC\4261379111\4261379111BDV780WUC\gb03par.fm] masterpage:Right specdef v20070110 gb_book.
filename[E:\BDV2011\Models\E2WFE8WF_UC\4261379111\4261379111BDV780WUC\gb03par.fm] masterpage:Left specdef v20070110 gb_book.
filename[E:\BDV2011\Models\E2WFE8WF_UC\4261379111\4261379111BDV780WUC\gb03par.fm] gb_book.book Page 9 Thursday, November 25, 2010 6:04 PM masterpage:Right specdef v20070110 Preparing the remote Insert two R6 (size AA) batteries (supplied) by matching the 3 and # ends on the batteries to the markings inside the compartment.
filename[E:\BDV2011\Models\E2WFE8WF_UC\4261379111\4261379111BDV780WUC\gb03par.fm] masterpage:Left specdef v20070110 gb_book.book Page 10 Thursday, November 25, 2010 6:04 PM Index to Parts and Controls For more information, refer to the pages indicated in parentheses. Front panel VOL A Front panel display B Soft-touch buttons/indicators Z (open/close) (page 34) Opens or closes the disc tray. C VOL FUNCTION (USB) port (page 35) Used for connecting a USB device.
filename[E:\BDV2011\Models\E2WFE8WF_UC\4261379111\4261379111BDV780WUC\gb03par.fm] masterpage:Right specdef v20070110 gb_book.book Page 11 Thursday, November 25, 2010 6:04 PM Front panel display About the indications in the front panel display A Displays the system’s playing status. F Lights up when muting is on. B Lights up when repeat play is activated. G Displays the system’s status, such as radio frequency, etc. C Lights up when stereo sound is received.
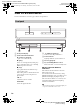
filename[E:\BDV2011\Models\E2WFE8WF_UC\4261379111\4261379111BDV780WUC\gb03par.fm] masterpage:Left specdef v20070110 gb_book.book Page 12 Thursday, November 25, 2010 6:04 PM Rear panel SPEAKERS FRONT R FRONT L COMPONENT VIDEO OUT SUBWOOFER CENTER Y PB OUT ARC DIGITAL IN COAXIAL SAT/ CABLE IN 1 EZW-RT50 L DIGITAL IN OPTICAL PR AUDIO IN ECM-AC2 IN 2 FM COAXIAL 75 R VIDEO OUT LAN (100) TV AUDIO A.
filename[E:\BDV2011\Models\E2WFE8WF_UC\4261379111\4261379111BDV780WUC\gb03par.fm] masterpage:Right specdef v20070110 gb_book.book Page 13 Thursday, November 25, 2010 6:04 PM Surround amplifier Rear panel Front panel L R IMPEDANCE USE 3-16 SPEAKERS EZW-RT50 SECURE LINK LINK/STANDBY A "/1 (Power) C Wireless transceiver (EZW-RT50) slot Turns the surround amplifier on/off. B LINK/STANDBY indicator You can check the status of wireless transmission between the main unit and surround amplifier.
filename[E:\BDV2011\Models\E2WFE8WF_UC\4261379111\4261379111BDV780WUC\gb03par.fm] masterpage:Left specdef v20070110 gb_book.book Page 14 Thursday, November 25, 2010 6:04 PM A Z (open/close) Remote control Opens or closes the disc tray. The buttons for system operation only are described below. See “Controlling Your TV or Other Components with the Supplied Remote” (page 51) for the buttons for operation of the connected components.
filename[E:\BDV2011\Models\E2WFE8WF_UC\4261379111\4261379111BDV780WUC\gb03par.fm] masterpage:Right specdef v20070110 gb_book.book Page 15 Thursday, November 25, 2010 6:04 PM E FUNCTION (pages 30, 45) G MUTING Selects the playback source. Turns off the sound temporarily. HOME (pages 29, 45, 48, 49, 53, 54, 55, 59) AUDIO (pages 43, 44) Enters or exits the system’s home menu. VOL +/– (page 45) SOUND MODE (page 43) Adjusts the volume. Selects the sound mode.
filename[E:\BDV2011\Models\E2WFE8WF_UC\4261379111\4261379111BDV780WUC\gb04gst.fm] masterpage:Left specdef v20080116 gb_book.book Page 16 Thursday, November 25, 2010 6:04 PM Getting Started Getting Started Step 1: Installing the System How to position the system Install the system by referring to the illustration below.
filename[E:\BDV2011\Models\E2WFE8WF_UC\4261379111\4261379111BDV780WUC\gb04gst.fm] masterpage:Right specdef v20080116 gb_book.book Page 17 Thursday, November 25, 2010 6:04 PM About the subwoofer’s speaker cord Bottom of the subwoofer When packing is opened: Speaker cord is connected. • To avoid short-circuiting the speakers, make sure that the speaker cord connection is not like the following examples. If there is a problem, correct it.
filename[E:\BDV2011\Models\E2WFE8WF_UC\4261379111\4261379111BDV780WUC\gb04gst.fm] masterpage:Left specdef v20080116 gb_book.book Page 18 Thursday, November 25, 2010 6:04 PM Getting Started When installing the subwoofer with the wide side facing forward Toward the listening position 1 Secure the speaker cord in the speaker cord holder to the right of the speaker terminal.
filename[E:\BDV2011\Models\E2WFE8WF_UC\4261379111\4261379111BDV780WUC\gb04gst.fm] masterpage:Right specdef v20080116 gb_book.book Page 19 Thursday, November 25, 2010 6:04 PM When installing the subwoofer with the narrow side facing forward Getting Started Toward the listening position 1 Secure the speaker cord in the speaker cord holder to the left of the speaker terminal.
filename[E:\BDV2011\Models\E2WFE8WF_UC\4261379111\4261379111BDV780WUC\gb04gst.fm] masterpage:Left specdef v20080116 gb_book.book Page 20 Thursday, November 25, 2010 6:04 PM Getting Started Step 2: Connecting the System For connecting the system, read the information on the following pages. Do not connect the AC power cords (mains leads) of the unit and surround amplifier to a wall outlet (mains) until all the other connections are made.
filename[E:\BDV2011\Models\E2WFE8WF_UC\4261379111\4261379111BDV780WUC\gb04gst.fm] masterpage:Right specdef v20080116 gb_book.
filename[E:\BDV2011\Models\E2WFE8WF_UC\4261379111\4261379111BDV780WUC\gb04gst.fm] masterpage:Left specdef v20080116 gb_book.book Page 22 Thursday, November 25, 2010 6:04 PM Getting Started Connecting the TV Connect the system to your TV to display the image of the system on your TV, and listen to TV sound via the system’s speakers. Depending on the jacks and functions on your TV, select the connection method.
filename[E:\BDV2011\Models\E2WFE8WF_UC\4261379111\4261379111BDV780WUC\gb04gst.fm] gb_book.book Page 23 Thursday, November 25, 2010 6:04 PM masterpage:Right specdef v20080116 A HDMI cable connection About Audio Return Channel If your TV is compatible with the Audio Return Channel function, an HDMI cable connection also sends a digital audio signal from the TV. You do not need to make a separate audio connection for listening to TV sound.
filename[E:\BDV2011\Models\E2WFE8WF_UC\4261379111\4261379111BDV780WUC\gb04gst.fm] masterpage:Left specdef v20080116 gb_book.book Page 24 Thursday, November 25, 2010 6:04 PM Getting Started Connecting the other components When a component you wish to connect to the system has an HDMI (OUT) jack You can connect a component that has an HDMI (OUT) jack such as a set-top box/digital satellite receiver or PLAYSTATION®3, etc., with an HDMI cable. An HDMI cable connection can send both video and audio signals.
filename[E:\BDV2011\Models\E2WFE8WF_UC\4261379111\4261379111BDV780WUC\gb04gst.fm] masterpage:Right specdef v20080116 gb_book.book Page 25 Thursday, November 25, 2010 6:04 PM When the component does not have an HDMI OUT jack TV Video out Component Audio out Signal flow System : Video signal : Audio signal If the component plays sound only, connect the audio output of the component to the system. Depending on the jacks on the component, select the connection method.
filename[E:\BDV2011\Models\E2WFE8WF_UC\4261379111\4261379111BDV780WUC\gb04gst.fm] masterpage:Left specdef v20080116 gb_book.book Page 26 Thursday, November 25, 2010 6:04 PM Getting Started Connecting the antenna (aerial) Rear panel of the unit FM COAXIAL 75 ANTENNA or FM wire antenna (aerial) (supplied) • Be sure to fully extend the FM wire antenna (aerial). • After connecting the FM wire antenna (aerial), keep it as horizontal as possible.
filename[E:\BDV2011\Models\E2WFE8WF_UC\4261379111\4261379111BDV780WUC\gb04gst.fm] masterpage:Right specdef v20080116 gb_book.book Page 27 Thursday, November 25, 2010 6:04 PM Step 3: Connecting to the Network Select the method based on your LAN (Local Area Network) environment. • If you use a wireless LAN The system has built-in Wi-Fi, and you can connect the system to the network by making the network settings.
filename[E:\BDV2011\Models\E2WFE8WF_UC\4261379111\4261379111BDV780WUC\gb04gst.fm] masterpage:Left specdef v20080116 Getting Started gb_book.book Page 28 Thursday, November 25, 2010 6:04 PM Step 4: Setting up the Wireless System The unit transmits sound to the surround amplifier that is connected to the surround speakers. To activate wireless transmission, perform the following Steps. 1 Insert the wireless transceiver into the unit. 4 Press "/1 to turn the system on.
filename[E:\BDV2011\Models\E2WFE8WF_UC\4261379111\4261379111BDV780WUC\gb04gst.fm] masterpage:Right specdef v20080116 gb_book.book Page 29 Thursday, November 25, 2010 6:04 PM 2 Connect the calibration mic to the A.CAL MIC jack on the rear panel. Set up the calibration mic at ear level using a tripod, etc. (not supplied). The front of each speaker should face the calibration mic, and there should be no obstruction between the speakers and the calibration mic.
filename[E:\BDV2011\Models\E2WFE8WF_UC\4261379111\4261379111BDV780WUC\gb04gst.fm] masterpage:Left specdef v20080116 gb_book.book Page 30 Thursday, November 25, 2010 6:04 PM Getting Started 5 Perform the [Easy Setup]. Follow the on-screen instructions to make the basic settings using C/X/x/c, and . Depending on the connection method (page 22), perform the following setting. • HDMI cable connection: Follow the instructions that are displayed on the TV screen.
filename[E:\BDV2011\Models\E2WFE8WF_UC\4261379111\4261379111BDV780WUC\gb04gst.fm] masterpage:Right specdef v20080116 gb_book.book Page 31 Thursday, November 25, 2010 6:04 PM Step 7: Enjoying Surround Sound 1 2 3 4 5 6 7 8 9 0 X/x/c, OPTIONS Selecting surround settings based on your listening preference The setting method differs depending on the function. When playing via the “BD/DVD”* or “FM” function 1 Press OPTIONS. The option menu appears on the TV screen.
filename[E:\BDV2011\Models\E2WFE8WF_UC\4261379111\4261379111BDV780WUC\gb04gst.fm] masterpage:Left specdef v20080116 gb_book.book Page 32 Thursday, November 25, 2010 6:04 PM 5 Press OPTIONS. Getting Started The option menu in the front panel display turns off. About speaker output of each surround setting The table below describes the options when you connect all the speakers to the unit. The default setting is [A.F.D. Multi] (“A.F.D. MULTI”).
filename[E:\BDV2011\Models\E2WFE8WF_UC\4261379111\4261379111BDV780WUC\gb04gst.fm] gb_book.book Page 33 Thursday, November 25, 2010 6:04 PM masterpage:Right specdef v20080116 • You can also select the surround setting in [Surround Setting] of [Audio Settings] (page 62).
filename[E:\BDV2011\Models\E2WFE8WF_UC\4261379111\4261379111BDV780WUC\gb05ply.fm] masterpage:Left specdef v20070110 gb_book.book Page 34 Thursday, November 25, 2010 6:04 PM 2 • Connect the system to a network (page 27). • Set [BD Internet Connection] to [Allow] (page 62). Playback Playing a Disc For playable discs, see “Playable Discs” (page 74). 1 2 3 Insert a BD-ROM with BONUSVIEW/ BD-LIVE. The operation method differs depending on the disc. Refer to the operating instructions of the disc.
filename[E:\BDV2011\Models\E2WFE8WF_UC\4261379111\4261379111BDV780WUC\gb05ply.fm] masterpage:Right specdef v20070110 gb_book.book Page 35 Thursday, November 25, 2010 6:04 PM Displaying the play information Example: when playing a BD-ROM You can play video/music/photo files on the connected USB device. For playable types of files, see “Playable Types of Files” (page 75). 1 Playback You can check the playback information, etc., by pressing DISPLAY.
filename[E:\BDV2011\Models\E2WFE8WF_UC\4261379111\4261379111BDV780WUC\gb05ply.fm] masterpage:Left specdef v20070110 gb_book.book Page 36 Thursday, November 25, 2010 6:04 PM Enjoying an iPod/iPhone Front panel You can enjoy the music/video/photo and charge the battery of an iPod/iPhone via the system. Rear panel TV or VIDEO IN Compatible iPod/iPhone models The compatible iPod/iPhone models are as follows. Update your iPod/iPhone with the latest software before using with the system.
filename[E:\BDV2011\Models\E2WFE8WF_UC\4261379111\4261379111BDV780WUC\gb05ply.fm] gb_book.book Page 37 Thursday, November 25, 2010 6:04 PM You can operate the iPod/iPhone using the buttons on the remote. For operation details of the iPod/iPhone, also refer to the operating instructions of the iPod/iPhone. To operate the iPod/iPhone using the remote You can operate the iPod/iPhone using the buttons on the remote. The following table shows an example of buttons that can be used.
filename[E:\BDV2011\Models\E2WFE8WF_UC\4261379111\4261379111BDV780WUC\gb05ply.fm] masterpage:Left specdef v20070110 gb_book.book Page 38 Thursday, November 25, 2010 6:04 PM Playing via a Network Streaming BRAVIA Internet Video BRAVIA Internet Video serves as a gateway delivering selected Internet content and a variety of on-demand entertainment straight to your unit. • For customers in the U.S. and Canada: Some Internet content requires registration via a PC before it can be played.
filename[E:\BDV2011\Models\E2WFE8WF_UC\4261379111\4261379111BDV780WUC\gb05ply.fm] masterpage:Right specdef v20070110 gb_book.book Page 39 Thursday, November 25, 2010 6:04 PM To play files stored on a DLNA server via the system (DLNA Player) Server You can play the same music at the same time across all Sony components which are compatible with the PARTY STREAMING function and connected to your home network.
filename[E:\BDV2011\Models\E2WFE8WF_UC\4261379111\4261379111BDV780WUC\gb05ply.fm] masterpage:Left specdef v20070110 gb_book.book Page 40 Thursday, November 25, 2010 6:04 PM • The sale and product lineup of products that are compatible with the PARTY STREAMING function differ depending on the area. Searching for video/music information You can acquire content information using Gracenote technology and search for related information. 1 2 Connect the system to a network (page 27).
filename[E:\BDV2011\Models\E2WFE8WF_UC\4261379111\4261379111BDV780WUC\gb05ply.fm] masterpage:Right specdef v20070110 gb_book.book Page 41 Thursday, November 25, 2010 6:04 PM [Video] only [Music] only Details Items Details [A/V SYNC] Adjusts the gap between picture and sound. For details, see “Adjusting the delay between the picture and sound” (page 42). [Add Slideshow BGM] Registers music files in the USB memory as slideshow background music (BGM).
filename[E:\BDV2011\Models\E2WFE8WF_UC\4261379111\4261379111BDV780WUC\gb05ply.fm] masterpage:Left specdef v20070110 gb_book.book Page 42 Thursday, November 25, 2010 6:04 PM Adjusting the delay between the picture and sound 5 Press OPTIONS. The option menu in the front panel display turns off. (A/V SYNC) When the sound does not match the pictures on the TV screen, you can adjust the delay between the picture and sound. The setting method differs depending on the function.