
Data Projector Operating Instructions

27
Operating a Computer from the Projector—Remote Desktop
Using the Network Features
If “Remote Desktop” was selected, this
option is not shown in the Switch dialog
box. In this case, proceed to step 4.
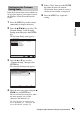
3 Press the v or V key to select “Remote
Desktop” then press the ENTER key.
The Remote Desktop menu is displayed.
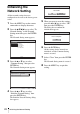
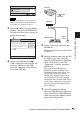
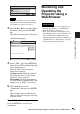
4 Connect the USB hub to the
(USB) connector on the projector and
connect a USB mouse and USB
keyboard (alphabetic layout 101/102
keys) to the USB hub.
5 Select “Connection” then press the
ENTER key.
The Remote Desktop Connection dialog
is displayed.
6 Enter the computer name that you will
be remotely accessing, using the
connected USB keyboard (alphabetic
layout 101/102 keys), and click
“Connection,” using the connected
USB mouse.
The logon dialog of Windows is
displayed. Operate according to the
instructions shown in the menus. You
can check the computer name by
clicking the [Computer name] tab of
[System Properties] of the computer.
Connection starts, then the same display
as that on the computer is projected by
the projector once the connection has
been completed.
7 Operate the computer with the
connected USB keyboard (alphabetic
layout 101/102 keys) and USB mouse,
while observing the computer picture
projected by the projector.
Note
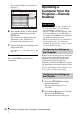
Select:
Set:
Switch
Close
Network File Viewer
Remote Desktop
Video Streaming
Remote Desktop
Select:
Press the "Connection" button. The "Remote
Desktop Connection" dialog box will open.
Connect a USB mouse and USB keyboard
to the projector for operations.
Set:
Connection
Switch
Detail Information
Press to finish the Remote Desktop
Connection.
Remote Desktop display
Projector
to (USB)
connector
USB hub
USB keyboard
USB
mouse