
DVD Recorder Operating Instructions


Table Of Contents
- WARNING
- Precautions
- Guide to Parts and Controls
- Hookups and Settings
- Hooking Up the Recorder
- Step 1: Connecting the Aerial Cable
- Step 2: Connecting the TV and Audio Component
- Step 3: Inserting a Conditional Access Module (CAM) (RDR-DC105/DC205/DC305/DC505 only)
- Step 4: Connecting the Mains Lead
- Step 5: Preparing the Remote
- Step 6: Easy Setup
- Connecting a VCR or Similar Device
- Connecting an External Decoder
- Basic Operations
- Recording to the HDD (“GUIDE Plus+”)
- Recording to the HDD (“Freeview+”)
- Using the EPG (Electronic Programme Guide) Display
- One Button Recording Using the EPG
- Recording TV Programme Using the EPG
- Recording Programmes Using Series Recording (Models for the UK Only)
- Setting the Timer Manually (Manual)
- Checking/Changing/Cancelling Timer Settings (Timer List)
- Recording from Connected Equipment
- Playback
- Erasing and Editing
- Dubbing (HDD y DVD)
- HDD/DV Camcorder Dubbing
- Settings and Adjustments
- Using the Disc Setup Menus (Disc Setup)
- Disc Settings (Disc Information)
- Formatting the HDD (HDD Formatting)
- Using the Setup Menus (Initial Setup)
- Clock Setting
- Aerial Reception Settings (Channel)
- Recorder Settings (System 1)
- Recorder Settings (System 2)
- Language Settings (Language)
- Video Settings (Video In/Out)
- Audio Input Settings (Audio In)
- Audio Output Settings (Audio Out)
- Limitation Settings (Parental Lock)
- Easy Setup (Resetting the Recorder)
- Additional Information
39
Recording to the HDD (“GUIDE Plus+”)
3 Press the red button (“Record”).
The set programme and Time Slot
change colour and the recorder is ready
to start recording.
Unlike a VCR, there is no need to turn
off the recorder before the timer
recording starts.
z
To cancel the timer recording, select the
programme set for timer recording, and press the
red button (“Cancel”).
To search for a programme
1 Press M to move the cursor to the Menu
Bar while the GUIDE Plus+ system
“Home Screen” is displayed.
2 Select “Search” using </,.
3 Press m.
4 Select a category or “My Choice” using
</,.
When you select “My Choice,” you can
search for a programme by keyword. To
enter a new keyword, see page 39.
5 Select a sub-category or keyword using
M/m, and press .
Programmes that meet the conditions
are listed.
When searching by keyword,
programmes that contain the keyword in
the programme’s title and in the
programme’s Information Box are
listed.
6 Select a programme using M/m, and
press .
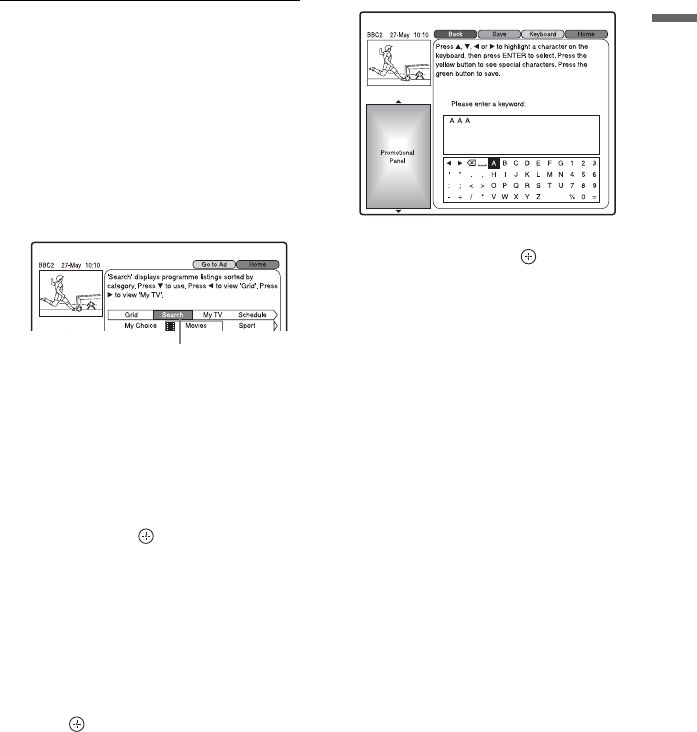
To enter a new keyword
1 After step 3 of “To search for a
programme,” select “My Choice” using
</,.
2 Press the yellow button (“Add”).
The display for entering characters
appears.
3 Select a character on the keyboard using
</M/m/,, and press .
To switch between upper-case, lower-
case, or characters with accents, press
the yellow button (“Keyboard”)
repeatedly.
To cancel entering a new keyword, press
the red button (“Back”).
4 Repeat step 3 to enter the keyword.
5 Press the green button (“Save”).
The entered keyword is registered.
To delete the keyword, select the
keyword you want to delete, and press
the red button (“Delete”).
To change the keyword, select the
keyword you want to change, and press
the green button (“Edit”).
6 Go to step 5 of “To search for a
programme” on page 39.
z
When two or more keywords are set for “My
Choice,” you can select “All” for sub-category.
To confirm, change, or cancel a timer
recording
See “Checking/Changing/Cancelling Timer
Settings (Schedule)” on page 42.
To stop recording during timer recording
Press x REC STOP.
Note that it may take a few seconds for the
recorder to stop recording.
“Search”