
DVD Recorder Operating Instructions


Table Of Contents
- WARNING
- Precautions
- Guide to Parts and Controls
- Hookups and Settings
- Hooking Up the Recorder
- Step 1: Connecting the Aerial Cable
- Step 2: Connecting the TV and Audio Component
- Step 3: Inserting a Conditional Access Module (CAM) (RDR-DC105/DC205/DC305/DC505 only)
- Step 4: Connecting the Mains Lead
- Step 5: Preparing the Remote
- Step 6: Easy Setup
- Connecting a VCR or Similar Device
- Connecting an External Decoder
- Basic Operations
- Recording to the HDD (“GUIDE Plus+”)
- Recording to the HDD (“Freeview+”)
- Using the EPG (Electronic Programme Guide) Display
- One Button Recording Using the EPG
- Recording TV Programme Using the EPG
- Recording Programmes Using Series Recording (Models for the UK Only)
- Setting the Timer Manually (Manual)
- Checking/Changing/Cancelling Timer Settings (Timer List)
- Recording from Connected Equipment
- Playback
- Erasing and Editing
- Dubbing (HDD y DVD)
- HDD/DV Camcorder Dubbing
- Settings and Adjustments
- Using the Disc Setup Menus (Disc Setup)
- Disc Settings (Disc Information)
- Formatting the HDD (HDD Formatting)
- Using the Setup Menus (Initial Setup)
- Clock Setting
- Aerial Reception Settings (Channel)
- Recorder Settings (System 1)
- Recorder Settings (System 2)
- Language Settings (Language)
- Video Settings (Video In/Out)
- Audio Input Settings (Audio In)
- Audio Output Settings (Audio Out)
- Limitation Settings (Parental Lock)
- Easy Setup (Resetting the Recorder)
- Additional Information
62
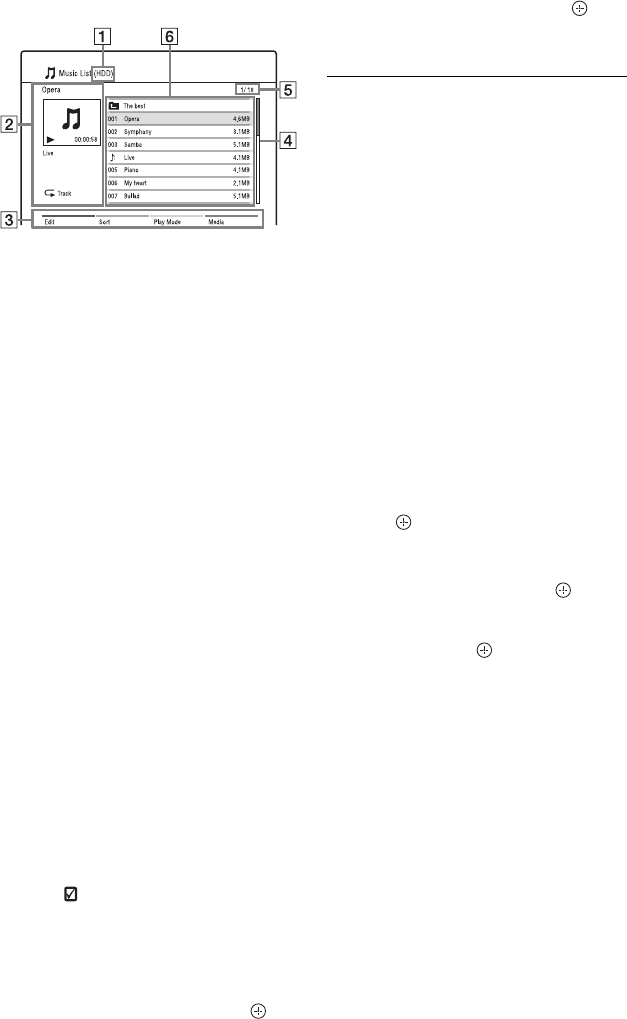
Example: HDD
A Media type: HDD, DVD, CD, or
USB
B Current folder/track/file name and
playback information
C Colour buttons:
Press the same colour button on the
remote.
Red button (“Edit”): Allows you to
erase/copy folders/tracks/files,
switch to the Playlist (page 62), etc.
Green button (“Sort”): Sorts files by
name or size.
Yellow button (“Play Mode”):
Allows you to set play mode
(Repeat Play or Shuffle Play).
Blue button (“Media”): Switches
the list to the Title List, DivX List,
or Photo List.
D Scroll bar:
Appears when all of the folders/
tracks/files do not fit on the list. To
view the hidden folders/tracks/files,
press M/m.
E Track/file number/Total number
of tracks/files
F Folder name/Track/file name/
Playing time or file size:
“9”: Indicates the currently playing
track/file.
“ ”: Select a folder/track/file, and
press MARKER. A check mark
appears next to the selected folder/
track/file. You can then edit all the
selected folders/tracks/files at once.
To display a track/file list, select a
folder using M/m, and press .
5 Select a track/file, and press or
N.
Playback starts.
To stop playback
Press x (stop).
To scroll the list display by page (Page
mode)
See “To scroll the list display by page (Page
mode)” on page 32.
Various playback options
See “Various playback options” on page 60.
To display ID3 tag information
Select an MP3 file on the Music List, and
press DISPLAY.
Press DISPLAY again to exit.
To create a Playlist
You can create Playlists on the HDD.
1 Press the red button (“Edit”) in the
Music List to select “New Playlist,” and
press .
The “New Playlist” display appears.
2 Select a file in the Music List (left) to
add to the Playlist, and press .
To remove a file from the Playlist, press
, to select the file in the Playlist
(right), and press .
To move the cursor back to the Music
List (left), press <.
3 Repeat step 2 to select all of the files you
want to add to the Playlist.
4 Press the red button (“Save”).
The Playlist is saved and the display
switches to the Playlist.
To go back to the Music List, press the
blue button (“Music List”).
Notes on playing discs with a DTS sound
track
DTS audio signals are output only through the
DIGITAL OUT (COAXIAL) jack or HDMI OUT
jack.
When you play a disc with DTS sound tracks, set
“DTS” to “On” in the “Audio Out” setup
(page 95).