
DVD Recorder Operating Instructions


Table Of Contents
- WARNING
- Precautions
- Guide to Parts and Controls
- Hookups and Settings
- Hooking Up the Recorder
- Step 1: Connecting the Aerial Cable
- Step 2: Connecting the TV and Audio Component
- Step 3: Inserting a Conditional Access Module (CAM) (RDR-DC105/DC205/DC305/DC505 only)
- Step 4: Connecting the Mains Lead
- Step 5: Preparing the Remote
- Step 6: Easy Setup
- Connecting a VCR or Similar Device
- Connecting an External Decoder
- Basic Operations
- Recording to the HDD (“GUIDE Plus+”)
- Recording to the HDD (“Freeview+”)
- Using the EPG (Electronic Programme Guide) Display
- One Button Recording Using the EPG
- Recording TV Programme Using the EPG
- Recording Programmes Using Series Recording (Models for the UK Only)
- Setting the Timer Manually (Manual)
- Checking/Changing/Cancelling Timer Settings (Timer List)
- Recording from Connected Equipment
- Playback
- Erasing and Editing
- Dubbing (HDD y DVD)
- HDD/DV Camcorder Dubbing
- Settings and Adjustments
- Using the Disc Setup Menus (Disc Setup)
- Disc Settings (Disc Information)
- Formatting the HDD (HDD Formatting)
- Using the Setup Menus (Initial Setup)
- Clock Setting
- Aerial Reception Settings (Channel)
- Recorder Settings (System 1)
- Recorder Settings (System 2)
- Language Settings (Language)
- Video Settings (Video In/Out)
- Audio Input Settings (Audio In)
- Audio Output Settings (Audio Out)
- Limitation Settings (Parental Lock)
- Easy Setup (Resetting the Recorder)
- Additional Information
63
Playback
To view photo files from the USB device,
see page 65.
If you have a Sony TV compatible with
“PhotoTV HD,” you can enjoy best quality
images.
1 Press HDD or DVD.
When you select DVD, insert a disc (see
“Playing Discs and Recorded
Programmes” on page 54).
2 Press SYSTEM MENU.
The System Menu appears.
3 Select “Media,” and press .
4 Select “Photo,” and press .
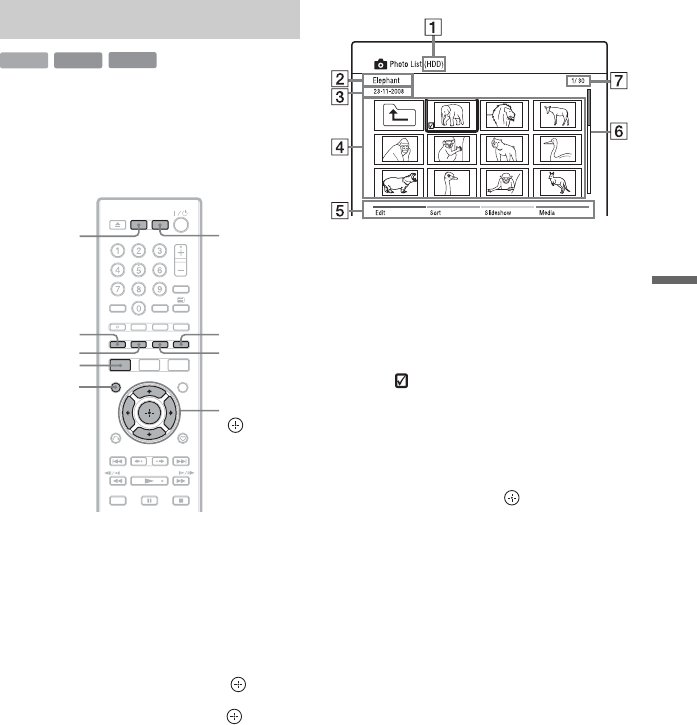
The Photo List appears.
Options applicable only to the selected
media are displayed.
Example: HDD
A Media type: HDD, DVD, CD, or
USB
B Photo folder/file name
C Date of photo folder/file
D Photo folders/files
“ ”: Select a folder/file, and press
MARKER. A check mark appears
by the selected folder/file. You can
then edit all the selected folders/
files at once.
To display a photo file list, select a
folder, and press .
E Colour buttons:
Press the same colour button on the
remote.
Red button (“Edit”): Allows you to
erase/copy folders/files, etc.
Green button (“Sort”): Sorts files by
name, date, or size.
Yellow button (“Slideshow”):
Allows you to start a slideshow.
You can also play the slideshow
with the sound (page 64).
Blue button (“Media”): Switches
the list to the Title List, Music List,
or DivX List.
F Scroll bar:
Appears when all of the folders/files
do not fit on the list. To view the
hidden items, press M/m.
G Photo file number/Total number
of photo files
Playing photo files
HDD
DATA DVD
DATA CD
Yellow button
G
reen button
Red button
</M/m/,,
DVDHDD
SYSTEM
MENU
MARKER
Blue button
,continued