DVD Recorder Operating Instructions
Table Of Contents
- WARNING
- Precautions
- Guide to Parts and Controls
- Hookups and Settings
- Hooking Up the Recorder
- Step 1: Connecting the Aerial Cable
- Step 2: Connecting the TV and Audio Component
- Step 3: Inserting a Conditional Access Module (CAM) (RDR-DC105/DC205/DC305/DC505 only)
- Step 4: Connecting the Mains Lead
- Step 5: Preparing the Remote
- Step 6: Easy Setup
- Connecting a VCR or Similar Device
- Connecting an External Decoder
- Basic Operations
- Recording to the HDD (“GUIDE Plus+”)
- Recording to the HDD (“Freeview+”)
- Using the EPG (Electronic Programme Guide) Display
- One Button Recording Using the EPG
- Recording TV Programme Using the EPG
- Recording Programmes Using Series Recording (Models for the UK Only)
- Setting the Timer Manually (Manual)
- Checking/Changing/Cancelling Timer Settings (Timer List)
- Recording from Connected Equipment
- Playback
- Erasing and Editing
- Dubbing (HDD y DVD)
- HDD/DV Camcorder Dubbing
- Settings and Adjustments
- Using the Disc Setup Menus (Disc Setup)
- Disc Settings (Disc Information)
- Formatting the HDD (HDD Formatting)
- Using the Setup Menus (Initial Setup)
- Clock Setting
- Aerial Reception Settings (Channel)
- Recorder Settings (System 1)
- Recorder Settings (System 2)
- Language Settings (Language)
- Video Settings (Video In/Out)
- Audio Input Settings (Audio In)
- Audio Output Settings (Audio Out)
- Limitation Settings (Parental Lock)
- Easy Setup (Resetting the Recorder)
- Additional Information

87
Settings and Adjustments
Recorder Settings
(System 1)
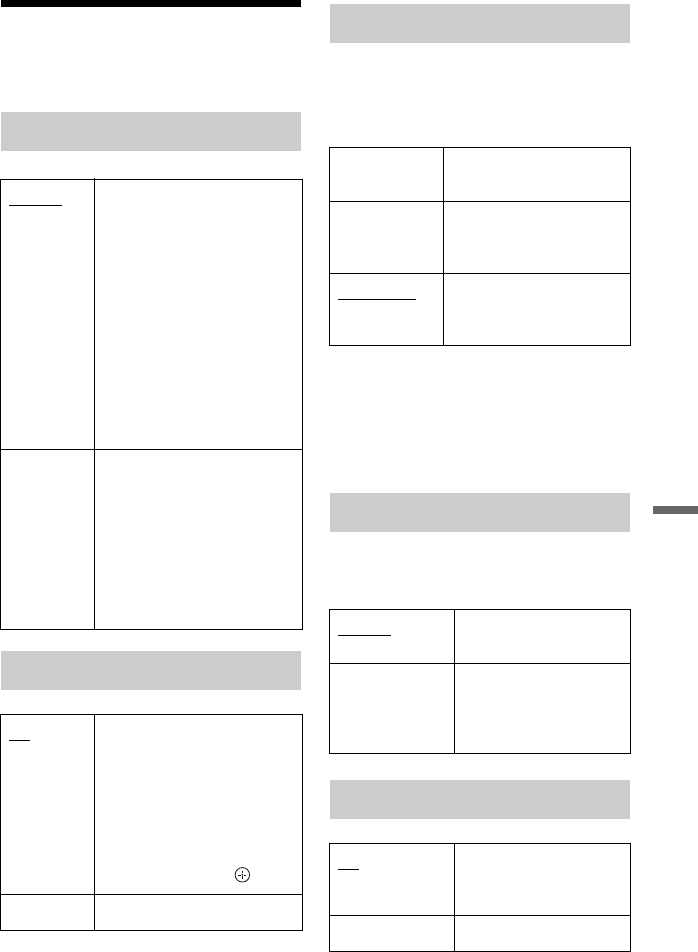
The recorder can automatically divide a
recording (title) into chapters by inserting
chapter marks. You can select chapter mark
intervals or disable this function.
b
• The actual chapter mark interval may vary
depending on the amount of information
contained in the video to be recorded.
• The “Auto Chapter” function is not available
during dubbing.
Sets the maximum continuous recording
time for recording in EP mode (only for
analogue broadcasts or an external input).
Standby Mode
Mode 1 When the recorder is turned
off,
– Input signals from the LINE
1/DECODER jack are not
output from the LINE 3 –
TV jack (page 25) and the
connected external decoder
cannot be used (page 27).
– Aerial input signals are not
output to the connected TV.
To watch TV, use a splitter to
divide aerial input signals
between the TV and the
recorder (page 16).
Mode 2 When the recorder is turned
off, input signals from the
LINE 1/DECODER jack are
output from the LINE 3 – TV
jack and aerial input signals
are output to the connected
TV. The standby power
consumption is higher than
that of “Mode 1.”
Auto Power off
On The recorder automatically
turns off when you do not
press any buttons for 6 hours
in stop mode. The display asks
for confirmation about one
minute before the recorder
turns off. If you want to keep
the recorder on, select
“Cancel,” and press .
Off Turns off the function.
Auto Chapter
Off No chapter mark is
inserted.
10 minutes Inserts chapter marks at
approximately 10-minute
intervals.
15 minutes Inserts chapter marks at
approximately 15-minute
intervals.
EP Mode Time
6 hours Allows you to record
continuously for 6 hours.
8 hours Allows you to record
continuously for 8 hours
with lower picture
quality.
Control for HDMI
On Allows you to use the
“Control for HDMI”
function (page 20).
Off Turns off the function.
,continued


