4-151-079-11(1) DVD Recorder Operating Instructions RDR-HDC100/HDC300/HDC500 © 2010 Sony Corporation
Precautions WARNING To reduce the risk of fire or electric shock, do not expose this apparatus to rain or moisture. To avoid electrical shock, do not open the cabinet. Refer servicing to qualified personnel only. The power cord (mains lead) must be changed only at a qualified service shop. Batteries or batteries installed apparatus shall not be exposed to excessive heat such as sunshine, fire or the like.
• Do not move the recorder for one minute after you have unplugged the AC power cord (mains lead). • Do not attempt to replace or upgrade the hard disk by yourself, as this may result in malfunction. If the hard disk drive should malfunction, you cannot recover lost data. The hard disk drive is only a temporary storage space. About repairing the hard disk drive • The contents of the hard disk drive may be checked in case of repair or inspection during a malfunction or modification.
Copy guard function Since the recorder has a copy guard function, programmes received through an external tuner (not supplied) may contain copy protection signals (copy guard function) and as such may not be recordable, depending on the type of signal. IMPORTANT NOTICE Caution: This recorder is capable of holding a still video image or on-screen display image on your television screen indefinitely.
Table of Contents WARNING . . . . . . . . . . . . . . . . . . . . . . . . . . . . . . . . . . . . . . . . . . . . . . . . . . 2 Precautions . . . . . . . . . . . . . . . . . . . . . . . . . . . . . . . . . . . . . . . . . . . . . . . . . 2 Guide to Parts and Controls . . . . . . . . . . . . . . . . . . . . . . . . . . . . . . . . . . . . . 8 Hookups and Settings Hooking Up the Recorder . . . . . . . . . . . . . . . . . . . . . . . . . . . . . . . . . . . . . . 13 Step 1: Connecting the Aerial Cable . . . .
Playback Playing Discs and Recorded Programmes . . . . . . . . . . . . . . . . . . . . . . . . 40 Pausing a TV broadcast (TV Pause/Pause Live TV) . . . . . . . . . . . . . 42 Playing from the beginning of the programme you are recording (Chase Play) . . . . . . . . . . . . . . . . . . . . . . . . . . . . . . . . . . . . . . . . 42 Playing a previous recording while making another (Simultaneous Rec and Play) . . . . . . . . . . . . . . . . . . . . . . . . . . .
Settings and Adjustments Using the Disc Setup Menus (Disc Setup) . . . . . . . . . . . . . . . . . . . . . . . . . 66 Disc Settings (Disc Information) . . . . . . . . . . . . . . . . . . . . . . . . . . . . . . . . . 66 Formatting the HDD (HDD Formatting) . . . . . . . . . . . . . . . . . . . . . . . . . . . 67 Using the Setup Menus (Initial Setup) . . . . . . . . . . . . . . . . . . . . . . . . . . . . 68 Clock Setting . . . . . . . . . . . . . . . . . . . . . . . . . . . . . . . . . . . . . . . . . . . .
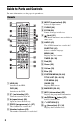
Guide to Parts and Controls For more information, see the pages in parentheses. Remote F INPUT (input select) (39) Selects an input source. G CLEAR (44) H ZOOM (50) Zooms an image in full view. I (text) (31) This button function is not available in some areas. J AUDIO (41) The AUDIO button has a tactile dot*. SUBTITLE (41) Selects a subtitle language. MENU (40) Displays the disc’s menu.
U ./> (previous/next) (41) PAGE +/– (33) Changes the programme list by page. / (instant replay/instant advance) (41) mc / CM (search/ slow/freeze frame) (41) DAY +/– (33) Changes the programme list by day. N (play) (40) X (pause) (27, 41) x (stop) (40) The N button has a tactile dot*. V DISPLAY (31) Displays the playing status. W z REC (27) x REC STOP (27) cz SYNCHRO REC This button function is not available. REC MODE (27) Selects the recording mode.
Front panel A [/1 (on/standby) (21) Turns the recorder on or off. B (remote sensor) (19) J x REC STOP (27) K z REC (27) L RESET C Disc tray (40) D Front panel display (11) E Z (open/close) (40) Opens or closes the disc tray. F N (play) (40) The N button has a tactile dot*. G x (stop) (40) When the recorder does not operate properly, press the RESET button. M LINE 2 IN (S VIDEO/VIDEO/ L(MONO) AUDIO R) jacks (25) Connect a VCR or similar recording device to these jacks.
Front panel display A Displays the following: • • • • • Playing/Recording time Current title number Clock Programme position UPDATE indication “UPDATE” appears when the recorder is updating information. B HDD Lights up when the HDD is selected. DVD Lights up when the DVD is selected. C Timer indicator (36) Lights up when the timer for recording is set. D NTSC indicator (76) Lights up when playing an NTSC disc. E Disc type “RW” lights up when a DVD+RW/ DVD-RW disc is loaded.
Rear panel A AERIAL IN/OUT jacks (14) B LINE 2 OUT (R-AUDIO-L/VIDEO) jacks (16) C LINE 1 jack (23) To connect the EURO AV adapter, see page 17. D HDMI OUT jack (15) 12 E DIGITAL OUT (COAXIAL) jack (16) F AC IN terminal (19) G LINE 3 – TV jack (15) To connect the EURO AV adapter, see page 17.
Hookups and Settings Hooking Up the Recorder b • • • • • See “Specifications” (page 96) for a list of supplied accessories. Plug in cables securely to prevent unwanted noise. Refer to the instructions supplied with the components to be connected. You cannot connect this recorder to a TV that does not have a video input jack. Be sure to disconnect the AC power cord (mains lead) of each component before connecting.
Step 1: Connecting the Aerial Cable Connect the aerial cable by following the steps below. “Standby Mode” is set to “Mode 1” (default) in the “System 1” setup and the picture does not appear on the TV when the recorder is in standby mode. To watch TV in standby mode, set “Standby Mode” to “Mode 2” in “Step 5: Easy Setup” (page 21) or use a splitter to divide aerial input signals between the TV and the recorder. z You can also set “Standby Mode” to “Mode 2” in the “System 1” setup (page 72).
Step 2: Connecting the TV and Audio Component Select one of the following patterns according to the input jack on your TV monitor, projector, or audio component such as an AV amplifier (receiver). Connect the EURO AV adapter with selector to the LINE 3 – TV jack, and set the selector to the “OUTPUT” position (page 17). Then, connect the EURO AV adapter and the input of your TV using the audio/video cable. This connection will enable you to view pictures and listen to sound.
To connect a TV through an audio component DVD recorder Audio component TV HDMI cable (not supplied) HDMI cable (not supplied) Connecting other cables To connect to video jacks To connect to audio jacks Connecting to video jacks will enable you to view pictures. Connecting to audio jacks will enable you to listen to sound.
D Audio L/R (left/right) output jacks White (L) White (L) Red (R) When connecting to the HDMI jack Follow the steps below. Improper handling may damage the HDMI jack and the connector. 1 This connection will use your TV’s or audio component’s two speakers for sound. To connect the EURO AV adapter Two types of EURO AV adapters are supplied with the recorder; with selector (big) and without selector (small).
z For correct speaker location, refer to the operating instructions supplied with the connected components. b • Do not connect more than one type of video cable between the recorder and your TV at the same time. • You cannot connect the HDMI OUT jack to DVI jacks that are not HDCP compliant (e.g., DVI jacks on PC displays). • Component progressive signals are not output when using the HDMI connection. • Do not connect your TV’s audio output jacks to the LINE 2 IN (R-AUDIO-L) jacks at the same time.
Step 3: Connecting the AC power cord (Mains Lead) You can control the recorder using the supplied remote. Insert two R6 (size AA) batteries by matching the 3 and # ends on the batteries to the markings inside the battery compartment. When using the remote, point it at the remote sensor on the recorder. Hookups and Settings Connect the supplied AC power cord (mains lead) to the AC IN terminal of the recorder. Then plug the recorder and TV AC power cords (mains leads) into the mains.
Controlling TVs with the remote You can adjust the remote’s signal to control your TV. b • Depending on the connected unit, you may not be able to control your TV with some or all of the buttons below. • If you enter a new code number, the code number previously entered will be erased.
Changing programme positions of the recorder using the remote Example: for channel 50 Press “5,” “0,” then press Make the basic adjustments by following the on-screen instructions in “Easy Setup.” Be careful not to disconnect the cables or exit the “Easy Setup” function during this procedure. . [/1 Hookups and Settings You can change programme positions of the recorder using the number buttons. Step 5: Easy Setup
TV Type (page 75) • If you have a widescreen TV, select “16:9.” • If you have a standard TV, select “4:3 Letter Box” or “4:3 Pan Scan.” This will determine how “widescreen” images are displayed on your TV. Progressive When you connect a progressive format TV to this recorder using the COMPONENT VIDEO OUT jacks, select “Compatible.” When using the HDMI connection (page 15), the recorder skips the “Progressive” setting. Standby Mode (page 72) Select the mode for when the recorder is turned off.
Connecting a VCR or Similar Device Hookups and Settings After disconnecting the recorder’s AC power cord (mains lead) from the mains, connect a VCR or similar recording device to the LINE IN jacks of this recorder. To watch the connected VCR or a similar device’s picture through the recorder while the recorder is in standby mode, set “Standby Mode” to “Mode 2” in the “System 1” setup (page 72). If not, the picture will not appear.
b • Pictures containing copy protection signals that prohibit any copying cannot be recorded. • If you pass the recorder signals through a VCR, you may not receive a clear image on your TV screen. DVD recorder VCR TV Be sure to connect your VCR to the DVD recorder and to your TV in the order shown below. To watch video tapes, watch the tapes through a second line input on your TV.
Connecting to the LINE 2 IN jacks on the front panel Connect a VCR or similar recording device to the LINE 2 IN jacks of this recorder. If the equipment has an S-video jack, you can use an S-video cable instead of an audio/video cable. VCR, etc.
Media Basic Operations Using the System Menu The System Menu provides entry to the recorder’s functions. SYSTEM MENU Timer Recording
To pause recording Recording a TV Programme to the HDD HDD b The recording destination is HDD only. [/1 PROG +/– INPUT To change the recording mode (for analogue broadcasting only) Press REC MODE repeatedly to select the recording mode before recording starts. Each time you press the button, the display on the TV screen changes as follows: For more details about the recording mode, see page 91.
Using the Quick Timer function You can set the recorder to record in 30minute increments. Press z REC repeatedly to set the duration. Each press advances the time in 30-minute increments. The maximum duration is 8 hours. Playing the Recorded Programme (Title List) HDD +RW -RVR -RVideo -RWVR -RWVideo +R To play a recorded title, select the title from the Title List. b (normal recording) The recorder records TV programmes only to the HDD.
2 Press TITLE LIST. G Icons/Title name/Recording Date: • Options applicable only to the selected media are displayed. • Only the options that are available during recording are displayed. Example: HDD 3 B Preview of the selected title: Displays the selected title’s preview with information (title name, recording date and time, station name or programme number, recording mode, title size, and icons). For details on icons, see “Icons/Title name/Recording Date:” below.
Visual Search Select a title in the Title List, and press the yellow button “Go To” to select “Visual Search.” Chapters in the selected title are displayed in the “Visual Search” display. Select a chapter using
To display the programme information (for digital broadcasting only) While watching TV, press INFO. The information display appears showing a description of the current programme on view. To switch the display between descriptions of the current and next programme, press
3 Select a channel you want to add to the Favourites List using M/m, and press the green button (“Add”). The selected channel is added to the Favourites List. • To remove a channel from the Favourites List, press the red button (“Remove”) after step 1. Then select a channel you want to remove from the Favourites List using M/m, and press the red button (“Remove”) again. • To scroll the list display by page, press ./>. • To go back to the Favourites List, press O RETURN.
Press GUIDE. Recording to the HDD Using the EPG (Electronic Programme Guide) Display This display consists of an information box and a 9-channel programme list covering a 30-minute period. Example of EPG Display: Recording to the HDD The Electronic Programme Guide is a guide showing the television programme schedule for a day or more at a time on your television. The EPG provides a quick and easy way to: • View a complete list of all available channels.
Buttons Operations Displays the Favourites List. INFO Colour buttons (red, yellow, green, blue) TIMER Displays the detailed information of the selected programme. : Indicates that the programme has parental control information (page 79). : Indicates that the programme is pay-perview. Activates the same colour function on the screen. One Button Recording Using the EPG HDD The EPG function is a feature that simplifies setting the timer. Just select the programme you want to record in the EPG display.
3 Press the red button (“REC”). To stop recording during timer recording Press x REC STOP. Note that it may take a few seconds for the recorder to stop recording. z • To cancel the timer recording, select the programme set for timer recording, and press the red button (“Cancel”). • You can display the favourite channels set in the Favourites List on the EPG display (page 34).
To search for programmes by genre (Genre) 1 Press the yellow button (“Genre”) while the programme list is displayed. 2 Select a genre using M/m, and press . Programmes that belong to the selected genre are displayed in the programme list. To stop recording during timer recording Press x REC STOP. Note that it may take a few seconds for the recorder to stop recording. z • To cancel the timer recording, select the programme set for timer recording, and press the red button (“Cancel”).
“Mode”: Sets the recording mode (for analogue broadcasting only) (page 91). “Update”: Sets the recorder automatically, replacing the previous timer recording with the new one (only when “Date” is set daily or weekly). • If you make a mistake, select the item and change the setting. Press . The “Timer List” display appears. The timer recording indicator lights up on the front panel display and the recorder is ready to start recording.
When the timer settings overlap Checking/Changing/ Cancelling Timer Settings (Timer List) HDD You can check, change, or cancel the timer settings using the Timer List. Checking/changing timer settings b When you change the EPG timer settings, the update function turns off automatically. 1 Press TIMER. The “Timer List” display appears. When all of the timer settings are not visible on the display, press M/m to view the hidden timer settings.
b Recording from Connected Equipment HDD 1 Press INPUT to select an input source (“LINE 1” or “LINE 2”) according to the connection you made. 2 Select the desired audio signal when recording a bilingual programme. Recording to the HDD You can record from a connected VCR or similar device. To connect a VCR or similar device, see “Connecting a VCR or Similar Device” on page 23. • When recording a video game image, the screen may not be clear.
3 Playback Wait until “LOADING” disappears from the front panel display. • If you insert a DVD VIDEO or VIDEO CD, press N. Playback starts. Playing Discs and Recorded Programmes HDD +RW -RVR -RVideo -RWVR -RWVideo DVD +R 4 Press TITLE LIST. Example: HDD VCD Z (open/ close) HDD Press Z (open/close) to close the disc tray. DVD AUDIO SUBTITLE TITLE LIST INFO
To play VIDEO CDs/Super VIDEO CDs with PBC (Playback Control) functions 1 Press TOP MENU to open the menu of the VIDEO CD/Super VIDEO CD. 2 3 Select an item using the number buttons. Follow the instructions in the menu. Press N when “Press SELECT” appears. To play restricted DVDs (Parental Lock) One-Touch Play (for HDMI connection only) Press N. With one touch of the N button, the recorder and your TV automatically turn on and the TV’s input is switched to the recorder. Playback starts automatically.
Buttons Operations c / C* Plays in slow motion when pressed for more than one second in pause (slow, freeze frame) mode. Plays one frame at a time when pressed briefly in pause mode. To resume normal playback, press N. * For VIDEO CDs/Super VIDEO CDs, playback direction only. X (pause) Pauses playback. To resume normal playback, press N.
3 Playing a previous recording while making another (Simultaneous Rec and Play) HDD +RW -RVR -RVideo -RWVR -RWVideo DVD Select the number of the title, chapter, time code, etc., you want using the number buttons or
3 Select an item to be repeated using
8 Playing DivX/Music/ Photo Files Connect the USB device to the USB jack on the recorder. Refer to the operating instructions supplied with the USB device before connecting. 9 DVD recorder Repeat step 8 to select all the folders or files/tracks you want to copy. Playback A check mark appears by the selected item. • To clear the check mark, press MARKER again. • To select/unselect all items, press the yellow button (“Selection”) repeatedly.
4 Notes on copying files • Music files from a CD are converted to MP3 format. Names for music files are automatically labelled as “TRACK01,” “TRACK02,” etc. • While copying files, other operations including timer recordings are unavailable. If the timer is set during copying, the recorder starts the timer recording after copying is finished. • Some discs cannot be copied to the HDD. • If the HDD becomes full during copying, a warning message appears.
5 Select a file using M/m, and press or N. Playback starts. Operations C* (slow, freeze frame) Plays in slow motion when pressed for more than one second in pause mode. Plays one frame at a time when pressed briefly in pause mode. To resume normal playback, press N. X (pause) Pauses playback. To resume normal playback, press N. To stop playback Press x (stop). To scroll the list display by page (Page mode) See “To scroll the list display by page (Page mode)” on page 29.
To display playback information Example: HDD See “Displaying the programme/playback information” on page 31. Playing music CDs and MP3 HDD CD DATA DVD DATA CD To play from the USB device, see page 51. HDD Red button Green button SYSTEM MENU MARKER DVD Blue button Yellow button
5 Select a track/file, and press N. or Playback starts. To stop playback Press x (stop). To scroll the list display by page (Page mode) Playing photo files HDD DATA DVD DATA CD To view photo files from the USB device, see page 51. If you have a Sony TV compatible with “PhotoTV HD,” you can enjoy best quality images. HDD DVD Various playback options See “Various playback options” on page 47. To display ID3 tag information Select an MP3 file on the Music List, and press DISPLAY.
Example: HDD 5 Select a photo file, and press . The photo file is displayed in full view. • To view the previous/next image, press ./>. • To rotate the image, press the green button (“Rotate”). • To start a slideshow from the current image, press N. • To go back to the Photo List, press O RETURN. A Media type: HDD, DVD, CD, or USB B Photo folder/file name z When you select photo files using the MARKER button, only the selected photo files are played in full view or slideshow.
3 Set the screen resolution of the TV to 1080p or 1080i. When your TV is compatible with [VIDEO-A] mode, set the TV’s video/ photo setting to [VIDEO-A] mode. For details, refer to the operating instructions supplied with the TV. To play a slideshow with the sound (HDD only) 1 2 3 4 After step 4 of “Playing photo files” on page 49, press the yellow button (“Slideshow”) while a file is highlighted and select “Effect Setting,” then press . The “Effect Setting” display appears. Select “BGM” or “Speed.
7 Select a folder or file to copy, and press MARKER. A check mark appears by the selected item. • To clear the check mark, press MARKER again. • To select/unselect all items, press the yellow button (“Selection”) repeatedly. • To change the item order, press the green button (“Sort”) to select “Name,” “Size,” or “Date” (for photo files only), and press . 8 Repeat step 7 to select all the folders or files you want to copy. 9 Press the red button (“Start Copy”). The items are copied to the disc.
Erasing and Editing Before Editing You can edit titles on the HDD. b This section explains the basic edit functions. Note that editing is irreversible. 1 2 Press TITLE LIST. Select a title, and press the red button (“Edit”). The sub-menu appears. 3 Select an option, and press . You can make the following edits to the title. “Erase”: Erases the selected titles (page 53). “Dubbing”: Displays the Dubbing List (page 56). “Rename”: Allows you to change the title name (page 55).
6 Select “Yes,” and press . To cancel “A-B Erase” Press O RETURN. The Title List appears. The selected titles are erased. b b Titles on DVD+RWs/DVD+Rs or DVD-RWs/ DVD-Rs (Video mode) cannot be erased. Erasing a section of a title (A-B Erase) HDD • Images or sound may be momentarily interrupted at the point where you erase a section of a title. • Sections shorter than about 3 seconds may not be erased. Dividing a title (Divide) HDD You can select a section (scene) in a title and erase it.
b Labelling a title (Rename) Only the characters displayed on the on-screen keyboard can be input with this recorder. HDD 1 2 Press TITLE LIST. 3 Press the red button (“Edit”) to select “Rename,” and press . Select the title you want to rename using M/m. You can enter up to 31 characters. Input row: the current name Erasing and Editing 4 Move the cursor to the point where you want to insert the character using
Dubbing (HDD y DVD) Before Dubbing In this section, “dubbing” refers to “copying a recorded title on the internal hard disk drive (HDD) to another disc, or vice versa.” Before you start, read the following precautions, which are common to all dubbing methods. Dubbing from the HDD to a DVD (HDD t DVD) HDD +RW -RVR -RVideo +R You can select the titles you want to dub at 1× speed using Dubbing List. 1 Insert the DVD that you are going to dub to. See “Playing Discs and Recorded Programmes” on page 40.
5 Select a title you want to dub, and press MARKER. A check mark appears next to the selected title. • To cancel the selection, press MARKER again. • To select/unselect all items, press the yellow button (“Selection”) to select “Select All” or “Unselect All,” and press . • To change the title order, press the green button (“Sort”) to select “By Name,” “By Length,” etc., and press . 6 Press the red button (“Start Dub”).
To cancel dubbing Dubbing from a Finalised DVD to the HDD (DVD t HDD) HDD +RW -RVR -RVideo -RWVR -RWVideo Press x REC STOP. When dubbing is stopped partway, no part of the title will be dubbed to the HDD. b +R You can dub titles on a finalised DVD to the HDD. 1 Insert the finalised DVD that you are going to dub from. See “Playing Discs and Recorded Programmes” on page 40. 2 3 Press DVD. Press SYSTEM MENU. The System Menu appears. 4 5 6 Select “Media,” and press .
Playing the Disc on Other DVD Equipment (Finalise) -RWVR -RWVideo +R -RVR -RVideo Finalising is necessary when you play discs dubbed with this recorder on other DVD equipment. Before finalising, check the differences between the disc types in the table below. Differences between disc types +RW -RWVideo -RVR +R -RVideo Finalising is unnecessary when playing a disc on VR format compatible equipment. After finalising, you cannot edit or dub on the disc.
b HDD/DV Camcorder Dubbing Dubbing from HDD Camcorder You can dub the contents of a Sony HDD camcorder to the hard disk drive of the recorder via the USB jack on the front panel. Methods to dub from the HDD camcorder include: – One-Touch Dubbing – Dubbing using the on-screen display Follow the instructions in “Preparing for HDD camcorder dubbing,” and then move on to the section on dubbing.
b Preparing for HDD camcorder dubbing Connect an HDD camcorder to the USB jack on the recorder. Refer as well to the instruction manual supplied with the HDD camcorder before connecting. 1 Turn on your HDD camcorder and the recorder. 2 Connect your HDD camcorder to the USB jack on the front panel. • Connect the HDD camcorder directly to the recorder. • Do not disconnect the USB cable while dubbing.
Dubbing from HDD camcorder using the on-screen display (HDD-Cam Dubbing) HDD You can dub the contents of your HDD camcorder onto the HDD of the recorder using the on-screen display. 1 Follow steps 1 to 3 of “Preparing for HDD camcorder dubbing” on page 61. 2 Press SYSTEM MENU. The System Menu appears. 3 Select “HDD-Cam/DV,” and press . 4 Select “HDD-Cam Dubbing,” and press . 5 Select “Yes” or “No” using
b Dubbing from DV Camcorder This section explains dubbing with a DV camcorder via the DV IN jack on the front panel. If you want to dub by way of the LINE IN jacks, see “Recording from Connected Equipment” on page 39. The DV IN jack on this recorder conforms to the i.LINK standard. Follow the instructions in “Preparing for DV camcorder dubbing,” and then move on to the section on dubbing. For more information about i.LINK, see “About i.LINK” on page 96.
2 Press REC MODE on the remote repeatedly to select the recording mode. To change the recording mode, press INPUT to switch the input source to analogue broadcasting or the external input beforehand. For details about the recording mode, see page 91. 3 Set the “DV Input” setting in the “Audio In” setup (page 77). You are ready to start dubbing. Select one of the dubbing methods on the following pages. b • You cannot connect more than one piece of digital video equipment to the recorder.
b Dubbing from DV camcorder using the on-screen display (DV Dubbing) HDD You can select and dub scenes while playing a DV/Digital8 format tape. 1 Follow steps 1 to 3 of “Preparing for DV camcorder dubbing” on page 63. 2 Press SYSTEM MENU. • You cannot set a scene to be shorter than one second. • The recorder will pause recording when there is a blank space or an image containing copy protection signals or signals in a different colour system from that of the recorder on the tape.
Settings and Adjustments Using the Disc Setup Menus (Disc Setup) You can adjust HDD/DVD related settings. 1 Press SYSTEM MENU while the recorder is in stop mode or during playback. 2 Select “Disc Setup” using M/m, and press . 3 Select the desired setup item using M/m, and press . See the explanations in the following sections. Disc Settings (Disc Information) You can check the disc information and use the following functions. Example: When a DVD-RW (VR mode) is inserted.
Unfinalise You can unfinalise a disc when the disc is finalised. For DVD-RWs (Video mode) DVD-RWs (Video mode) that have been finalised to prohibit additional dubbing can be unfinalised to allow further dubbing. Formatting the HDD (HDD Formatting) You can check used/remaining space of the HDD and use the following functions. For DVD-RWs (VR mode) If you cannot edit on a DVD-RW (VR mode) that has been finalised with other DVD equipment, unfinalise the disc.
Using the Setup Menus (Initial Setup) You can change the settings of the recorder, such as channel settings, audio settings, etc. 1 Press SYSTEM MENU while the recorder is in stop mode or during playback. 2 Select “Initial Setup” using M/m, and press . 3 Select the desired setup item using M/m, and press . See the explanations in the following sections. The default settings are underlined.
5 Aerial Reception Settings (Channel) You can make tuner and channel settings for the recorder. Select your area using
• Yellow button (“Swap”): Changes the channel order. Select the channel you want to move, and press the yellow button (“Swap”). Then select another channel to swap positions with, and press the yellow button (“Swap”). • Blue button (“Signal”): Displays the signal strength and the signal quality. Channel coverage BG • Australia E2 – E12 VHF AS0 – AS12 VHF E21 – E69 UHF AS28 – AS69 UHF b S1 – S20 CATV To retain the current channel list setting at “Swap,” etc.
Channel Set number Channel AFT 41 AS41 42 AS42 43 AS43 44 AS44 45 AS45 46 AS46 47 AS47 48 AS48 • If the Auto Fine Tuning function does not work effectively, select “Off” and press m to select “Level.” Press
Recorder Settings (System 1) Standby Mode Mode 1 Mode 2 When the recorder is turned off, input signals from the LINE 1 jack are output from the LINE 3 – TV jack and aerial input signals are output to the connected TV. The standby power consumption is higher than that of “Mode 1.” The recorder can automatically divide a recording (title) into chapters by inserting chapter marks. You can select chapter mark intervals or disable this function. Off No chapter mark is inserted.
DivX® Registration Displays the registration code of DivX video files for this recorder. ABOUT DIVX VIDEO-ON-DEMAND: This DivX Certified® device must be registered in order to play DivX Video-onDemand (VOD) content. Go to vod.divx.com with this code to complete the registration process and learn more about DivX VOD. Recorder Settings (System 2) Software Update You can check the current software version of the built-in digital tuner and keep it up to date with the latest software.
Front Panel Display Adjusts the lighting of the front panel display. On Bright lighting. Off Turns off the lighting and saves power consumption when the power is off. Language Settings (Language) You can make language settings. DVD Menu (DVD VIDEO only) Switches the language for the DVD menu. b When you select “Off,” Child Lock is not available. To set the Child Lock, select “On.” DVD Audio (DVD VIDEO only) Switches the language of the sound track.
Video Settings (Video In/ Out) You can adjust items related to the image, such as size and colour, according to the type of TV or tuner that is connected to the recorder. Component Video Out Selects the signal format in which the recorder outputs video signals: interlace or progressive, from the COMPONENT VIDEO OUT jacks. Normal (Inter- Outputs signals in the lace) interlace format.
Input Colour System Selects the colour system when picture noise appears. This setting is effective when you record an analogue broadcast or an external input. Auto Recorder automatically detects signals of colour systems and selects the appropriate colour system. PAL Selects the PAL colour system. SECAM Selects the SECAM colour system. 4:3 Video Output This setting is effective only when you set “TV Type” to “16:9” in the “Video In/Out” setup. Adjust this setting to watch 4:3 aspect ratio signals.
b Audio Input Settings (Audio In) You can adjust the sound according to the playback and connection conditions. NICAM Select For details on NICAM system, see page 37. NICAM Normally select this position. Standard Select this if the sound from NICAM broadcasts is not clear. When recording a bilingual audio signal to the HDD (when “Bilingual Rec. Mode (HDD)” is set to “On” (page 77)), both audio channels are recorded and you can select the sound when playing.
b Audio Output Settings (Audio Out) You can switch the method of outputting audio signals when you connect a component such as an amplifier (receiver) with a digital input jack. b If you connect a component that does not accept the selected audio signal, a loud noise (or no sound) will come from the speakers, and may affect your ears or cause speaker damage. When HDMI output is performed to equipment not compatible with DTS signals, the signals will not be output regardless of the “DTS” setting.
DRC (Dynamic Range Control) Selects the dynamic range (difference between soft and loud sounds) setting when playing sounds that conform to “DRC.” This affects the output from the following jacks: – LINE 2 OUT (R-AUDIO-L) jacks – LINE 3 – TV jack – LINE 1 jack – DIGITAL OUT (COAXIAL)/HDMI OUT jack only when “Dolby Digital” is set to “PCM” (page 78). Off Normally select this position. On Makes low sounds clear even if you turn the volume down.
Change Password You can change the password that gives access to the “Parental Lock” settings. Enter your four-digit password using the number buttons, then enter a new password. b If you forgot your password, reset the recorder (page 87). 80 Easy Setup (Resetting the Recorder) Select this to run the “Easy Setup” programme. Follow the instructions for “Easy Setup” (page 21).
Additional Information Troubleshooting If you experience any of the following difficulties while using the recorder, use this troubleshooting guide to help remedy the problem before requesting repairs. Should any problem persist, consult your nearest Sony dealer. Power The power does not turn on. , Check that the AC power cord (mains lead) is connected securely. The power of the recorder turns off at the same time as the TV is turned off. Tuner The channel is not found or stored or missed.
, When playing a double-layer DVD, the video and audio may be momentarily interrupted at the point where the layers switch. , Video signals from the LINE 1 jack appear in standby mode when connecting your TV to the LINE 3 – TV jack. This is not a malfunction. In this case, reconnect your TV to the LINE 2 OUT jacks, or turn off the equipment connected to the LINE 1 jack. There is no picture or picture noise appears when connected to the DV IN jack. , Try the following: 1Turn the recorder off and on again.
The picture does not fill the screen. , Set “TV Type” in the “Video In/Out” setup in accordance with the screen size of your TV (page 75). The picture does not fill the screen, even though the picture size is set in “TV Type” in the “Video In/Out” setup. , The picture size of the title is fixed. The picture is black and white. , If you are using a EURO AV (SCART) cable, check that “LINE 3 Out [LINE 1 In]” in the “Video In/Out” setup is set to the appropriate item that conforms to your system (page 75).
Recording/Timer recording/ Editing Recording to a DVD is not possible. Recording does not stop immediately after you press x REC STOP. , It will take a few seconds for the recorder to input disc data before recording can stop. , The recording destination is HDD only. The programme position cannot be changed from the programme position you are recording. , Set the TV’s input source to “TV.” Recording does not start immediately after you press z REC.
, Moisture has condensed inside the recorder. See “Notes About This Recorder” on page 94. , If the disc was recorded on another recorder and was not finalised (page 59), the recorder cannot play the disc. , The DVD prohibits changing angles. , Try changing the angle using the DVD’s menu. , The angles cannot be changed for the titles recorded on this recorder. The DivX video files do not play. The recorder does not start playback from the beginning. , Resume play was activated (page 42).
HDD camcorder dubbing is not possible. , An HDD camcorder which is not supported by this recorder is connected (page 60). , The HDD camcorder is not set to the USB connection mode (page 61). , The HDD camcorder contains only the contents that have already been dubbed to the recorder when you are dubbing using the ONE-TOUCH DUB button. To dub the same contents to the recorder again, perform “One-Touch Dubbing reset” in the “System 2” setup (page 73), then perform One-Touch Dubbing again.
The disc tray does not open after you press Z (open/close). “UPDATE” appears in the front panel display. , It may take a few seconds for the disc tray to open after you have dubbed or edited a DVD. This is because the recorder is adding disc data to the disc. , The recorder is locked. Cancel the Child Lock (page 40). , Depending on the disc, the recorder checks whether the disc is finalised when the disc is removed from the recorder. , The recorder is updating the EPG and other information.
Discs That Can Be Dubbed on Type Disc Logo Icon used in this manual DVD+RW Formatting (new discs) Compatibility with other DVD players (finalising) Format in VR mode (DVD+RW VIDEO) (page 66) Playable on DVD+RWcompatible players (finalisation unnecessary) Format in VR mode (page 66) Playable only on VR mode compatible players (finalisation unnecessary) Format in Video mode (page 66) Playable on most DVD players (finalisation necessary) (page 59) Format in VR mode (DVD+R VIDEO) Playable on most D
Usable disc versions (as of April 2009) b • 8x-speed or slower DVD+RWs • 6x-speed or slower DVD-RWs (Ver.1.1, Ver.1.2 with CPRM*) • 16x-speed or slower DVD+Rs • 16x-speed or slower DVD-Rs (Ver.2.0, Ver.2.1 with CPRM*) • 8x-speed or slower DVD+R DL (Double Layer) discs • 8x-speed or slower DVD-R DL (Dual Layer) discs (Ver.3.0 with CPRM*) • You cannot record TV programmes or contents on connected equipment directly to a disc. • You cannot mix VR mode and Video mode on the same DVD-RW.
Discs That Can Be Played Type Disc Logo Icon used in this manual DVD VIDEO DVD Discs such as movies that can be purchased or rented This recorder also recognises DVDRAMs*1 as DVD Video compatible discs.
Region code (DVD VIDEO only) Your recorder has a region code printed on the rear of the unit and will only play DVD VIDEOs (playback only) labelled with identical region codes. This system is used to protect copyrights. DVD VIDEOs labelled ALL will also play on this recorder. If you try to play any other DVD VIDEO, the message “Playback prohibited by region code.” will appear on the TV screen.
b • The maximum continuous recording time to the HDD is 8 hours for a single title. A title longer than 8 hours is divided. • Situations below may cause slight inaccuracies with the recording time. – Recording a programme with poor reception, or a programme or video source of low picture quality. – Recording only a still picture or just sound. About Copy Protection Pictures with copy protection cannot be recorded on this recorder. Dubbing restriction You cannot dub movies and other DVD VIDEOs to the HDD.
Language Code List For details, see page 74. The language spellings conform to the ISO 639: 1988 (E/F) standard.
Notes about the discs Notes About This Recorder • To keep the disc clean, handle the disc by its edge. Do not touch the surface. Dust, fingerprints, or scratches on the disc may cause it to malfunction. On operation • If the recorder is brought directly from a cold to a warm location, or is placed in a very damp room, moisture may condense on the lenses inside the recorder. Should this occur, the recorder may not operate properly.
Notes on MP3 files, JPEG Image Files, DivX Video Files, and i.Link About MP3 files, JPEG image files, and DivX video files * Not available for MP3 files. Note on MultiSession/Border discs If audio tracks and images in Music CD format or Video CD format are recorded in the first session/border, only the first session/border will be played back. The recorder can play the following tracks and files: – MP3 files with the extension “.mp3.” – JPEG image files with the extension “.jpeg” or “.jpg.
• Note that the size of JPEG image files copied to the HDD may be automatically increased to fit the TV screen. • You cannot copy JPEG image files onto a DATA DVD finalised on other recorders or devices. About i.LINK The DV IN jack on this recorder is i.LINKcompliant for digital video cameras. i.LINK is a more familiar term for IEEE 1394 data transport bus proposed by Sony, and is a trademark approved by many corporations.
General Power requirements: 220-240 V AC, 50/60 Hz Power consumption: 44 W Dimensions (approx.): 430 × 71.5 × 258 mm (width/height/ depth) incl. projecting parts Hard disk drive capacity: RDR-HDC100: 160 GB RDR-HDC300: 320 GB RDR-HDC500: 500 GB Maximum recordable number of titles*: 999 Mass (approx.): 4.
Index Words in quotations appear in the on-screen displays. Numerics “96kHz PCM” 78 A “A-B Erase” 54 AC power cord (mains lead) 19 Aerial 14 “AFT” 71 “Analog Manual Setting” 70 “Area” 21 “Audio In” 77 “Audio Out” 78 Audio output 17 “Auto Channel Setting” 21, 69 “Auto Chapter” 72 “Auto Clock Setting” 68 “Auto Finalisation” 73 “Auto Power off” 72 “Auto Service Update” 71 B Batteries 19 “Bilingual Rec.
“HDD-Cam Dubbing” 62 HDMI “4:3 Video Output” 76 “Control for HDMI” 72 “HDMI Audio” 79 “HDMI Colour” 76 “HDMI Resolution” 76 HDMI cable 15 I i.
U “Unfinalise” 67 “Unselect All” 53 Usable discs 88, 90 USB 61 V “Version” 73 Video cable 15 VIDEO CD 90 “Video In/Out” 75 Video mode 88 Video output 16 “Visual Search” 30 VR mode 88 Z Zoom 50 ZWEITON 37 Sony Corporation Printed in Malaysia