
DVD Recorder Operating Instructions


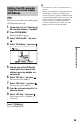


Table Of Contents
- WARNING
- Precautions
- Guide to Parts and Controls
- Hookups and Settings
- Basic Operations
- Recording to the HDD
- Playback
- Erasing and Editing
- Dubbing (HDD y DVD)
- HDD/DV Camcorder Dubbing
- Settings and Adjustments
- Using the Disc Setup Menus (Disc Setup)
- Disc Settings (Disc Information)
- Formatting the HDD (HDD Formatting)
- Using the Setup Menus (Initial Setup)
- Clock Setting
- Aerial Reception Settings (Channel)
- Recorder Settings (System 1)
- Recorder Settings (System 2)
- Language Settings (Language)
- Video Settings (Video In/Out)
- Audio Input Settings (Audio In)
- Audio Output Settings (Audio Out)
- Limitation Settings (Parental Lock)
- Easy Setup (Resetting the Recorder)
- Additional Information
65
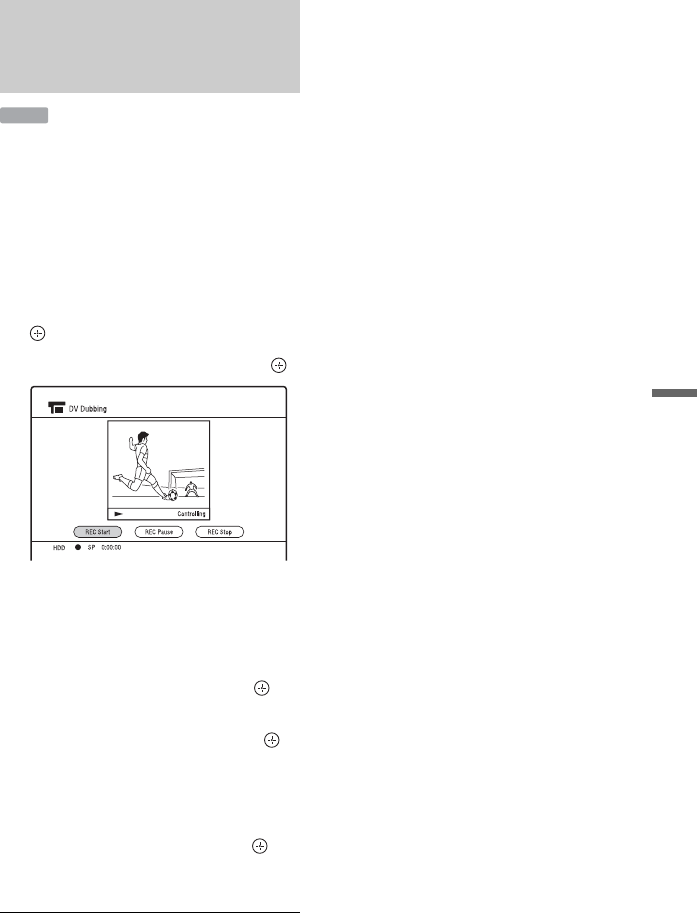
HDD/DV Camcorder Dubbing
You can select and dub scenes while playing
a DV/Digital8 format tape.
1 Follow steps 1 to 3 of “Preparing for
DV camcorder dubbing” on page 63.
2 Press SYSTEM MENU.
The System Menu appears.
3 Select “HDD-Cam/DV,” and press
.
4 Select “DV Dubbing,” and press .
5 Find the point on the DV/Digital8
format tape that you want to start
dubbing from using m/M, etc.,
and press X.
6 Select “REC Start,” and press .
The recorder starts dubbing.
7 Select “REC Pause,” and press .
The recorder pauses dubbing.
8 Press N and repeat steps 5 to 7 to
dub more scenes.
9 Select “REC Stop,” and press .
The selected scenes are dubbed as a
single title.
To exit “DV Dubbing”
Press SYSTEM MENU.
b
• You cannot set a scene to be shorter than one
second.
• The recorder will pause recording when there is
a blank space or an image containing copy
protection signals or signals in a different colour
system from that of the recorder on the tape. The
recorder will resume recording automatically
when receiving a recordable signal within
5 minutes. Otherwise, the recorder stops DV
dubbing and exits to the System Menu.
Dubbing from DV camcorder
using the on-screen display
(DV Dubbing)
HDD