
Instruction Manual


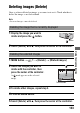


Table Of Contents
- Notes on using your camera
- Table of Contents
- Preparing the camera
- Before your operation
- Shooting images
- Using the shooting function
- Selecting the focus method
- Zooming in in one step
- Using the flash
- Adjusting the brightness of the image (Exposure, Flash compensation, Metering)
- Shooting with fixed brightness (AE Lock)
- Using brightness compensation for the entire image (Exposure compensation)
- Adjusting the amount of flash light (Flash compensation)
- Selecting the flash control mode to set the amount of flash light (Flash control)
- Selecting the method for measuring the brightness of a subject (Metering mode)
- Compensating for the brightness and contrast automatically (D-Range)
- Image processing
- Setting ISO
- Adjusting the color tones (White balance)
- Selecting the drive mode
- Capturing smiling faces (Smile Shutter)
- Using the viewing function
- Changing your setup
- Viewing images on a computer
- Printing images
- Others
- Index

Using the viewing function
125
Viewing images on a TV screen
To view images recorded on the camera on a TV set, an HDMI cable (sold
separately) and an HD TV equipped with an HDMI connector are required.
Notes
• Use an HDMI cable with the HDMI logo.
• Use an HDMI mini connector on one end (for the camera), and a connector suitable
for connection to your TV on the other end.
1 Turn off both your camera and the
TV, and connect the camera to the
TV.
2 Turn on the TV and switch the input.
• See also the operating instructions supplied with the TV.
3 Turn on the camera.
Images shot with the camera appear on
the TV screen.
Select the desired image with b/B on the
controller.
• The LCD monitor on the camera does
not turned on.
Controller
1 To the HDMI
connector
HDMI cable
(sold separately)
2 To the
HDMI terminal