
Handbook

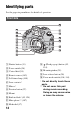
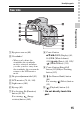
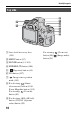
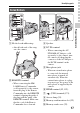
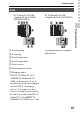
Table Of Contents
- Table of Contents
- Basic operations
- Advanced operations
- Preparation
- Shooting
- Selecting the shooting mode
- Movie recording setup
- Adjusting the focus
- Detecting faces
- Adjusting the brightness of the image
- The flash
- Setting ISO
- Compensating for the brightness and contrast automatically (D-Range)
- Setting the image processing
- Adjusting the color tones (White balance)
- Zooming in in one step
- Selecting the drive mode
- Playback
- Setup of the camera
- Computer
- Cleaning
- Trouble shooting/Others
- Index

17
Identifying parts
Preparing the camera
A Hooks for shoulder strap
• Attach both ends of the strap
onto the camera.
B REMOTE terminal
• When connecting the RM-
L1AM Remote Commander
(sold separately) to the camera,
insert the plug of the Remote
Commander into the REMOTE
terminal, aligning the guide of
the plug with the guide of the
REMOTE terminal. Make sure
that the cord of the Remote
Commander faces forward.
C Speaker
D DC IN terminal
• When connecting the AC-
PW10AM AC Adaptor (sold
separately) to the camera, turn
the camera off, then plug the
connector of the AC Adaptor to
the DC IN terminal on the
camera.
E Microphone jack
• When an external microphone
is connected, the internal
microphone is turned off
automatically. When the
external microphone is a plug-
in-power type, the power of the
microphone is supplied by the
camera.
F HDMI terminal (52, 152)
G (USB) terminal (175)
H Access lamp (23)
I Memory card insertion slot (22)
J Memory card cover (22)
Sides/Bottom