
Handbook
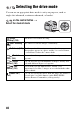


Table Of Contents
- Table of Contents
- Basic operations
- Advanced operations
- Preparation
- Shooting
- Selecting the shooting mode
- Movie recording setup
- Adjusting the focus
- Detecting faces
- Adjusting the brightness of the image
- The flash
- Setting ISO
- Compensating for the brightness and contrast automatically (D-Range)
- Setting the image processing
- Adjusting the color tones (White balance)
- Zooming in in one step
- Selecting the drive mode
- Playback
- Setup of the camera
- Computer
- Cleaning
- Trouble shooting/Others
- Index

46
Selecting the drive mode
You can use an appropriate drive mode to suit your purposes, such as
single-shot advanced, continuous advanced, or bracket.
on the control button t
Select the desired mode
(Single
Shooting) (139)
This mode is for normal shooting.
(Cont. Shooting)
(139)
The camera records the images continuously.
(Self-timer) (140) The 10-second self-timer is convenient when the
photographer appears in a photo and the 2-second self-timer
is convenient to reduce the camera shake.
(Bracket:
Cont.) (140)
You can shoot 3 images, each with different degrees of
exposure.
(Single
Bracket) (140)
You can shoot the specified number of images, shot by shot,
each with different degrees of exposure.
(WB
bracket) (142)
Based on the selected white balance, and the color
temperature/color filter, 3 images are recorded with the white
balance shifted.
(Remote Cdr.)
(142)
You can shoot using the SHUTTER and 2SEC (the shutter is
released after 2 seconds) buttons on the RMT-DSLR1
Wireless Remote Commander (sold separately).