
VCR Operating Instructions DSR-85, 85P


Chapter 3 Convenient Functions for Editing Operation
Chapter 3 Convenient Functions for Editing Operation 33
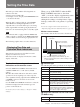
Using the Internal Time Code
Generator
You can set the time code’s initial value before
recording the time code generated by the internal time
code generator onto a tape. In addition, you can set the
time code’s user bits to record user bit data such as the
date, time, scene number, reel number, or other useful
information.
When the unit is equipped with an optional DSBK-
130/130P Time Code Input/Output Board, the internal
time code generator can be locked to (synchronized
with) an external time code.
To set the time code’s initial value and
user bit data
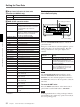
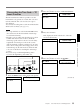
1 Press the COUNTER SELECT button to light the
time data type indicator “TC” or “U-BIT”.
TC: To set the time code’s initial value.
U-BIT: To set user bit data
The current time code value or user bit data is
shown in the time counter display.
2 Set the TIME CODE menu items as shown below.
Menu item Setting
TC MODE “INT”
RUN MODE “FREE RUN” or “REC RUN”
DF MODE Usually “DF”
(on DSR-85 only)
For details of menu settings, see Chapter 4 “Menu
Settings”.
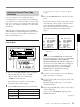
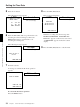
3 Press the TC PRESET button on the menu control
panel.
The current setting is shown on the monitor screen
and in the time counter display on the unit’s front
panel. The leftmost digit keeps flashing.
One of the following menu screens is displayed on
the monitor depending on the setting made in
Step 1.
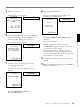
TC PRESET MODE
TCG 00:00:00:00
UP :DATA INCREMENT
DOWN :DATA DECREMENT
LEFT :LEFT SHIFT
RIGHT :RIGHT SHIFT
RESET :DATA CLEAR
SET :DATA SET
TC PSET:ABORT & EXIT
UB PRESET MODE
UBG 00:00:00:00
UP :DATA INCREMENT
DOWN :DATA DECREMENT
LEFT :LEFT SHIFT
RIGHT :RIGHT SHIFT
RESET :DATA CLEAR
SET :DATA SET
TC PSET:ABORT & EXIT
Time code initial value User bit setting screen
setting screen
Note
If you press the TC PRESET button while CNT
value is being displayed, the message “COUNTER
MODE IS SELECTED. SET COUNTER
SELECT SWITCH TO TC OR UB” will appear on
the monitor screen and “CNT mode!” will appear
in the time counter display on the unit’s front
panel. If this happens, press the COUNTER
SELECT button to light the time data type
indicator “TC” or “U-BIT”.
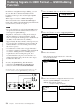
4 Use the ¿ and ÷ buttons to move the flashing
digit to the value to be changed.
5 Use the ˘ and ≥ buttons to change the value of the
flashing digit.
Enter hexadecimal values (0 to 9, A to F) when
setting user bit data.
6 Repeat Steps 4 and 5 until you have set the desired
values for all digits.
To set a value of 00:00:00:00, simply press the
RESET (NO) button.
)
0
6
r
p
1 2 3 4,5,6 7
(Continued)