
Digital Camera User Manual


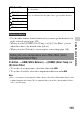
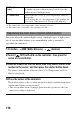


Table Of Contents
- Notes on using your camera
- Table of Contents
- Preparing the camera
- Before your operation
- Shooting images
- Using the shooting function
- Selecting the focus method
- Using autofocus
- Shooting with your desired composition (Focus-lock)
- Selecting the focus method to suit the movement of the subject (Autofocus Mode)
- Selecting the focus area (AF area)
- Adjusting the focus manually (Manual focus)
- Composing your shot using the image sensor (Focus check Live View)
- Checking the focus by enlarging the image
- Detecting faces
- Using the flash
- Adjusting the brightness of the image (Exposure, Flash compensation, Metering)
- Shooting with fixed brightness (AE Lock)
- Using brightness compensation for the entire image (Exposure compensation)
- Adjusting the amount of flash light (Flash Compensation)
- Selecting the flash control mode to set the amount of flash light (Flash control)
- Selecting the method for measuring the brightness of a subject (Metering Mode)
- Setting ISO
- Compensating for the brightness and contrast automatically (D-Range)
- Image processing
- Adjusting the color tones (White balance)
- Selecting the drive mode
- Selecting the focus method
- Using the viewing function
- Changing your setup
- Viewing images on a computer
- Printing images
- Others
- Index

116
*1 The value is the color temperature value currently selected.
*2 The value is the color filter value currently selected.
In a scene where the ambient light consists of multiple types of light source,
use of custom white balance is recommended in order to accurately
reproduce the whiteness.
5500K*
1
(Color
Temp.)
Sets the white balance by the color temperature. The higher
the number, the more reddish the image and the lower the
number, the more bluish the image.
0*
2
(Color Filter) Achieves the effect of CC (Color Compensation) filters for
photography.
Based on using the set color temperature as the standard, the
color can be compensated to G (Green) or M (Magenta).
Registering the color tones (Custom white balance)
1 Fn button t AWB (White Balance) t (Custom)
2 Select [ SET] with b/B on the controller, then press the
center of the controller.
3 Hold the camera so that the white area fully covers the AF area
located in the center, and then press the shutter button down.
The shutter clicks and the calibrated values (ColorTemperature and Color
filter) are displayed.
4 Press the center of the controller.
The monitor returns to the recording information display with the memorized
custom white balance setting retained.
• The custom white balance setting registered in this operation is effective
until a new setting is registered.