
Digital Camera User Manual

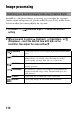


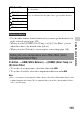
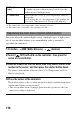

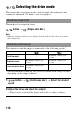

Table Of Contents
- Notes on using your camera
- Table of Contents
- Preparing the camera
- Before your operation
- Shooting images
- Using the shooting function
- Selecting the focus method
- Using autofocus
- Shooting with your desired composition (Focus-lock)
- Selecting the focus method to suit the movement of the subject (Autofocus Mode)
- Selecting the focus area (AF area)
- Adjusting the focus manually (Manual focus)
- Composing your shot using the image sensor (Focus check Live View)
- Checking the focus by enlarging the image
- Detecting faces
- Using the flash
- Adjusting the brightness of the image (Exposure, Flash compensation, Metering)
- Shooting with fixed brightness (AE Lock)
- Using brightness compensation for the entire image (Exposure compensation)
- Adjusting the amount of flash light (Flash Compensation)
- Selecting the flash control mode to set the amount of flash light (Flash control)
- Selecting the method for measuring the brightness of a subject (Metering Mode)
- Setting ISO
- Compensating for the brightness and contrast automatically (D-Range)
- Image processing
- Adjusting the color tones (White balance)
- Selecting the drive mode
- Selecting the focus method
- Using the viewing function
- Changing your setup
- Viewing images on a computer
- Printing images
- Others
- Index

119
Using the shooting function
The maximum number of continuous shots
The number of continuous shooting images obtainable has an upper limit.
To shoot continuously at higher speeds
The camera shoots continuously at a maximum of seven images per second.
The exposure and focus are set at the first shot.
button t (Speed Priority Cont.)
Notes
• You cannot shoot images continuously when “0” flashes in the viewfinder. Wait
until the indicator disappears.
• You cannot shoot continuously when using Scene Selection modes other than
[Sports Action].
• When [Face Detection] is set to [On], the speed of continuous shooting may be
slower.
The 10-second self-timer is convenient when the photographer appears in a
photo and the 2-second self-timer is convenient to reduce the camera shake
because the mirror is raised first.
DSLR-A580 DSLR-A560
Fine 44 images 27 images
Standard 45 images 47 images
RAW & JPEG 20 images 7 images
RAW 22 images 7 images
Using the self-timer
1 button t (Self-timer) t Select the desired setting
• The number after is the number of seconds that is currently selected.
2 Adjust the focus and shoot the subject.
• When the self-timer is activated, audio signals and the self-timer lamp
indicate the condition. The self-timer lamp flashes quickly and the audio
signal sounds quickly right before the shooting.