
Interchangeable Lens Digital Camera Instruction Manual

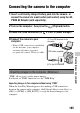
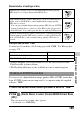
Table Of Contents
- Notes on using your camera
- Table of Contents
- Preparing the camera
- Before your operation
- Shooting images
- Using the shooting function
- Selecting the focus method
- Detecting faces
- Using the flash
- Adjusting the brightness of the image (Exposure, Flash compensation, Metering)
- Shooting with fixed brightness (AE Lock)
- Using brightness compensation for the entire image (Exposure compensation)
- Adjusting the amount of flash light (Flash Compensation)
- Selecting the flash control mode to set the amount of flash light (Flash control)
- Selecting the method for measuring the brightness of a subject (Metering Mode)
- Setting ISO
- Compensating for the brightness and contrast automatically (D-Range)
- Image processing
- Adjusting the color tones (White balance)
- Selecting the drive mode
- Using the viewing function
- Changing your setup
- GPS setting (SLT-A55V only)
- Setting image size and image quality
- Setting the method for recording on a memory card
- Changing the noise reduction setting
- Changing the function of the buttons
- Changing other settings
- Setting the LCD monitor/electronic viewfinder
- Confirming the version of the camera
- Resetting to the default
- Viewing images on a computer
- Printing images
- Others
- Index

165
Viewing images on a computer
Connecting the camera to the computer
“PMB” allows you to easily import images.
For details on “PMB” functions, see the “PMB Help.”
Importing images to the computer without using “PMB”
When the AutoPlay Wizard appears after making a USB connection
between the camera and a computer, click [Open folder to view files] t
[OK] t [DCIM] or [MP_ROOT] t copy the desired images to the
computer.
1 Insert a sufficiently charged battery pack into the camera, or
connect the camera to a wall outlet (wall socket) using the AC-
PW20 AC Adaptor (sold separately).
2 Turn on the computer, then press the (Playback) button.
3 Check that [USB Connection] in 2 is set to [Mass Storage].
4 Connect the camera to your
computer.
• When a USB connection is established
for the first time, your computer
automatically runs a program to
recognize the camera. Wait for a while.
Importing images to the computer (Windows)
1 To a USB terminal of the
computer
USB cable (supplied)
2 To the USB terminal