Revised November 12, 2009 This quick start manual provides you with a brief introduction to ACID® Music Studio™ software. For more details on using the software, see the online help. To access the online help, choose Contents and Index from the Help menu, or press F1. After ACID Music Studio software is installed and you start it for the first time, the registration wizard appears. This wizard offers easy steps that allow you to register the software online with Sony Creative Software Inc.
Legal notices ACID, ACIDized, ACIDplanet.com, ACIDplanet, the ACIDplanet logo, ACID XMC, Artist Integrated, the Artist Integrated logo, Beatmapper, Cinescore, CD Architect, DVD Architect, Jam Trax, Perfect Clarity Audio, Photo Go, Sound Forge, Super Duper Music Looper, Transparent Technology, Vegas, Vision Series, and Visual Creation Studio are the trademarks or registered trademarks of Sony Creative Software Inc. in the United States and other countries.
Thomson Fraunhofer MP3 MPEG Layer-3 audio coding technology licensed from Fraunhofer IIS and Thomson.
Sony Creative Software Inc. 1617 Sherman Avenue Madison, WI 53704 USA The information contained in this manual is subject to change without notice and does not represent a guarantee or commitment on behalf of Sony Creative Software Inc. in any way. All updates or additional information relating to the contents of this manual will be posted on the Sony Creative Software Inc. web site, located at http://www.sonycreativesoftware.com/.
Table of Contents Introduction . . . . . . . . . . . . . . . . . . . . . . . . . . . . . . . . . . . . . . . . . . . . . . . . . . . . . . . . . . . . . . . . . . . . . . . . 3 Welcome to ACID Music Studio software . . . . . . . . . . . . . . . . . . . . . . . . . . . . . . . . . . . . . . . . . . . . . . . 3 System requirements. . . . . . . . . . . . . . . . . . . . . . . . . . . . . . . . . . . . . . . . . . . . . . . . . . . . . . . . . . . . . . . . . . 3 Installing ACID Music Studio software . . . . .
Working with tracks (continued) Muting tracks . . . . . . . . . . . . . . . . . . . . . . . . . . . . . . . . . . . . . . . . . . . . . . . . . . . . . . . . . . . . . . . . . . . . . . . . . . . . . 23 Soloing tracks . . . . . . . . . . . . . . . . . . . . . . . . . . . . . . . . . . . . . . . . . . . . . . . . . . . . . . . . . . . . . . . . . . . . . . . . . . . . . 23 Working with groups of tracks . . . . . . . . . . . . . . . . . . . . . . . . . . . . . . . . . . . . . . . . . . . . . . . . . . . . . .
Chapter 1 Introduction Welcome to ACID Music Studio software Congratulations on purchasing ACID® Music Studio™, a revolutionary software application for Microsoft® Windows®. With ACID Music Studio, you can create great music by simply picking, painting, and playing.
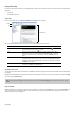
Using online help For the most extensive information on the ACID application, please refer to the help. You can access two varieties of help within the application: • Online help • Show Me How tutorials Online help To access online help, choose Contents and Index from the Help menu or press F1. Toolbar Tabs Information pane The online help window has four tabs that you can use to find the information you need. Tab Description Contents Provides a list of available help topics.
Chapter 2 Learning the ACID Window Overview of ACID Music Studio software ACID® Music Studio™ music creation software is designed to be powerful and flexible, yet easy to use. Many of the ACID Music Studio operations, commands, and shortcut keys are common to other Sony Creative Software Inc. applications. The following sections provide a tour of the ACID Music Studio work area. Main window The ACID Music Studio workspace includes three main areas: the track list, the timeline, and the window docking area.
Toolbar The toolbar allows you to quickly access commonly used functions and features in ACID Music Studio software. New Opens a new project. You will be prompted to save any changes to the current project. Automatic Crossfades Allows you to automatically create crossfades when you overlap two events. Open Displays the Open dialog. From this dialog, you can browse all of the available drives to select an ACID project or audio file to open.
Track list This list identifies the track order in your project and contains the track’s controls. Audio tracks Track number Arm for Record Track FX Mute Solo Track name Paint Clip Selector Volume slider Pan slider MIDI tracks Minimize Track Height Maximize Track Height MIDI Input MIDI Output Timeline In the timeline, you can view and edit the events in a track.
Transport bar The transport bar contains the playback and cursor positioning buttons frequently used while working on your project. Zoom controls To the right of the horizontal scroll bar are the time zoom controls. Clicking the Zoom In Time button ( ) increases the horizontal magnification of the project. To decrease the level of magnification, click the Zoom Out Time button ( ). Directly below the vertical scroll bar are the dedicated track height zoom controls.
Chopper The Chopper™ isolates audio events so that you can dissect them and reinsert them into a project to produce elaborate slice-n-dice effects with minimal effort. Display the Chopper by choosing Chopper from the View menu or pressing Alt+2. Mixing Console The Mixing Console provides an integrated view of all tracks and busses in your project using the appearance of a traditional hardware-based mixer. Display the Mixing Console window by choosing Mixing Console from the View menu or pressing Alt+3.
10 | CHAPTER 2
Chapter 3 Starting Projects Now that you have a basic understanding of the interface and controls found in the software, you are ready to begin creating an ACID® Music Studio™ project. Getting started Double-clicking the ACID Music Studio icon on the desktop starts the software. You can immediately begin building your ACID project using the application’s default project properties. However, you may prefer to customize the project properties prior to beginning the project.
Using the Audio tab This tab allows you to set the sample rate, bit depth, and recording folder for your project’s audio. Item Description Sample rate Choose a sample rate from the drop-down list or enter your own rate. The sample rate range is 2,000 Hz to 192,000 Hz. Higher sample rates result in better quality sound, but also mean larger audio files. Bit depth Choose a bit depth from the drop-down list. A higher bit depth results in better quality sound, but also means larger audio files.
Getting media files Now that you’ve created a new project or opened an existing project, the next step is to add media to the project. You can use the Explorer window to locate, preview and add media to your project. You can also extract audio from a CD or download media from the Web. Previewing media from the Explorer window The Explorer window allows you to preview files in looped playback at the current project tempo before adding them to your project.
Adding media files from the Explorer window You can use the Explorer window, which operates similarly to the Windows® Explorer, to locate media files for use in projects. Display the Explorer, if needed, by choosing Explorer from the View menu, or by pressing Alt+1. There are three ways to add media files from the Explorer window: • Double-click the desired file. • Drag the file from the Explorer to the timeline or track list.
Extracting media files from CD You can extract 44,100 Hz, 16-bit, stereo data from CDs. Extracted CD tracks are added to new tracks in your ACID project. 1. Insert a CD in the CD-ROM drive. 2. From the File menu, choose Extract Audio from CD. The Extract Audio from CD dialog is displayed. 3. If you have more than one CD drive, choose the CD drive that contains the audio you want to extract from the Drive dropdown list. 4.
Downloading media files from the Web The Get Media from the Web command allows you to view and download various audio and video files available on the Internet. 1. From the File menu, choose Get Media from the Web. 2. Choose an icon from the left frame to specify the media provider from which you want to download files. 3. Preview the file, select the file you want to open and click Download. The Browse for Folder dialog appears. 4. Select a folder for the download.
Chapter 4 Working with Projects This chapter provides the basics you need to begin working with events and tracks. Adding and editing events You have added media to the project, and tracks have been created for the media files. Now you can add events to the timeline. The following sections describe three basic techniques used when working with audio events: painting, deleting, and moving. Painting events After you add a media file to your project, you must paint it on the timeline in order to hear it.
Placing events with the Draw tool The Draw tool is the most common method of placing events on the timeline. This tool allows you to add track-specific events, one at a time. In addition, you can use the Draw tool to select, edit, and move events. 1. Click the Draw Tool button ( ) or choose Editing Tool from the Edit menu and choose Draw from the submenu. The pointer displays as a pencil icon. 2. Place the Draw tool at the left edge of any track containing a media file. 3.
Changing the length of events After an event is painted on the timeline, you may discover that it is too long or not long enough; however, ACID Music Studio software makes it easy to change the length of an event. You may find it helpful to turn snapping options on by choosing Snapping from the Options menu and choosing Enable from the submenu. To alter an event’s length, click the Draw Tool button ( ) and drag either end of the event.
Making selections You must select events before you can move or edit them. Selecting an event 1. Click the Draw Tool button ( ). 2. Click an event. The event is highlighted. Selected event Selecting multiple events You have several methods for selecting multiple events: • Press Ctrl or Shift while clicking events. • Use the Select All on Track command. • Use the Select Events to End command. • Use the Select All command. • Use the Selection tool.
Taking this concept a step further, if you select discontinuous events from several tracks, copying and pasting these events results in any selected time data being pasted into the project as well. This maintains the relative position of events in the project. Original events Pasted events Using the Paste command 1. Place the cursor at the desired position on the timeline. 2. Click the Paste button ( ) (Ctrl+V) on the toolbar.
You can also add multiple clips to one track. If you want to use one track for all the guitar loops in your project, you can create a single guitar track and add each guitar loop as a separate clip. When a track has multiple clips, the Draw and Paint tools create events using the active clip. For more information, see Setting the active clip and creating events on page 17. A single audio track can contain any combination of loops, one-shots, or Beatmapped clips. MIDI tracks can contain only MIDI clips.
Copying, cutting, and pasting tracks Copying a track places an exact copy of the selected track on the clipboard, but leaves the timeline unchanged. To copy a track, click the Copy button ( ) (Ctrl+C) on the toolbar. Cutting a track removes it from the timeline and places it on the clipboard. To cut a track, click the Cut button ( toolbar. ) (Ctrl+X) on the Tracks that are copied or cut to the clipboard can be pasted back into the current project or into a different project an unlimited number of times.
Working with groups of tracks Select a group of tracks by holding the Ctrl key while you click the track header of the desired tracks. Now you can adjust the volume, panning, track color, and other track attributes simultaneously. Using undo and redo You have unlimited undo and redo capabilities in ACID Music Studio projects. Each edit you perform is added in the project to an undo history, which allows you to quickly restore the project to any of its previous states.
Playing the project You have several methods for playing your projects. Using the transport bar All buttons required to play your project are located on the transport bar. The transport bar should look somewhat familiar to you, as it contains buttons found on most home CD and cassette players. For more information, see Transport bar on page 8. Using playback options As you build a project, you will likely have different playback needs.
Using the Mixing Console The Mixing Console window is a dockable window with a default location in the lower-right corner of the ACID workspace. The Mixer window contains the following controls: • A Preview fader, which allows you to adjust the loudness of media files previewed from the Explorer window, Track Properties window, Beatmapper, or the Chopper tool. Also, the Preview fader’s volume determines the volume of new tracks added to the project, unless you have set a default track volume level.
Item Description Meter Layout Choose Meter Layout, and then choose a command from the submenu to reset clip indicators; set the display range; or display labels, peaks, or valleys in the channel meters. Insert Audio Track Adds an audio track to your project. Insert MIDI Track Adds a MIDI track to your project. Insert Assignable FX Creates an assignable FX chain that you can route to one or more tracks in your project.
You can use the buttons in this pane to show or hide components in the Mixing Console. Item Description Show All Click to show channel strips for all tracks, busses, and assignable effects chains. Audio Tracks Click to show or hide channel strips for audio tracks. If your project does not contain any audio tracks, this button is unavailable. MIDI Tracks Click to show or hide channel strips for MIDI tracks. If your project does not contain any MIDI tracks, this button is unavailable.
Channel strips Tracks, busses, soft synths, and assignable effects chains are displayed as channel strips in the Mixing Console. Tips: • If you want to change the order in which channels are displayed, you can click the channel label and drag a channel strip to a new location. • Hover over a fader and roll your mouse wheel to change its setting. • To edit a fader value quickly, you can double-click the displayed value to type a new value. • Hold Ctrl while dragging a fader to move it in fine increments.
30 | CHAPTER 4
Chapter 5 Recording ACID® Music Studio™ software can record audio into multiple mono or stereo audio tracks while simultaneously playing back existing audio and MIDI tracks. You are limited only by the performance of your computer system and audio hardware. Audio is recorded to a media file on your computer and into an event on the timeline. You may record into an empty track, a time selection, an event, or a combination of time and event selection.
4. Start recording by clicking the Record button ( ) on the transport bar. Depending on the recording selection, a waveform is created along the timeline as you record into the armed track(s). Start/stop recording Recorded waveform Stop recording 5. Stop recording by clicking the Record button ( ) again or the Stop button ( ) on the transport bar. 6. A dialog displays the name and location of the file or files that were just created. Click Done to return to the main workspace.
Recording MIDI You can use an external MIDI controller (or the keyboard/drum list between the track header and timeline) to record MIDI into your ACID Music Studio project. You can record in real time during project playback or use step recording to build MIDI tracks.
7. To stop recording, click the Record button ( ) again or click the Stop button ( ) on the transport bar. A new clip is created for the recorded MIDI data on each armed track. You can use the Clip Pool tab in the Track Properties window to manage clips. Note: You can also record into time selections, punch into MIDI events, or record multiple clips (when recording into a selection with Loop Playback selected) in the same way you record audio.
Chapter 6 Saving and Rendering Projects Saving a project Though ACID® Music Studio™ software provides you with the tools to quickly build impressive musical projects, you may find yourself building elaborate projects over a period of weeks or even months. While you are working on a project, you should save it in the software’s native format, the ACID project file (.acd).
Rendering projects Rendering refers to the process of converting the ACID Music Studio project into a file that is formatted for a specific playback method. Possible playback methods include media player applications, Internet streaming media, CD-ROM, and CD audio. When an ACID project is rendered, it is not overwritten, deleted, or altered, and you are able to return to the original project to make changes and re-render. 1. From the File menu, choose Render As. The Render As dialog appears. 2.
Index A G adding events to timeline, 17 media to projects, 13 adjusting mix, 23 arming tracks to record, 31 Audio Plug-In window, 9 Audio properties tab, 12 B getting media from Web, 16 H help, 4 I input monitoring, 32 installation, 3 L beat ruler, 7 Beatmapped tracks, 22 bit depth, 12 looped playback, 25 loops, 22 M C main window, 5 marker bar, 7 media files adding to projects, 13 downloading from Web, 16 extracting from CDs, 15 previewing in Explorer, 13 metronome, 25 MIDI recording, 33 recordin
playback entire project, 25 from cursor position, 25 looped, 25 playing projects, 25 Plug-In Manager window, 9 preparing to record, 31 previewing media, 13 projects adding media, 13 bit depth, 12 opening, 12 playing, 25 properties, 11 rendering, 36 sample rate, 12 starting, 11 properties clips, 9 projects, 11 tracks, 9 tracks (continued) duplicating, 22 muting, 23 panning, 23 pasting, 23 properties, 9 renaming, 22 reordering, 22 soloing, 23 volume, 23 transport bar, 8 tutorials, 4 U undo history, 24 undoi