3-266-251-92 (1) Portable CD Player Operating Instructions “WALKMAN” is a registered trademark of Sony Corporation to represent Headphone Stereo products. D-NE10 © 2004 Sony Corporation is a trademark of Sony Corporation.
WARNING To prevent fire or shock hazard, do not expose the unit to rain or moisture. Do not install the appliance in a confined space, such as a bookcase or built-in cabinet. To prevent fire, do not cover the ventilation of the apparatus with newspapers, tablecloths, curtains, etc. And don’t place lighted candles on the apparatus. To prevent fire or shock hazard, do not place objects filled with liquids, such as vases, on the apparatus.
Table of Contents Enjoy your ATRAC CD Walkman! Music sources playable on this CD player .. 6 ATRAC3plus and ATRAC3 ......................... 7 MP3 ............................................................. 7 The structure of ATRAC3plus/ATRAC3 and MP3 files .......................................... 8 Getting started Checking the supplied accessories ............ 10 Locating the controls ................................. 11 Playing a CD 1. Insert a CD. ........................................... 14 2.
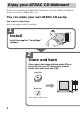
Enjoy your ATRAC CD Walkman! Thank you for purchasing the D-NE10. This CD Walkman is called an “ATRAC CD Walkman,” because you can enjoy “ATRAC CDs” on it. You can make your own ATRAC CD easily. How to use the SonicStage Refer to the supplied booklet “SonicStage.” 1 Install Install the supplied “SonicStage” software. 2 Store and burn Store music data imported from audio CDs or music files on your PC, select your favorite tracks, then burn your own CDs.
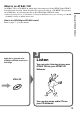
What is an ATRAC CD? An ATRAC CD is a CD-R/RW on which audio data compressed in the ATRAC3plus/ATRAC3 format has been recorded. About 30 audio CDs can be recorded on a CD-R/RW.* You can also record MP3 files by converting the files to the ATRAC3plus/ATRAC3 format. Enjoy your ATRAC CD Walkman! * When total playing time of one CD (album) is estimated at 60 minutes and you are recording on a 700 MB CD-R/RW at 48 kbps in ATRAC3plus format.
Music sources playable on this CD player You can play the following 3 music sources on this CD player: • Audio CDs (CDDA format) • CDs with ATRAC3plus/ATRAC3 format files (ATRAC CD) • CDs with MP3 format files (MP3 CD) Usable disc formats You can use ISO 9660 Level 1/2 and Joliet extension format discs only.
ATRAC3plus and ATRAC3 “ATRAC3,” which stands for “Adaptive Transform Acoustic Coding3” is audio compression technology that satisfies the demand for high sound quality and high compression rates. The ATRAC3 format can compress music content to about 1/10 of their original size, which contributes to reduction of the media volume. The available transfer bit rates are 132 kbps, 105 kbps and 66 kbps.
The usable number of groups and files • Maximum number of groups: 255 • Maximum number of files: 999 Settings for compression and writing software • This CD player is able to play MP3 files with the following specifications: Bit rate: 16 - 320 kbps, and sampling frequencies: 32/44.1/ 48 kHz. Variable Bit Rate (VBR) file can also be played. To compress a source for an MP3 file, we recommend setting the compression software to “44.1 kHz,” “128 kbps,” and “Constant Bit Rate.
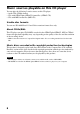
ATRAC3plus/ATRAC3/MP3 file structure and playing order •ATRAC3plus/ATRAC3 •MP3 Enjoy your ATRAC CD Walkman! Group ATRAC3plus/ ATRAC3 file Group MP3 file Notes • A group that does not include an MP3 file is skipped. • If ATRAC3plus/ATRAC3 files and MP3 files are recorded on the same CD, this CD player plays the ATRAC3plus/ATRAC3 files first. • Depending on the method used to record MP3 files on the disc, the playing order may be different from the one shown above.
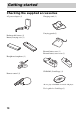
Getting started Checking the supplied accessories AC power adaptor (1) Charging stand (1) Carrying pouch (1) Rechargeable battery (1) Battery carrying case (1) External battery case (1) External battery case cover (1) Headphones/earphones (1) CD-ROM* (SonicStage) (1) Remote control (1) *Do not play a CD-ROM on an audio CD player.
Locating the controls CD player (rear) For details, see the pages in parentheses. 8 7 q; 1 VOL (volume) +*1/– buttons (15) 2 u*1 (play/pause) button (14, 15) 3 x (stop)/CHG (charge) button (15, 29) 4 ./> (AMS*2/search) buttons (15) 5 (group) +/– buttons (15, 20) 6 Terminals for the charging stand/external battery case (14, 29, 30) 7 OPEN switch (14, 28) Squeeze the switch from both sides. 8 HOLD switch (23) Slide the switch in the direction of the arrow to disable the buttons on the CD player.
Remote control For details, see the pages in parentheses. 1 6 2 7 3 4 8 9 q; 5 1 VOL (volume) +/– control (15, 21, 23) Turn to adjust the volume. 2 x (stop) button (15, 22, 23, 32) 3 Jog lever (. u/ENT >) (15, 18 - 26) u (play/pause)/ENT (enter): Press during stop to start play, and press during play to pause play. When selecting menu items, press to enter the selection. Flick toward .
Display (remote control) For details, see the pages in parentheses. 1 2 3 4 78 9q; 1 Disc indication Lights up while the CD player is playing. 2 Track number indication (20) 3 Character information display (16) While playing an audio CD, disc name, track name, etc. appear, if recorded on the CD. While playing an ATRAC CD/MP3 CD, group name, file name, etc. appear, if recorded on the CD. 4 Play mode indication (17 - 20) Shows various play modes such as shuffle play and program play.
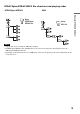
Playing a CD 1. Insert a CD. 1 Squeeze OPEN from both sides to open the CD player lid. OPEN switch 2 Place the CD on the tray and close the lid. Label side up to an AC outlet 2. Connect your CD player. You can use the following power sources: • Rechargeable battery (page 28) • LR6 (size AA) alkaline battery (external battery case) (page 30) • AC power adaptor We explain how to use your CD player on house current on this page. Connect the plugs and terminals securely.
3. Play a CD. u VOL + / – VOL + / – Jog lever To Play (from a point where you stopped previously) Play (from the first track) Pause/resume play after pause Stop*2 Find the beginning of the current track (AMS*1)*2 Find the beginning of previous tracks (AMS)*3 Find the beginning of the next track (AMS)*2, *3 Find the beginning of succeeding tracks (AMS)*3 Go backwards quickly*2, *5 Go forward quickly*2, *5 Jump to succeeding groups*4 Jump to previous groups*4 1 Press the jog lever.
Checking CD information on the display You can check CD information by pressing DISPLAY on the remote control repeatedly. When you are playing a CD containing text information such as CD-TEXT, “track name,” “album name,” “artist name,” etc. are displayed as shown in parentheses in the following table. When you are playing an ATRAC CD, information you input using the SonicStage software is displayed. When you are playing an MP3 CD containing MP3 files with an ID3 tag*1, ID3 tag information is displayed.
B Playback options You can enjoy the following playback button on the options using the P MODE/ remote control.
Playing all files in a selected group in random order (Group shuffle Playing your favorite tracks by adding Bookmarks (Bookmark track play) (ATRAC CD/MP3 CD only) play) During play, press P MODE/ repeatedly until “ SHUF” appears. While the CD player is playing, you can add Bookmarks to the tracks you want and play them only.
To check the tracks with Bookmarks During playback of the tracks with Bookmarks, “ ” flashes slowly in the display. Notes • During play of tracks with Bookmarks, tracks are played in order of track number, and not in the order you added the Bookmarks. • If you try to add Bookmarks to the tracks on the 11th CD (on a 6th CD when playing ATRAC CDs/MP3 CDs), the Bookmarks of the CD you played first will be erased.
Playing tracks in your favorite order (PGM play) 3 Repeat step 2 to select the tracks in your favorite order. You can program the CD player to play up to 64 tracks in your favorite order. 4 Press the jog lever to start PGM play. 1 While play is stopped, press P MODE/ repeatedly until “PGM” (program) appears. Audio CD/CD-TEXT
B Available features Adjusting sound quality 1 Press SOUND repeatedly to select “SOUND C”, then press SOUND until the display changes. 2 Flick and hold the jog lever toward . or > until the frequency range you want appears. “LOW” is displayed first.
Adjusting sound quality To cancel the adjustment operation Press x for 2 seconds or more. Notes • When you select CUSTOM sound, sound may be distorted depending on your sound settings when you turn up the volume. If this happens, turn the volume down. • You may feel a difference in sound volume between the CUSTOM sound setting and other sound settings. Adjust the volume for your preference.
Stopping playback automatically (OFF TIMER) Locking the controls You can set the CD player to stop playback automatically within a range of 1 to 99 minutes. While the timer function is working, “,” appears in the display of the remote control. You can lock the controls on your CD player to prevent accidental button presses. The OPERATION lamp flashes if you press any button when the HOLD function is activated. 1 Press DISPLAY until the display changes. 2 Flick the jog lever toward .
Turning off the beep sound You can turn off the beep sound that is heard from your headphones/earphones when you operate your CD player. 1 Press DISPLAY until the display changes. 2 Flick the jog lever toward . or > to select “BEEP,” then press the jog lever to enter the selection. 3 Flick the jog lever toward . or > to select “OFF,” then press the jog lever to enter the selection. To turn on the beep sound Perform steps 1 - 3, changing the BEEP setting to “ON.
Playing tracks continuously (SEAMLESS) (ATRAC CD only) You can play live concert music, etc. without space between the tracks. 1 While play is stopped, press DISPLAY until the display changes. 2 Flick the jog lever toward . or > to select “SEAMLESS,” then press the jog lever to enter the selection. 3 Flick the jog lever toward . or > to select “ON,” then press the jog lever to enter the selection.
B Connecting your CD player Connecting a stereo system You can listen to CDs through a stereo system and record CDs on a cassette tape or a MiniDisc. For details, see the instruction manual that comes with the device you want to connect. Be sure to turn off all devices before making connections. MiniDisc recorder, DAT deck, etc. 26 While play is stopped, press DISPLAY until the display changes. 2 Flick the jog lever toward . or > to select “AUDIO OUT,” then press the jog lever to enter the selection.
When the headphones or other devices are connected to the i/LINE OUT (OPTICAL) jack When an optical digital connecting cord is connected, the output is automatically switched to an optical digital output. When a remote control or a connecting cord is connected: The current AUDIO OUT setting (“HP” or “LINE”) flashes for about 5 seconds. If you connect another device to the i/LINE OUT (OPTICAL) jack, first remove the device and connect the headphones again, then switch the AUDIO OUT setting to “HP.
B Connecting to a power source You can check the remaining power of the battery in the display. t t t t t Lobatt* * Beep sounds. When the battery is depleted, charge the rechargeable battery or replace the dry battery with new one. • Using the rechargeable battery (this page) • Using the dry battery (page 30) Notes • The indicator sections of roughly show the remaining battery power. One section does not always indicate one-fourth of the battery power.
3 Connect the AC power adaptor to the DC IN 3 V jack of the supplied charging stand and an AC outlet. Then place the CD player on the supplied charging stand (page 14). Charging of the battery starts. In the display of the remote control, “Charging” indication flashes and the indicator sections of light up in succession. The OPERATION lamp lights up on the CD player. When the battery is completely charged, all indications on the display disappear and the OPERATION lamp goes off.
Using the rechargeable battery Notes • During charging, the CD player and the rechargeable battery become hot. This poses no danger. • If you press u during charging, charging stops and playback of the CD starts. • If you place the CD player on the charging stand during play, play stops and charging starts. • Place the CD player on the charging stand securely. Make sure that the OPERATION lamp on the CD player lights up. Wrong placement interrupts charging or play.
3 Attach the battery case to the CD player securely and fasten the screw in the direction of LOCK. Notes on the power source Disconnect all power sources when the CD player is not used for a long time. On AC power adaptor • Use only the AC power adaptor supplied. Do not use any other AC power adaptor. It may cause a malfunction. Polarity of the plug Notes • When you are not using the external battery case, make sure to attach the case cover while carrying or storing the battery case.
B Additional information List of menus Press DISPLAY repeatedly. BEEP To return to the previous screen, press x. To cancel the setting operation, press DISPLAY or x for 2 seconds or more . Items marked z are default settings. For playback options, see page 17.
Precautions On safety • Should any solid objects or liquid fall into the CD player, unplug it and have it checked by qualified personnel before operating it any further. • Do not put any foreign objects in the DC IN 3 V (external power input) jack. On the CD player • Keep the lens on the CD player clean and do not touch it. If you do so, the lens may be damaged and the CD player will not operate properly. • Do not put any heavy object on top of the CD player. The CD player and the CD may be damaged.
Troubleshooting Should any problem persist after you have checked these symptoms, consult your nearest Sony dealer. Symptom Cause and/or corrective action The volume does not increase even if you turn VOL +/– in the + direction repeatedly (even if you press VOL + repeatedly on the CD player). No sound, or noise is heard. c AVLS is set to “ON.” Set it to “OFF.” (page 22) c AUDIO OUT is set to “LINE.” Set it to “HP.” (page 26) Certain files cannot be played.
Symptom Cause and/or corrective action The CD does not play or “No disc” appears in the display when a CD is placed in the CD player. c The CD is dirty or defective. c Check that the CD is inserted with the label side up. (page 14) c Moisture condensation has occurred. Leave the CD player aside for several hours until the moisture evaporates. c Close the lid of the battery compartment firmly. (page 28) c Make sure the battery is inserted correctly.
Troubleshooting Symptom Cause and/or corrective action During playback of an ATRAC CD or MP3 CD, the CD does not rotate but you can hear the sound normally. “NO FILE” appears on the display after you press the jog lever or when the lid of the CD player is closed. When closing the lid of the CD player, the CD starts to rotate. The LCD display becomes hard to see or slows down. c The CD player is designed to stop the rotation of an ATRAC CD or MP3 CD during playback to reduce the power consumption.
Specifications System Compact disc digital audio system Laser diode properties Material: GaAlAs Wavelength: λ = 770 - 800 nm Emission duration: Continuous Laser output: Less than 44.6 µW (This output is the value measured at a distance of 200 mm from the objective lens surface on the optical pick-up block with 7 mm aperture.) D-A conversion 1-bit quartz time-axis control Battery life*1 (approx. hours) When you use the CD player on a flat and stable surface. When LIGHT mode and SOUND mode are set to “OFF.
Specifications Optional accessories Operating temperature Active speaker system 5°C - 35°C (41°F - 95°F) Dimensions (w/h/d) (excluding projecting parts and controls) Approx. 127 × 17.7 × 132.7 mm (5 × 23⁄32 × 5 1⁄4 in.) Mass (excluding accessories) Approx. 148 g (5.3 oz.) US and foreign patents licensed from Dolby Laboratories. Design and specifications are subject to change without notice.
Printed on 100 % recycled paper using VOC (Volatile Organic Compound)-free vegetable oil based ink.